Overview
CloudLabs VM Labs enables you to tailor the lab environment to specific needs by customizing the VM image. This includes installing necessary software, configuring the OS settings, and pre-loading data for lab users. Customizations are made using a template VM, a special VM created for lab administrators to update and manage the image used across lab VMs.
By the end of this documentation, you should be able to:
Start and connect to the template VM.
Perform the required modifications.
Export the image to the image gallery.
Prerequisites
Create new lab for Image capture, ensure you select the required OS, SKU, and region that match your customization and deployment needs.
Create or add an existing Image Gallery by following Create an Image Gallery using CloudLabs/Add an Existing Image Gallery from Azure to CloudLabs documentation.
NOTE :
Idle Tracker Settings:
When creating a lab for capturing a custom image, ensure that the Idle Tracker options are unchecked. This prevents the Idle Tracker from being installed on the Template VM.If the Idle Tracker is installed during image capture, it may cause conflicts in later Versions of images. Specifically, it can interfere with timeout settings and lead to random timeout triggers.
So it is recommended to disable these options should you proceed with customizing and capturing the image. Additionally, make sure to manually stop the VM when not in use during this process to avoid unnecessary costs.
Multi-Subscription Tenant:
If your tenant has multiple subscriptions onboarded and you intend to capture a Template VM image, Template VM is always deployed in the primary subscription so following points are important to ensure a smooth and reliable process:
Labs without Advanced Networking
Capture images from labs that do not have Advanced Networking enabled. This ensures a straightforward image capture process.
Labs with Advanced Networking (VNet in Primary Subscription)
If image capture scenario that requires Advanced Networking, Always ensure that selected VNet is Part of primary subscription while creating lab.
Labs with Advanced Networking (VNet in Secondary Subscriptions)
Avoid capturing images from labs where the VNet belongs to a secondary subscription.
Since Azure does not allow deploying a VM on a VNet that belongs to a different subscription due to cross-subscription dependency constraints.
Template Customization
Here are the steps to perform the template customization:
Select your lab from the Manage VM Labs menu and navigate to the Template tab.
.png "image(384).png")
Review the VM image and SKU details, and click on Deploy Template VM. It will take 2–3 minutes to get started. This is actually creating a VM for the admin/instructor for customization.
NOTE:
When you click on "Deploy Template VM" and if a VM lab instance is available, it will be assigned for this deployment. Since a VM lab instance is already provisioned, this will reduce the usual 2–3 minute wait time to get started. Additionally, the VM lab instance will not appear in the VM lab instance section after deployment of Template VM.
.png "image(385).png")
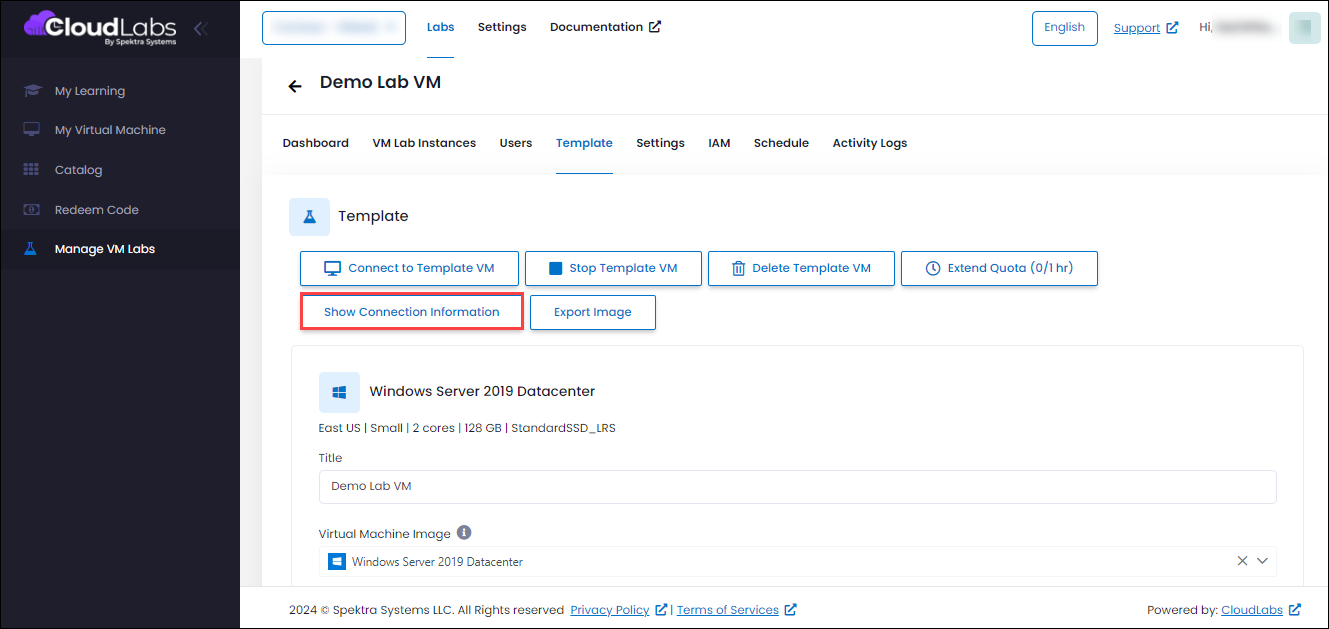
Once the template VM has started, click on Show Connection Information and use the details to connect to the VM.
NOTE:
If you have enabled the Enabled CloudLabs Direct Web Connect option, then you can directly connect to the Template VM by clicking Connect to Template VM.
Log into the VM and update the template VM as per your requirements.
a. You can view the quota used by the for template VMs, providing insights into resource utilization.
.png)
b. Additionally, if required, you can extend quotas for template VMs by clicking the "Extend Quota" button. , enter the additional quota hours for the template VM, which will be added to the existing quota hours, and then click Submit.
Note
The quotas for the template VMs will be the same as the VM Quota specified during the lab creation.
The quota for the lab can be extended either before or after it is exhausted- the template VM will not be deleted. Once the quota is exhausted, the "Start Template" button will be disabled. If needed, you can extend the Template VM quota allowing you to start the Template VM again. This ensures the Template VM remains intact and can be utilized for further customization without any impact on its existing data
The template VM is aligned with the lab's expiration date. As a result, the template VM will be deleted when the lab expires.
.png)
Once completed, navigate back to the Template tab in the CloudLabs portal and select Export Image.
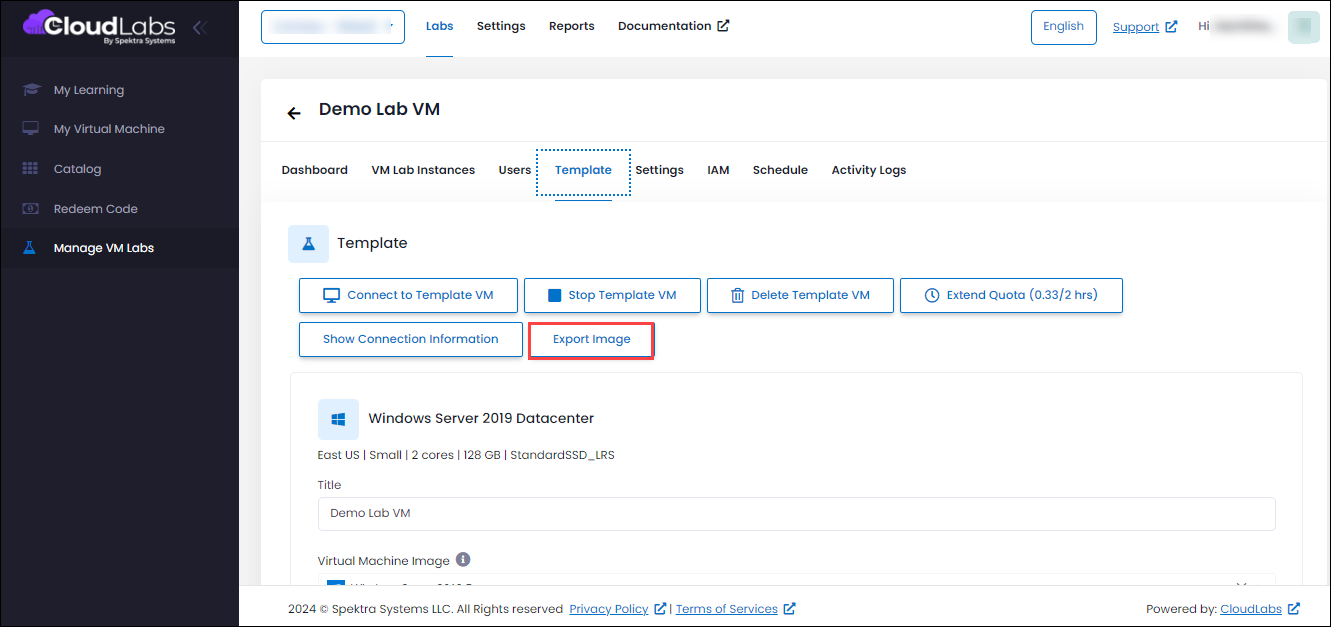
In the Export Image pop-up window, provide a Name (1) for the image, select the Gallery (2) that you created/added, choose the desired State (3) for the image, and click on Export (4).
.png)
Image State: You can publish your image either as a Generalized Image or a Specialized Image.
Generalizing an image will give users out of box experience (OOBE), which means that a generalized image is a VM image that has been prepared and generalized using the Sysprep tool. Generalizing a VM image removes any specific configuration or identity information, making it suitable for deployment as a template for multiple VM instances. When you generalize a VM image, it removes unique system-specific information like computer names, security identifiers (SIDs), and network configuration. This allows the image to be used to create multiple VM instances with different configurations.
A specialized image is a VM image that has been customized and configured for a specific purpose or use case. It typically contains specific software installations, configurations, and settings tailored for a specific application or workload. A specialized image is usually created from a generalized image by customizing it with additional software, configurations, or data specific to a particular requirement. Specialized images are often used when you want to create VM instances with specific pre-configured settings or applications.
To know more about generalized and specialized images, go through Generalized and specialized images documentation.
You must wait until the image is completely exported before using it. The Export Status will be shown as Succeeded once the image has been exported completely.
.png)
To update the image of the current Virtual Machine lab
Drop-down the Virtual Machine Image section
.png "image(448).png")
Scroll-down to the bottom of the list to select the exported image
.png)
Click on Submit once the new image is selected
.png)
Note :
If the lab was created with a Windows image, you can only update the lab with a Windows image. Similarly, if the lab was created with a Linux image, you can only update the template with a Linux image.
If you want the existing deployments to use the exported image, you need to reimage them for the updated changes to take effect for those deployments to apply the updated changes.
Navigate to the Settings (1) tab, select Custom Images (2), and click on the Manage Images (3) button of your Compute Gallery.
.png "image(393).png")
You should see the image in the Succeeded state. Sometimes CloudLabs might take some time to sync the images, so in case there are no images, click on the Sync Image button and you should see the image.
.png)
By clicking on the Manage replication button in the Action section, you can see the region where your image has been published. Please note that you must use the same region as the lab if you intend to create a VM lab using this custom image.
.png "image(396).png")
Additionally, you can follow the Image Replication process and easily replicate the image as per your requirements.
Note: It is not recommended to reimage a VM using a custom image, as this may lead to image corruption or unsupported behavior in Azure. Custom images should be used to deploy new instances rather than reimaging existing ones.
Next Steps
Now you know how to customize the template VM as per the lab requirement. Once the image customization is completed and exported, you will be able to see the image in the image gallery where you exported it. Now you can proceed to use the customized image by following the below links:
Create lab to create a VM lab using the custom image.
For the actual lab deployment, it is always recommended to enable the Idle Tracker options with the correct timers to optimize VM costs.
Learn more about Reimage in the Update VM Instances article to change the image used in existing deployments of the VM Labs.