Overview
This document is designed to guide you through the process of creating and managing the Azure compute image gallery and the image versions from CloudLabs global settings. It provides detailed instructions on how to:
Create an image gallery in Azure using CloudLabs.
Add an existing image gallery from Azure to CloudLabs VM Labs.
Sync images to fetch image definitions and versions from the Azure compute gallery to CloudLabs VM Labs.
Replicate image versions in other allowed regions.
To perform any action under global-level settings, you would need access to the CloudLabs portal with global admin permission. Refer to CloudLabs Identity and Access Management for more details.
Before beginning, evaluate the scenarios:
Scenario 01: Azure VM Image in your Azure Subscription (mapped to CloudLabs)
If you are having your own VM image that is in your own Azure subscription which is mapped to CloudLabs and willing to migrate that image, you can follow our comprehensive guide present here: Add an Existing Image Gallery from Azure to CloudLabs VM Labs
Scenario 02: Azure VM Image in your Subscription (not mapped to CloudLabs)
If you have an image in your own Azure subscription that isn’t mapped to CloudLabs but wish to use it within CloudLabs’ managed subscription, you can follow our step-by-step guide to migrate the image: Migrate VM Image
Scenario 03: Local Image
If you are having a VM image in your local machine and are willing to migrate the VM image to Azure you first need to convert the VM source file to VHD. You can follow the Microsoft documentation on how to “Prepare a Windows VHD or VHDX to upload to Azure”. For Linux, you can refer the Microsoft documentation on how to “Prepare Linux for imaging in Azure”.
Once the VM image is converted to VHD/VHDK file, you can follow the steps mentioned below:
1. As a Lab Admin, deploy a Template VM from the “Template” section of the lab and connect to the VM.
2. Download the VHD file into the “Template VM” (host).
3. Install Hyper-V Manager.
3. Use the VHD to create a guest-VM inside the Hyper-V host machine.
4. Once the guest VM is created and setup as per you requirements, follow the step-by-step guide to export the image: Template Customization
Create an Image Gallery using CloudLabs VM Labs
You can create an Azure compute gallery using CloudLabs. Once the gallery is created in Azure, you can export the images from the labs to this gallery. Follow the steps to create an image gallery in CloudLabs.
Login to https://portal.cloudlabs.ai/.
Navigate to Manage VM Labs (1) > Settings (2) > Custom Images (3). Under Custom Images, click on Create Image Gallery (4).

In the pop-up window, provide a name for the image gallery and select a region from the drop-down. Note that only the regions enabled in the global lab-level settings will be visible here. Once you have provided these 2 required values, click on Create.
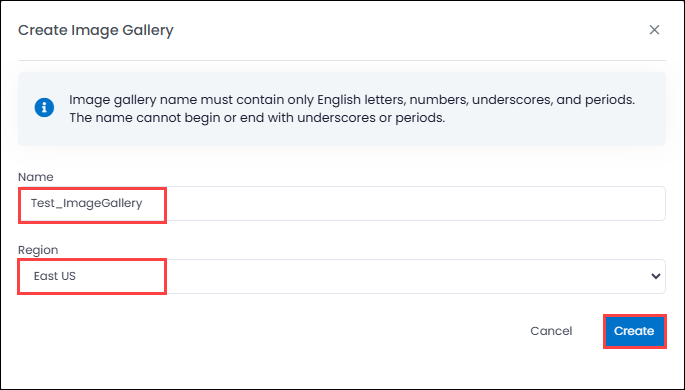
Note: Image gallery name must contain only English letters, numbers, underscores, and periods. The name cannot begin or end with underscores or periods and cannot contain any space.
Now this will create an Azure compute gallery in the selected region of Azure.
Note: When creating an image gallery, selecting 'Use your own subscription' will create the gallery within your subscription. This image gallery can then be used to create images. In addition, be aware that you cannot create a compute gallery with the same name if it already exists in the same Tenant.
Add an Existing Image Gallery from Azure to CloudLabs VM Labs
You can also add an existing Azure compute gallery to the CloudLabs managed subscription within the CloudLabs VM Labs portal by following the steps below:
Login to https://portal.cloudlabs.ai/.
Navigate to Manage VM Labs (1) > Settings (2) > Custom Images (3). Under Custom Images, click on Add Existing Image Gallery (4).

You will see all the available Azure compute galleries in the subscription with all the details: Azure Compute Gallery Name, Subscription Name, Resource Group Name, and Region. Select the required Azure compute gallery from the list by clicking on the checkbox corresponding to the gallery (1), and then click on Add (2).
.png "image(270).png")
Once the gallery is added to CloudLabs, it will show up under Custom Images.
Note(s):
If you have onboarded your own subscription, the image galleries available in that subscription will appear in the list of Existing Image galleries. You can select and add these galleries to CloudLabs VM Labs.
If you want to migrate your existing images from your own Azure subscriptions to CloudLabs managed subscriptions, please refer to the documentation under "Migrate VM Images" for detailed instructions and guidelines. This will help ensure a smooth transfer of your custom images to the CloudLabs environment. Once migrated, the image gallery will have the suffix "_migrated" to help you identify it within the CloudLabs environment.
Once the image migration is completed, you can add the existing image gallery from Azure to CloudLabs VM Labs as provided in the steps above.
Sync Images to Fetch Image Definitions and Versions from Azure to CloudLabs VM Labs
Once you migrate/export an image, CloudLabs VM Labs might take up to 24 hours to auto-sync and show it in the CloudLabs VM Labs portal. If you immediately want to use a custom image, you can use the auto-sync feature to fetch the details from Azure to CloudLabs VM Labs.
Login to https://portal.cloudlabs.ai/.
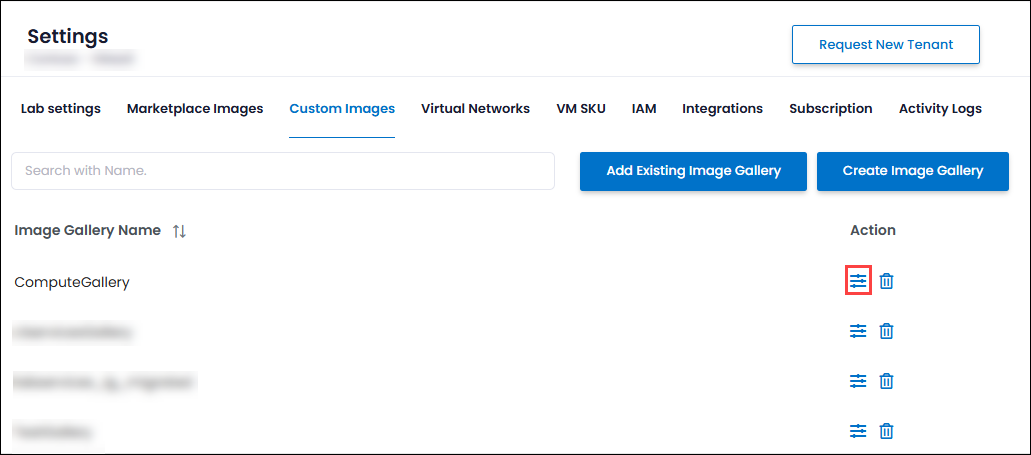
Navigate to Manage VM Labs > Settings > Custom images. Click on the Manage Images option under Action corresponding to the image gallery that you want to sync.
.png)
Now you will see the image definitions under the gallery with details: Custom Image Name, Latest Image Version, Image Definition Name, OS Type, OS State, Status, and Created Date. Click on Sync Image to fetch the latest image(s) from the gallery.
.png)
Replicate Image Versions to other allowed Regions
You might need to replicate your image version in a different region to set up a lab using the custom image in a different region. You can replicate the image version using CloudLabs VM Labs by following these steps:
Login to https://portal.cloudlabs.ai/.
Navigate to Settings > Custom Images. Click on the Manage Images option under Action corresponding to the image gallery to manage the image(s) in the gallery.
Now, you will see the image definitions under the gallery with details: Image Name, Latest Image Version, Image Definition Name, OS Type, OS State, Status, and Created Date. Click on the Manage Replication option under Action corresponding to the image definition to replicate the image in the gallery.
.png)
You will see all the regions that are enabled for your tenant. Select the region (where you want to perform the replication) from the list by clicking on the checkbox corresponding to the region, and then click on Replicate.
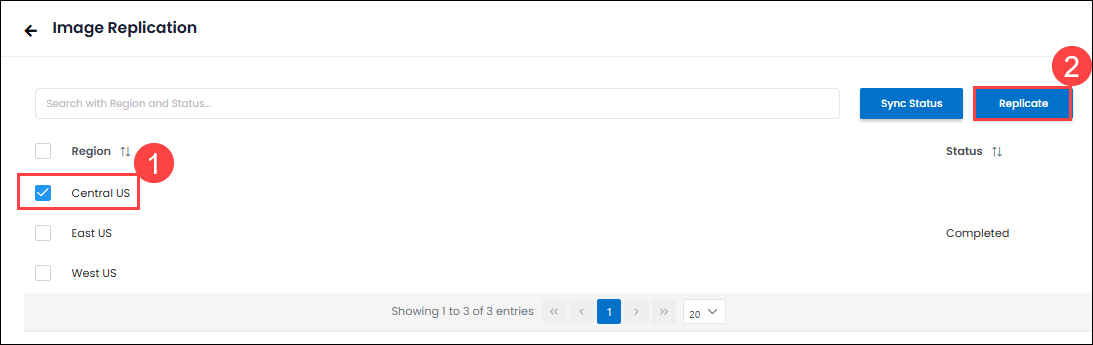
Replication might take some time to complete depending on the size of the image. You can check the status of replication by clicking on Sync Image. If you do not click on sync status, CloudLabs might take up to 24 hours to automatically show the updated status.
.png)
Next Steps
In this article, you have learned how to set up an Image Gallery, add, sync, and replicate custom images in CloudLabs VM Labs.
You can now start creating labs using these custom images. For detailed steps, refer to the Create Labs article.