Overview
This document is designed to guide you through the process of creating and managing virtual networks in CloudLabs global settings. You can either create a new virtual network or add an existing virtual network to CloudLabs and use it to set up advanced networking for your lab. You need to peer the CloudLabs-managed virtual network with your virtual network to complete the advanced networking setup. If you set up an advanced network for a lab, the lab virtual machine will be deployed on the virtual network selected when you created the lab. This guide provides detailed instructions on how to:
Create a virtual network using CloudLabs.
Add an existing virtual network from Azure to CloudLabs.
Peer the CloudLabs-managed virtual network with your network.
To perform any action under global-level settings, you would need access to the CloudLabs portal with global admin permission. Refer to CloudLabs Identity and Access Management for more details.
Create a Virtual Network using CloudLabs
Login to https://portal.cloudlabs.ai/.
Navigate to Manage VM Labs (1) > Settings (2) > Virtual Networks (3). Under Virtual Networks, click on Create Virtual Network (4).

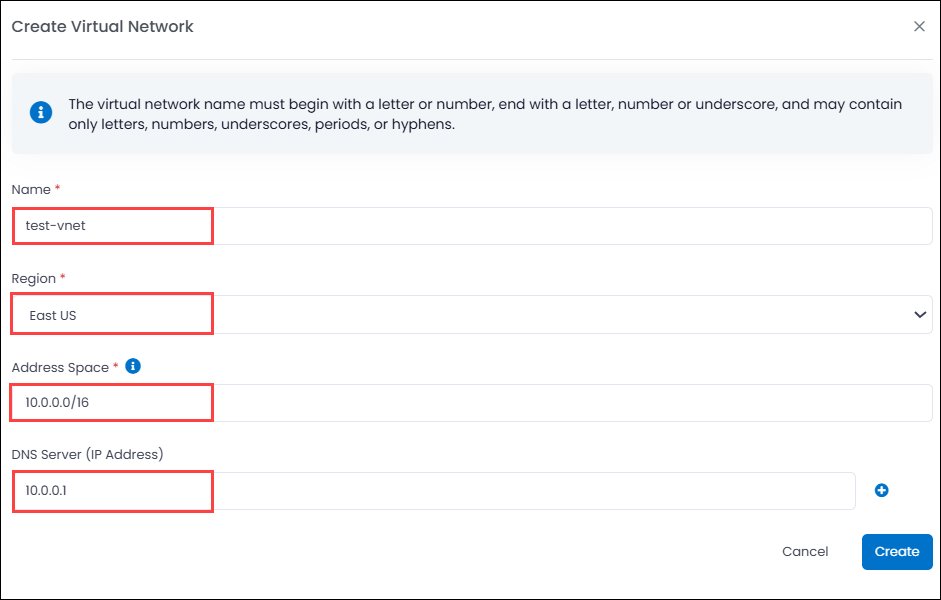
In the new window, provide the following values:
Name: Name of the CloudLabs virtual network.
Select a region where you want your CloudLabs virtual network to be hosted. Note that only the regions enabled at the global lab-level settings will be visible here. Note that the data transfer cost for global virtual network peering (connecting virtual networks across Azure regions) is higher than virtual network peering within the same region. So, we recommend you create the lab’s network in the same region as the existing virtual network.
Address Space: Provide an address space to be used for the virtual network. Please make sure that the address space does not overlap with the address range of your existing virtual network. Note that Azure assigns private IP addresses to the resources within that VNet from the specified address space. To understand more about how Azure assigns the private IP, refer to the Allocation method. Plan the address range in such a way that you have enough IP addresses for all VM deployments.
DNS Server (Optional): Provide the DNS server if want to use a custom DNS server instead of Azure’s default DNS server. DNS servers are used to resolve domain names into IP addresses, allowing the resources within the virtual network to communicate efficiently. By default, Azure assigns its own DNS servers, which are sufficient for most scenarios. However, if your environment requires specific DNS configurations, such as integration with on-premises DNS or if a domain controller is configured as a DNS server, you can specify custom DNS server IP addresses here. When you use your own Custom DNS servers, you can also specify multiple DNS servers per virtual network. This field is optional and can be left empty if you prefer to use the default Azure DNS server for the VMs. NOTE: Ensure that the DNS Server is running while you create lab instances so that the deployments can succeed without any DNS related issues.
Once you have provided all the required values, click on Create.
Now, this will create an Azure Virtual Network with the provided address range in the selected region of Azure. Once the virtual network is created, you will see the virtual network details: virtual network name, region, address space, subnet name, and subnet prefix.
Note: When creating a Virtual Network, selecting 'Use your own subscription' will create the VNET within your subscription. This VNET can then be utilized during labs. In addition, be aware that you cannot create a Virtual Network with the same name if it already exists in the same tenant.
Add an Existing Virtual Network from Azure to CloudLabs
You can also add an existing virtual network in the CloudLabs Managed subscription to the CloudLabs portal by following the steps below:
Login to https://portal.cloudlabs.ai/.
Navigate to Manage VM Labs (1) > Settings (2) > Virtual Networks (3). Under Virtual Networks, click on Add Existing Network (4).

You will see all the existing virtual networks with all the details: virtual network name, resource group name, region, and subnet name. Select the required virtual network from the list by clicking on the checkbox corresponding to the virtual network and then clicking on Add.

Once the virtual network is added to CloudLabs, it will show up under the virtual network list.
Note: If you have onboarded your own subscription (BYOS), the virtual networks (VNets) created within that subscription will appear in the list of Existing Virtual networks. You can select and associate these networks for the lab deployments in CloudLabs.
Peer the CloudLabs Managed Virtual Network with your Network
Once the virtual network is created/added to CloudLabs, you must peer the virtual network with your existing virtual network in your subscription to complete the advanced networking setup. Follow the steps below to complete the peering:
Login to https://portal.cloudlabs.ai/.
Navigate to Manage VM Labs > Settings > Virtual Networks. Click on the Request Peering option under the Action corresponding to the virtual network that you want to peer.
.png)
This will draft an email for you to address the CloudLabs support team, requesting that they provide you with network contributor access on the CloudLabs-managed virtual network you have selected. In the email draft, you can add the user Azure account ID(s) and send it to the CloudLabs support team. You will be provided with the required access to the network and informed as early as possible. You will find the resource ID of the CloudLabs-managed virtual network, which will be required for peering.
.png "image(322).png")
Once you receive the required access to the CloudLabs managed virtual networks, you need to make the peering connection between the CloudLabs managed network and your network as well. Refer to creating peering connection for instructions on how to perform peering in Azure.
If you want to remove a virtual network from CloudLabs, under the virtual network section, click on the Remove Virtual Network option under the Action corresponding to the virtual network that you want to remove.
.png)
Update Virtual Network
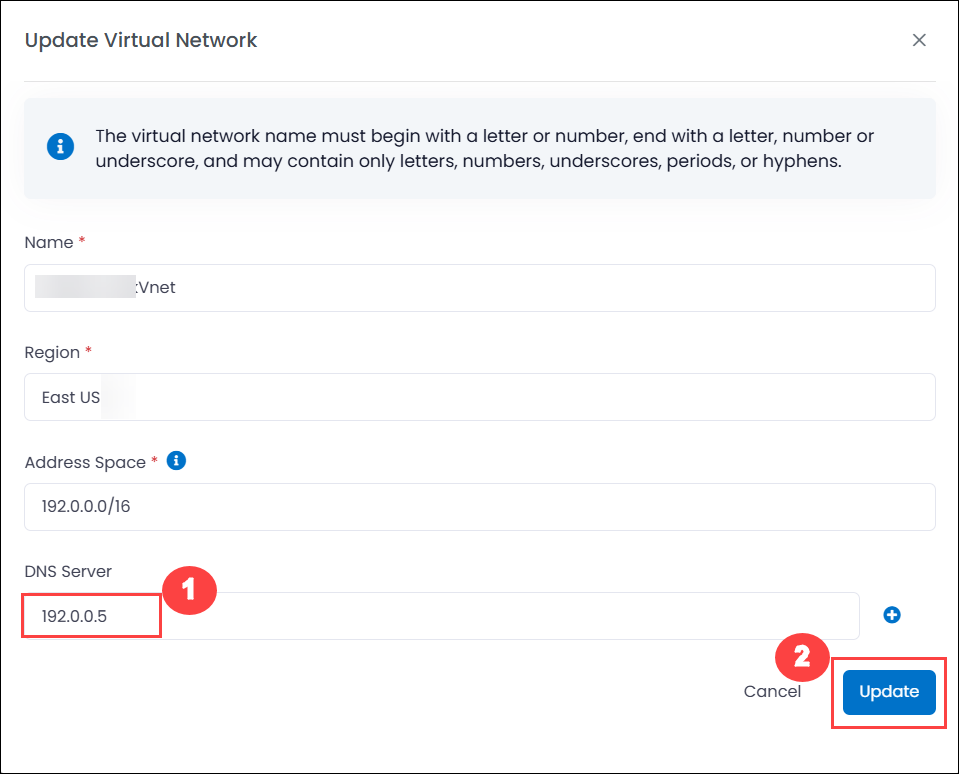
You can update the DNS server settings after creation of the Virtual Network from CloudLabs VM Labs Portal. Simply navigate to the Virtual Networks (1) section, and click the Edit (2) icon under the Actions tab.
.png)
Provide the required DNS Server (IP address) (1) and click on Update (2).
IMPORTANT NOTE(s):-
Existing Configuration Sync:
If you have added an existing Virtual Network (VNet) from your Azure subscription to CloudLabs, the current VNet, subnet, and DNS server configurations available in the Azure portal will be fetched and reflected in the CloudLabs VM Labs portal.
Changes Made Directly in Azure:
Any changes made directly to the VNet (such as modifying subnets or DNS settings) after it has been added to CloudLabs will not be synchronized back to the CloudLabs portal.
Changes Made via CloudLabs:
All modifications made to the VNet through the CloudLabs portal will be applied directly to the corresponding VNet resource in your Azure subscription.
Recommendation:
To avoid configuration mismatches and ensure consistent network setup, we strongly recommend using the CloudLabs portal for all VNet-related changes once the VNet has been onboarded.
Next Steps
In this article, you have learned how to enable and manage advanced networking.
You can now start creating labs. For detailed steps, refer to the Create Labs article.