Overview
The intent of this document is to explain how you can use the Azure Compute Galleries service to create VM Image defintion and utilize them.
Follow the below steps to get started:-
Prerequisites
Access to the required Azure tenant (If you do not have access to Azure, please reach out to CloudLabs team).
An Azure VM that is customized as per your needs (Customized Azure VM means pre-installing any applications or tools based on your requirements so that users will already have the tools pre-installed when they access the VM).
VM Image Reference details (Publisher, Offer, SKU).
Create Azure Compute Gallery
Navigate to the Azure Portal and login with your work account, which CloudLabs has granted Azure access to.
.png)
Once you're logged in to Azure successfully, click on the + Create a Resource button available on the home page, or you can also get it from the menu, which is available on the top left corner.
.png)
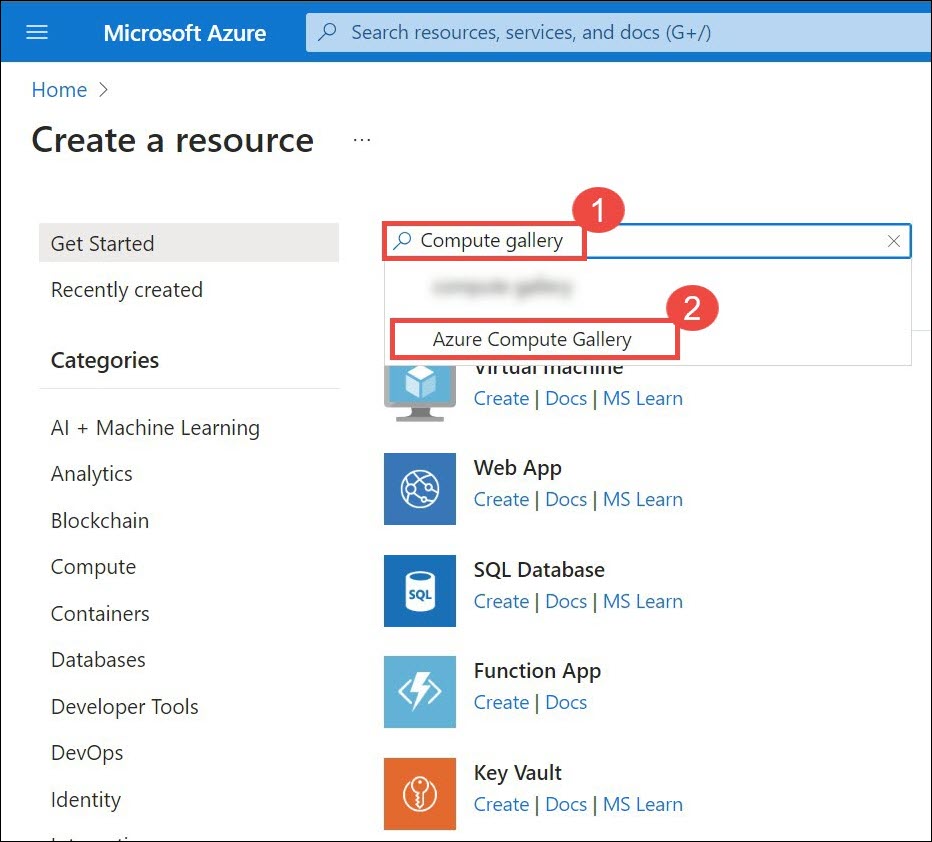
Now, type Compute gallery in the search bar and select the Azure Compute Gallery option from the list.
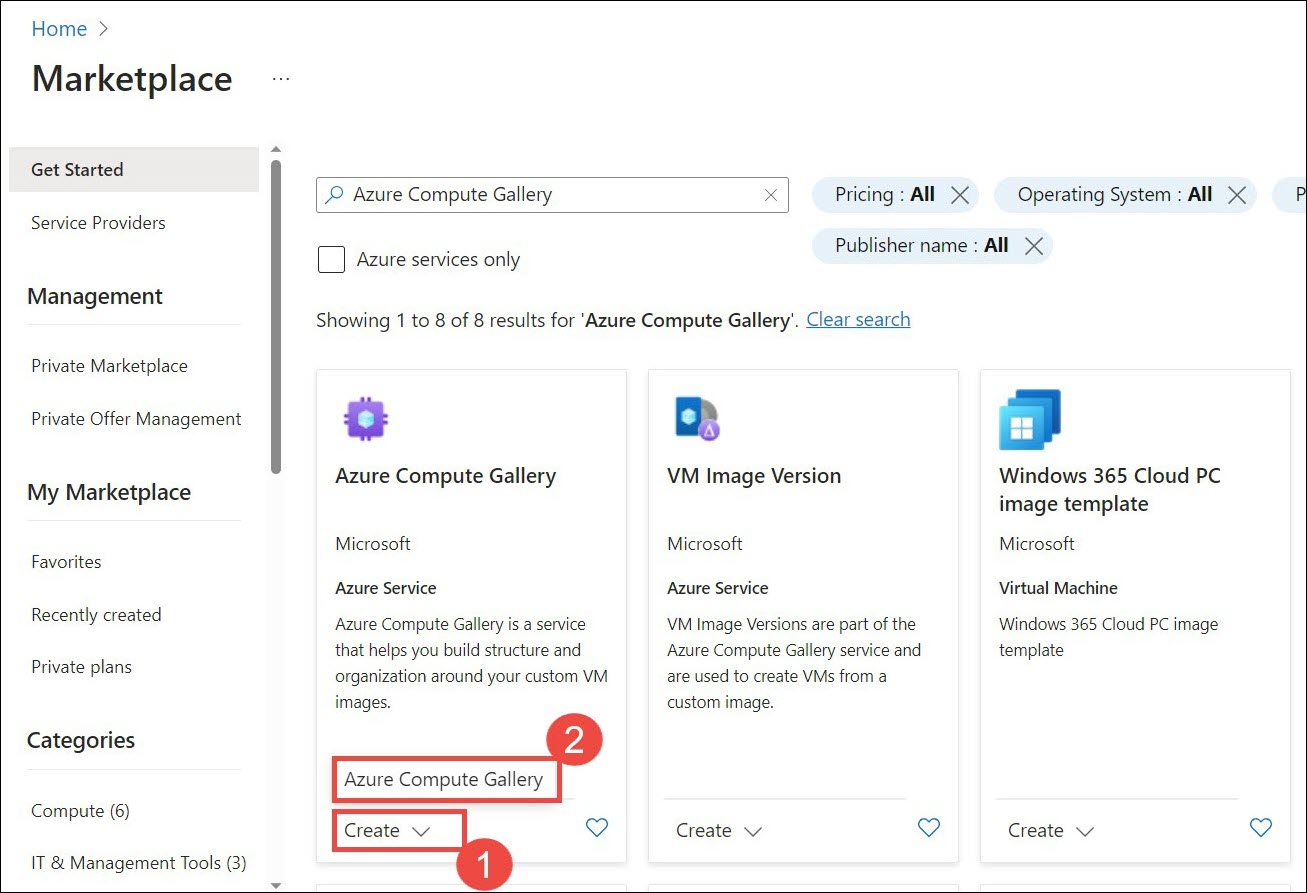
In the Marketplace page, select Create (1) on the Azure Compute Gallery service, then again select Azure Compute Gallery (2).
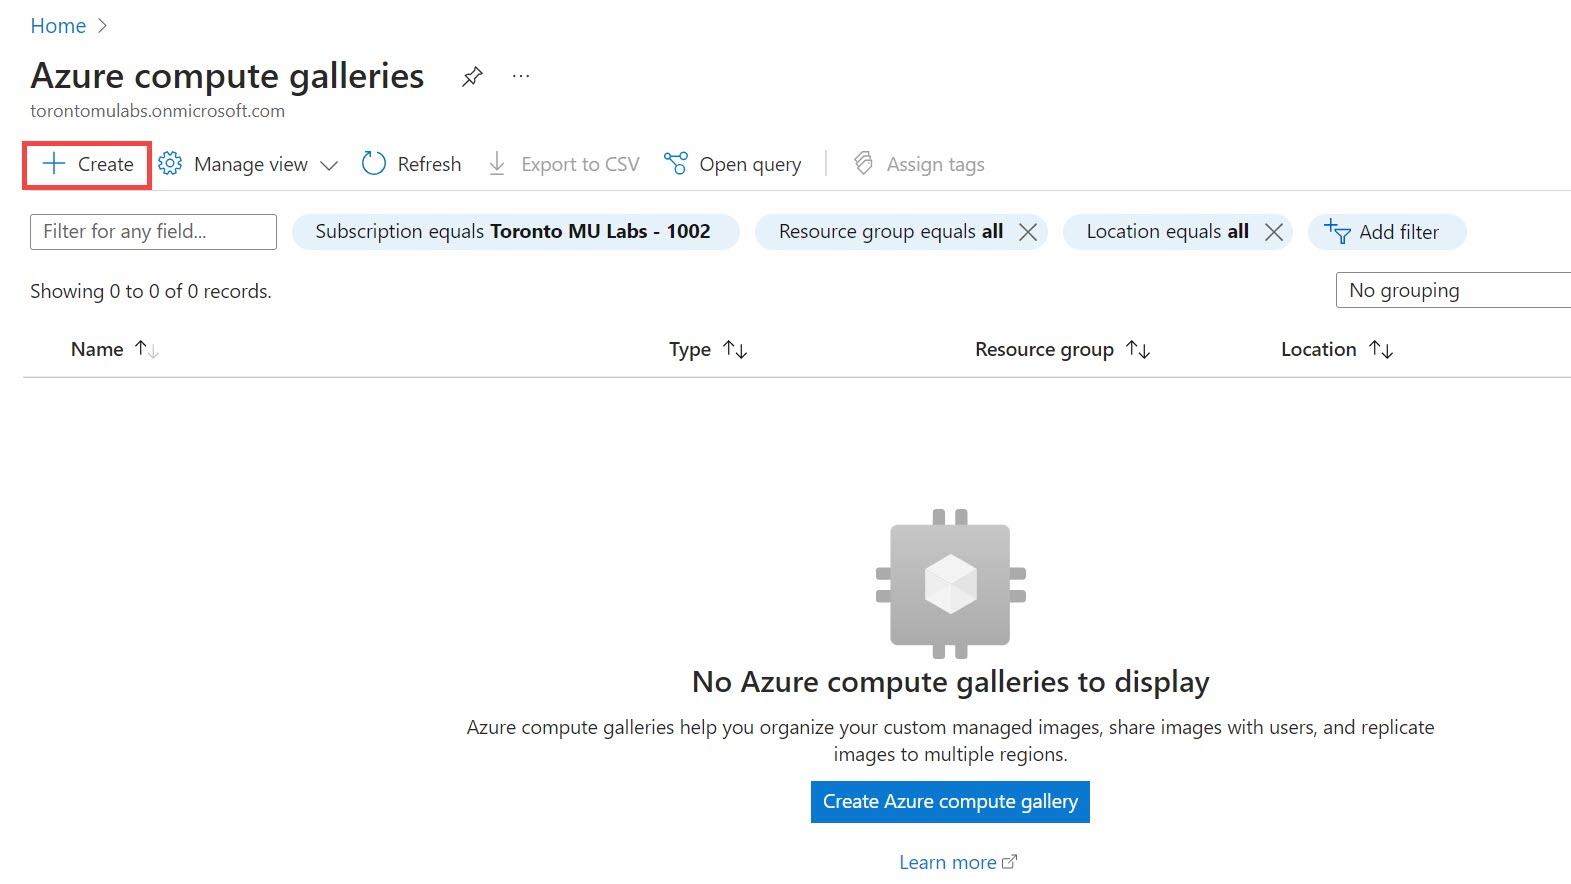
In the Azure compute galleries page, select + Create, which will lead you to the resource wizard from where you can provide the details for the resource.
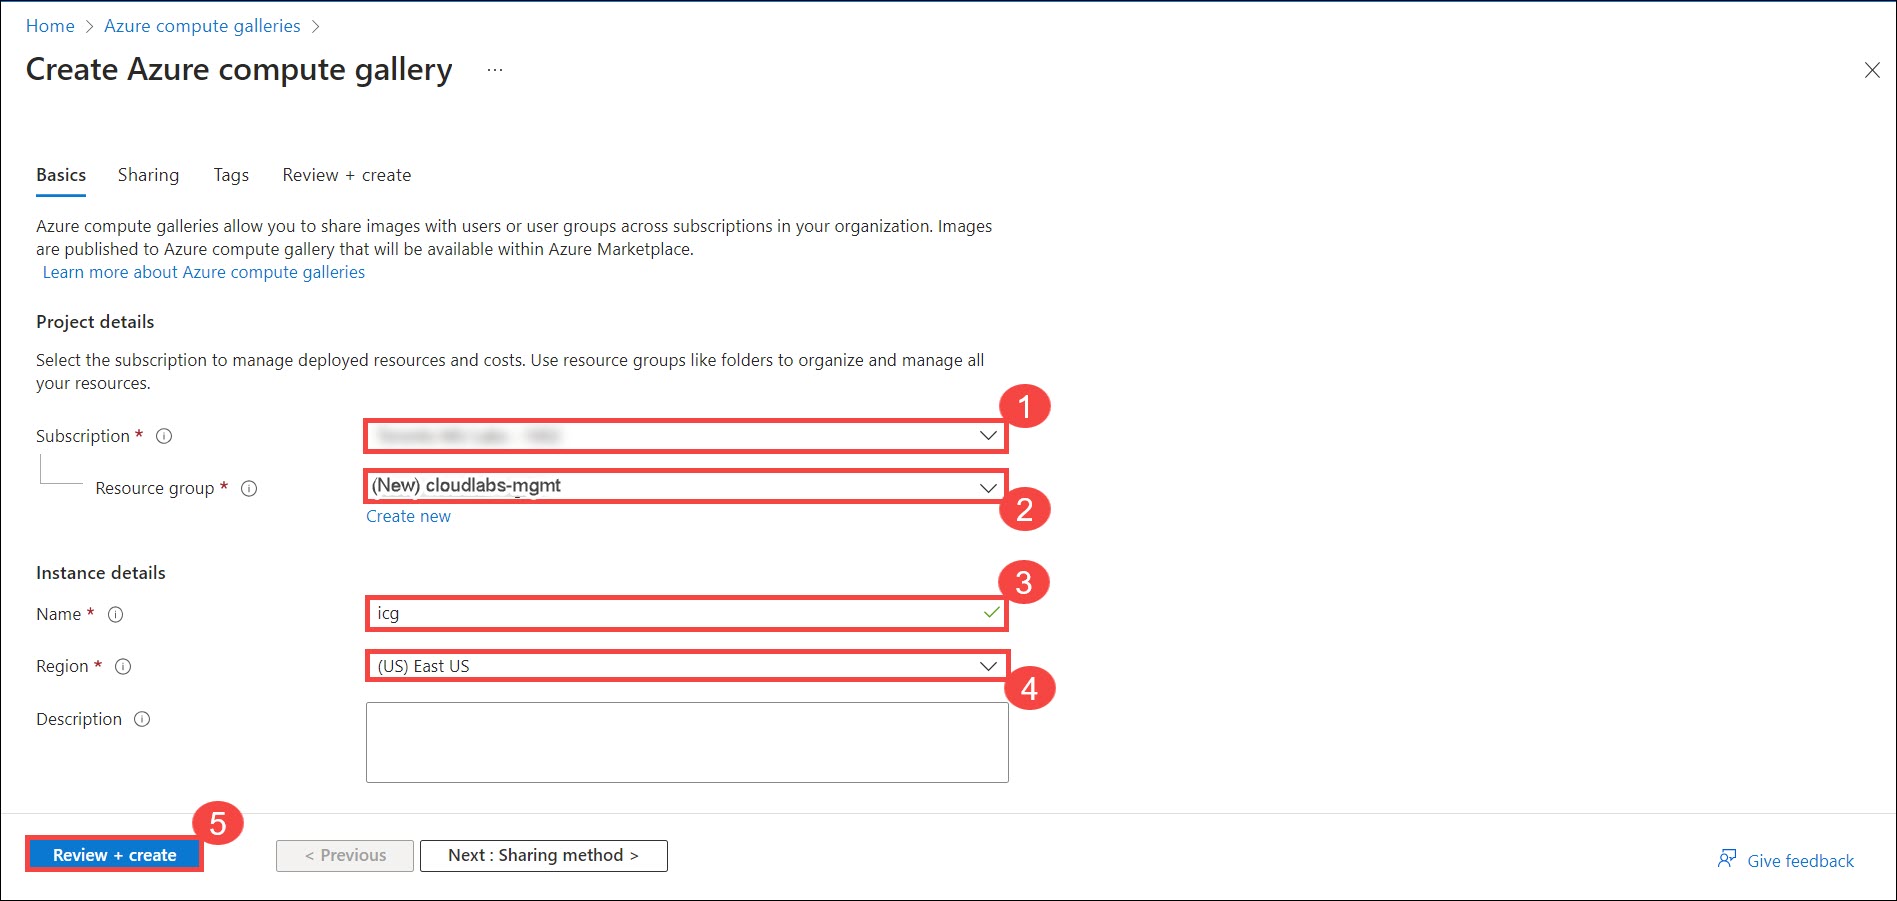
Once within the Create Azure compute gallery wizard, provide the values for the properties as below:
Subscription (1) : Choose the subscription where you want your Compute Gallery to be deployed. It is recommended to use the first Subscription in the series if you have more than one Subscription in a tenant.
Resource group (2) : Choose the resource group cloudlabs-mgmt-rg, else, create one if you do not have it already.
Name (3) : Provide a name for the service.
Region (4) : Select a region for the deployment of your Compute Gallery that is optimally situated in proximity to either yourself or your user base.
After providing the above details, click Review + create (5).
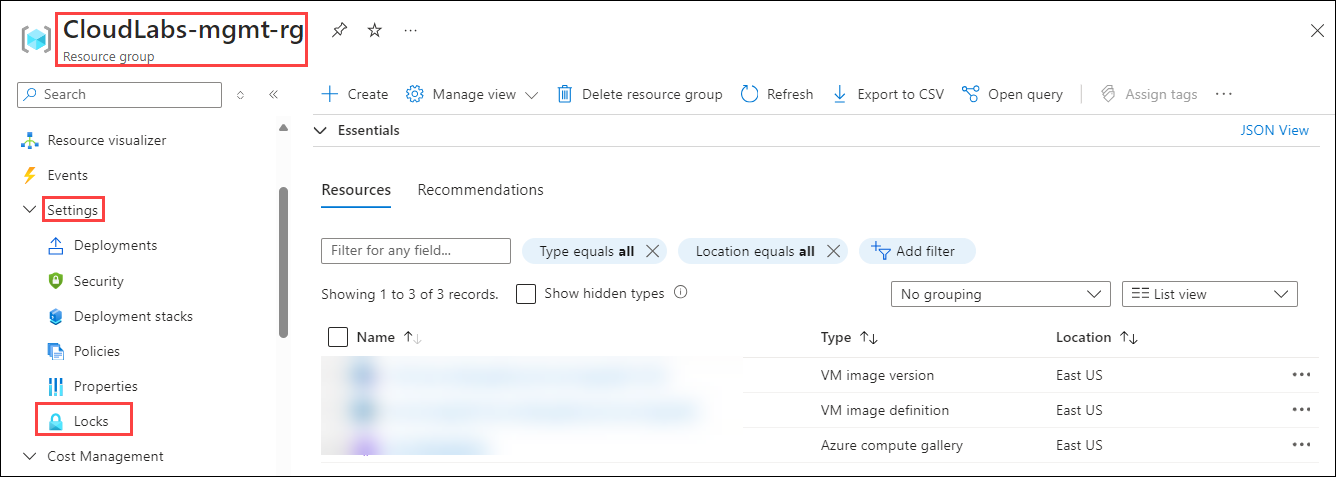
Note: The CloudLabs team stores the VM images in the resource group named cloudlabs-mgmt-rg. It is a best practice to avoid deleting this resource group and to apply a lock to it.
follow below steps for applying lock to resource group.
a. Locate and select the resource group named cloudlabs-mgmt-rg
b. In the resource group settings, find and select Locks in the menu.
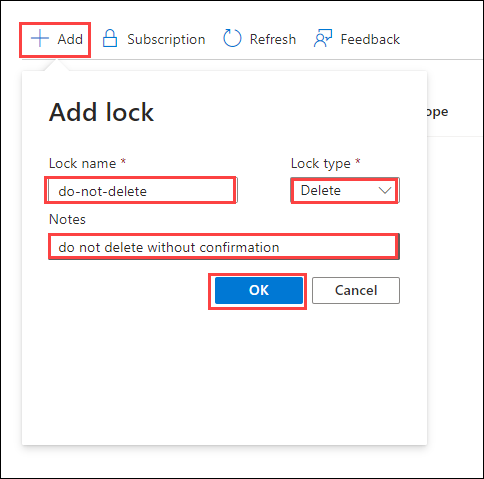
c. Lock name Give the lock a descriptive name, such as do-not-delete.
d. Lock type: Select Delete to prevent deletion of the resource group and its resources.
e. Notes: Optionally, add any notes for reference.
f. Click OK to apply the lock to the resource group.
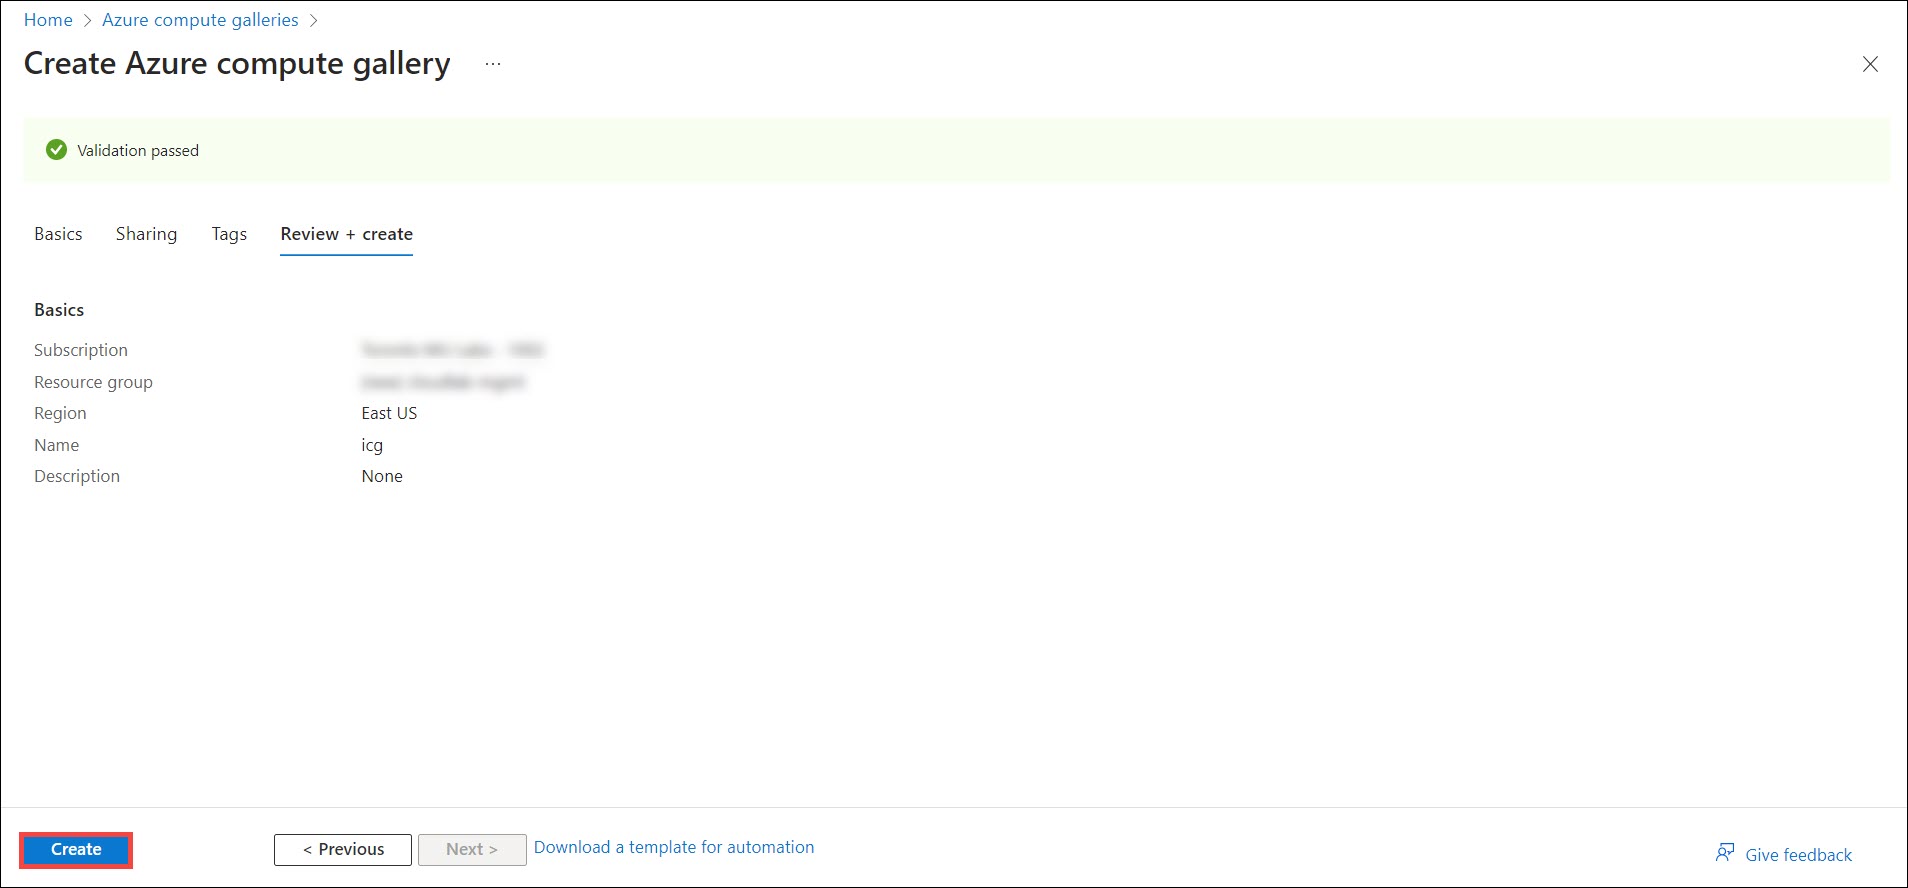
After the validation is passed, verify the details in the Review + create tab and proceed with creating the resource by clicking on the Create button.
Note: It will take around 30 seconds for Azure to create the Compute Gallery.
Upon successful deployment, you can directly access your resource by selecting Go to resource.
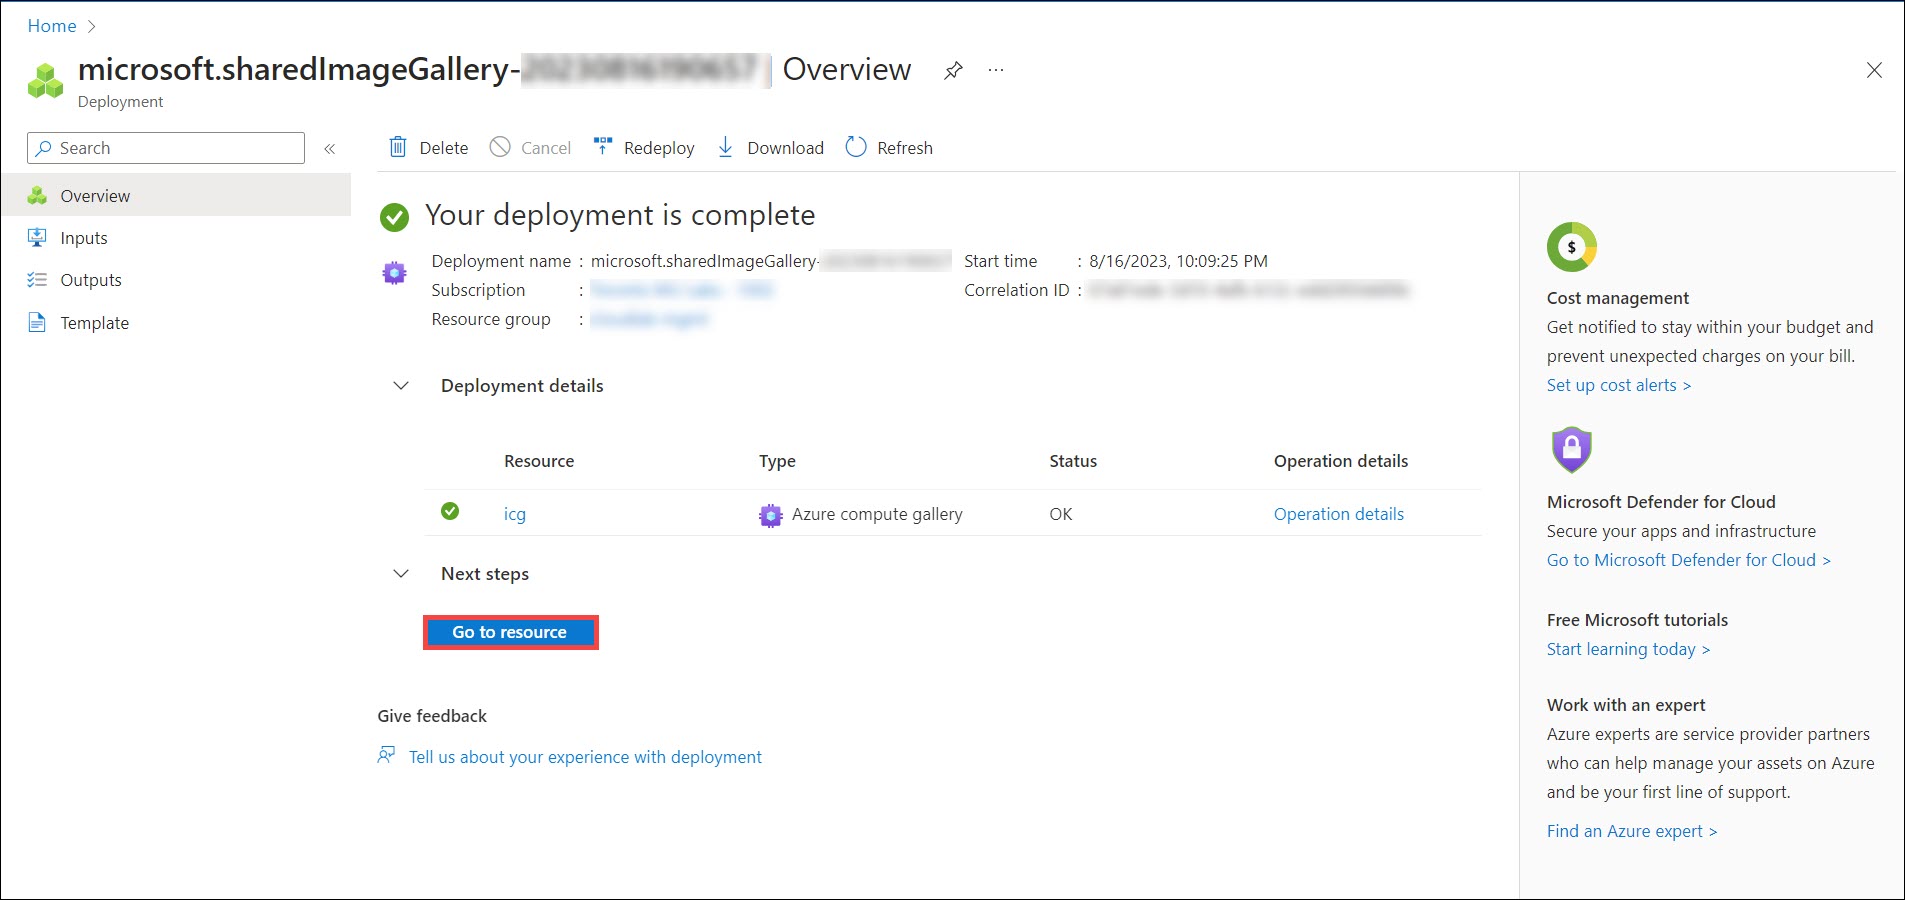
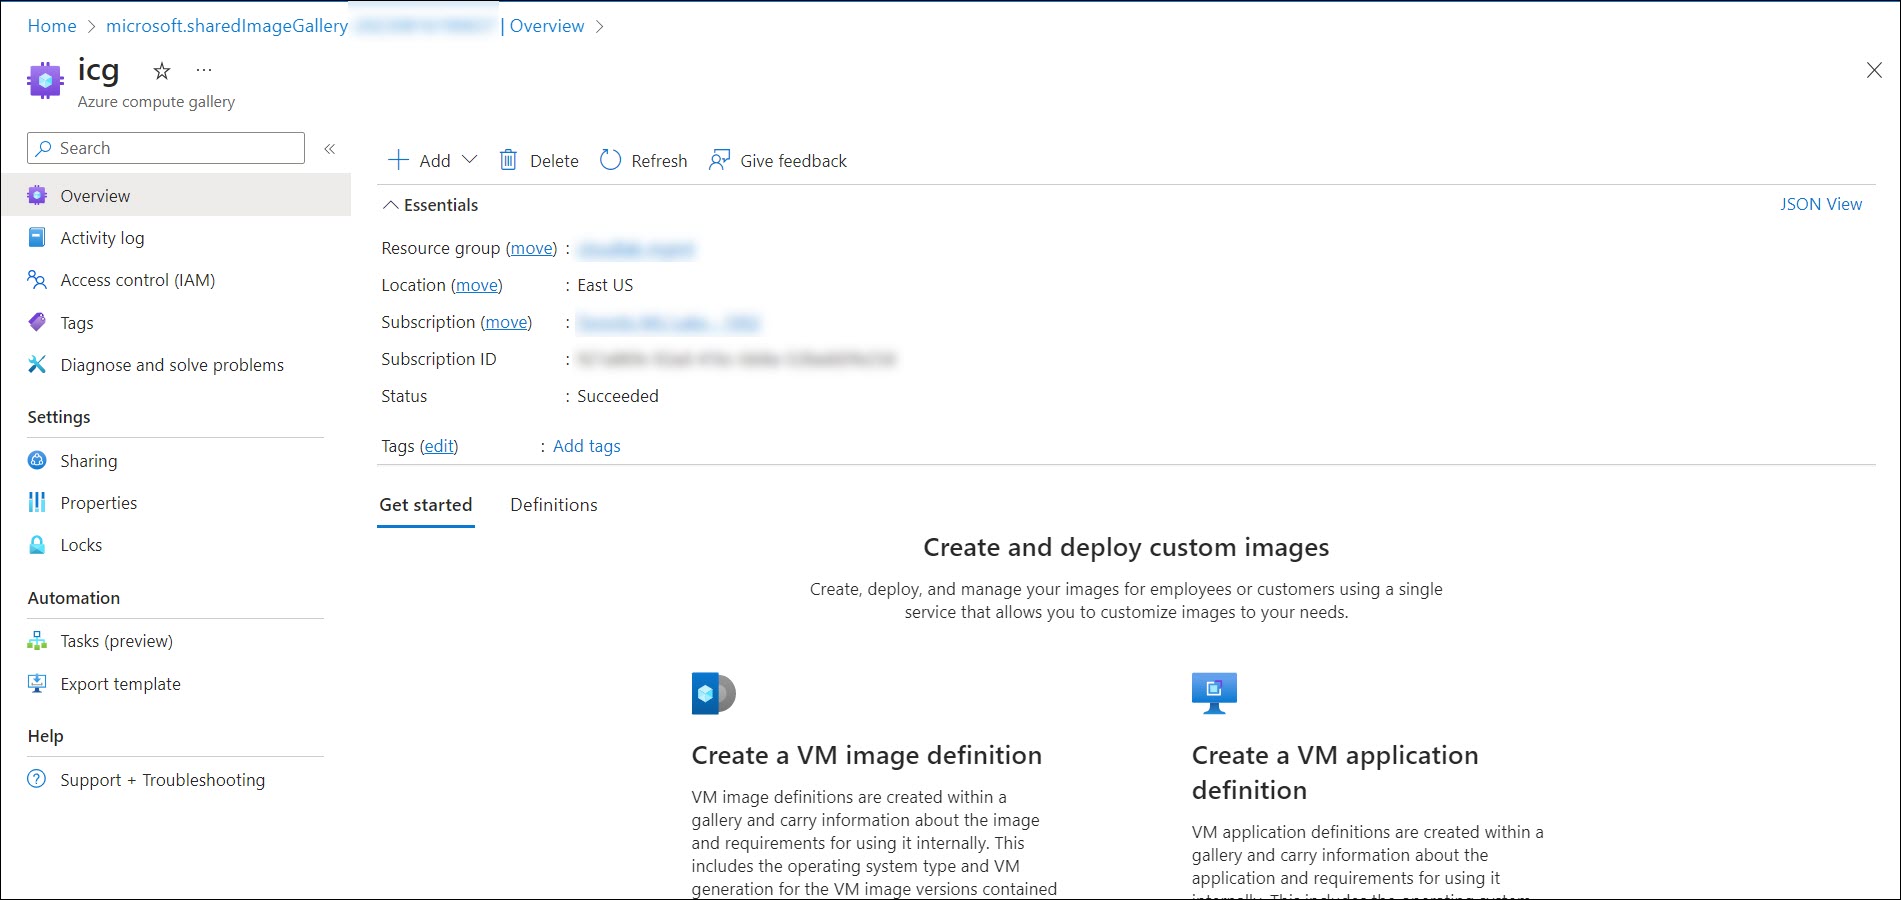
Following the aforementioned step will lead you to the icg Compute Gallery that you created.
Capturing VM and Creating Image Definition
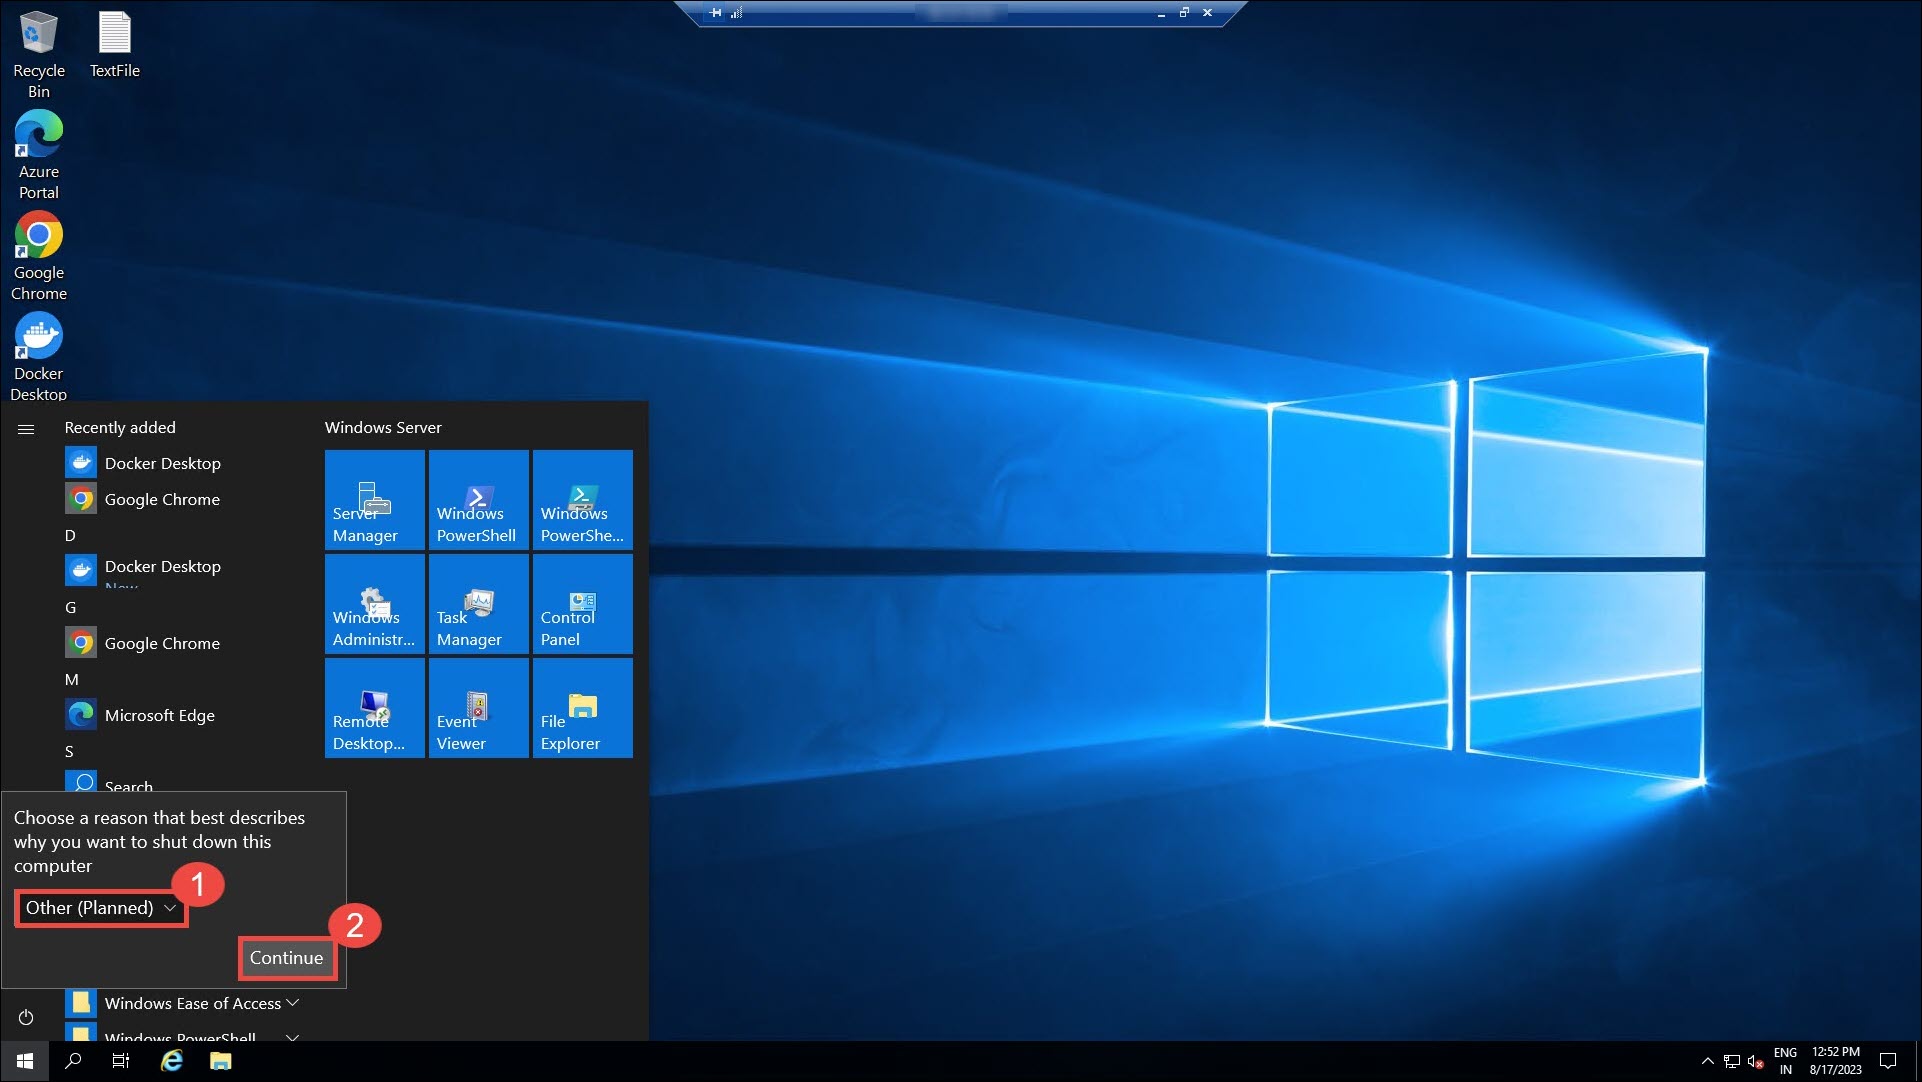
Firstly, login to the VM that you have already configured and ensure there is no window left open inside it. Then, shut down the VM by choosing Other[Planned] (1) and then click Continue (2).
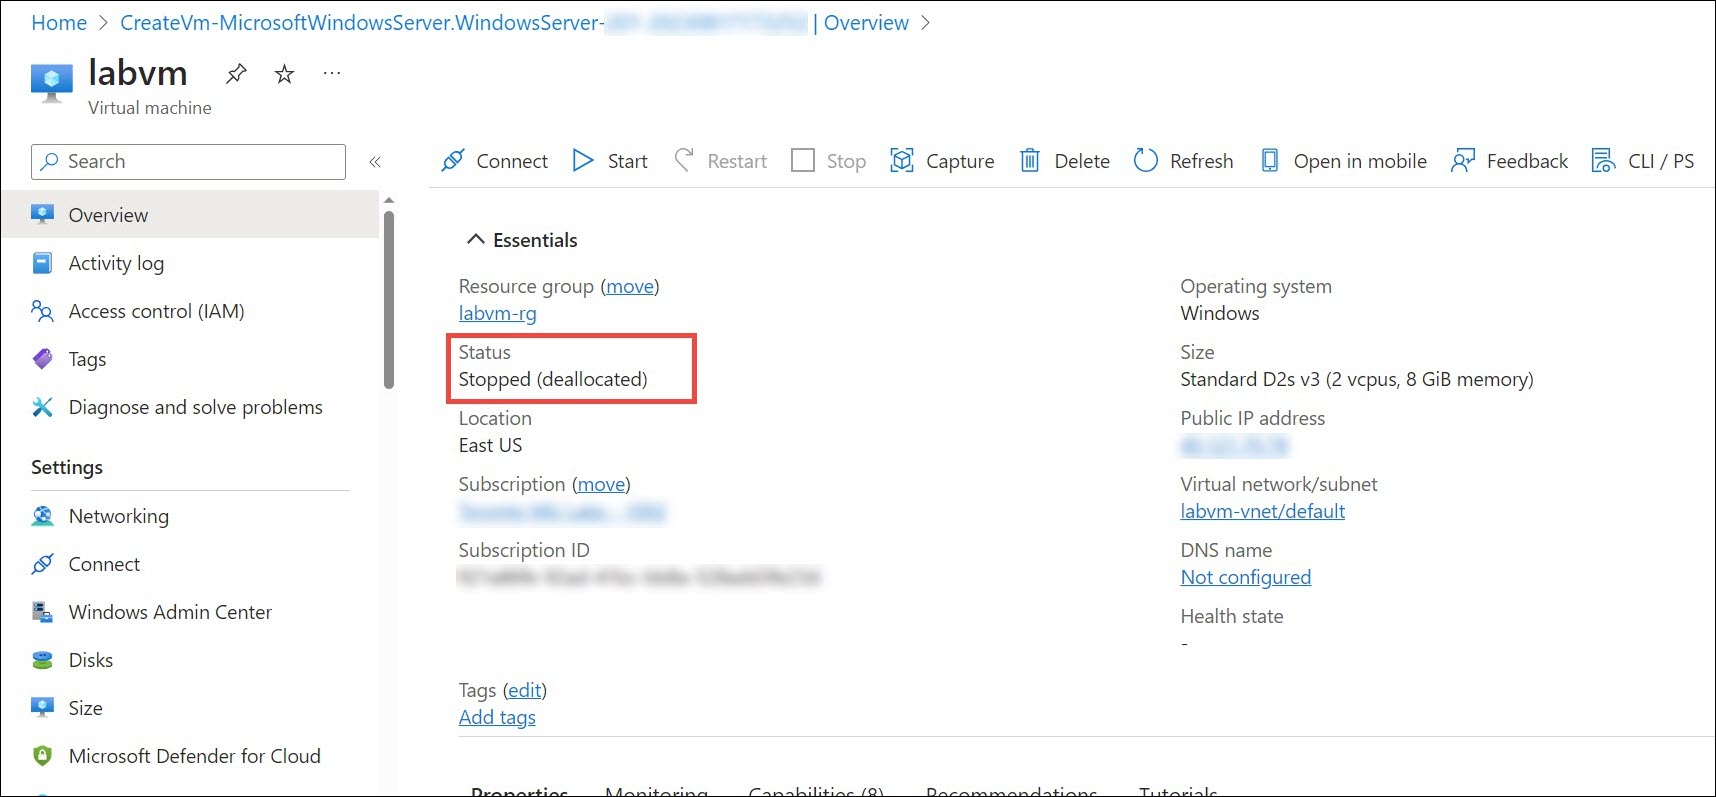
Now go back to the Azure portal and check the status of the VM. You may need to wait for a couple of minutes until the VM Status transitions to Stopped (deallocated).
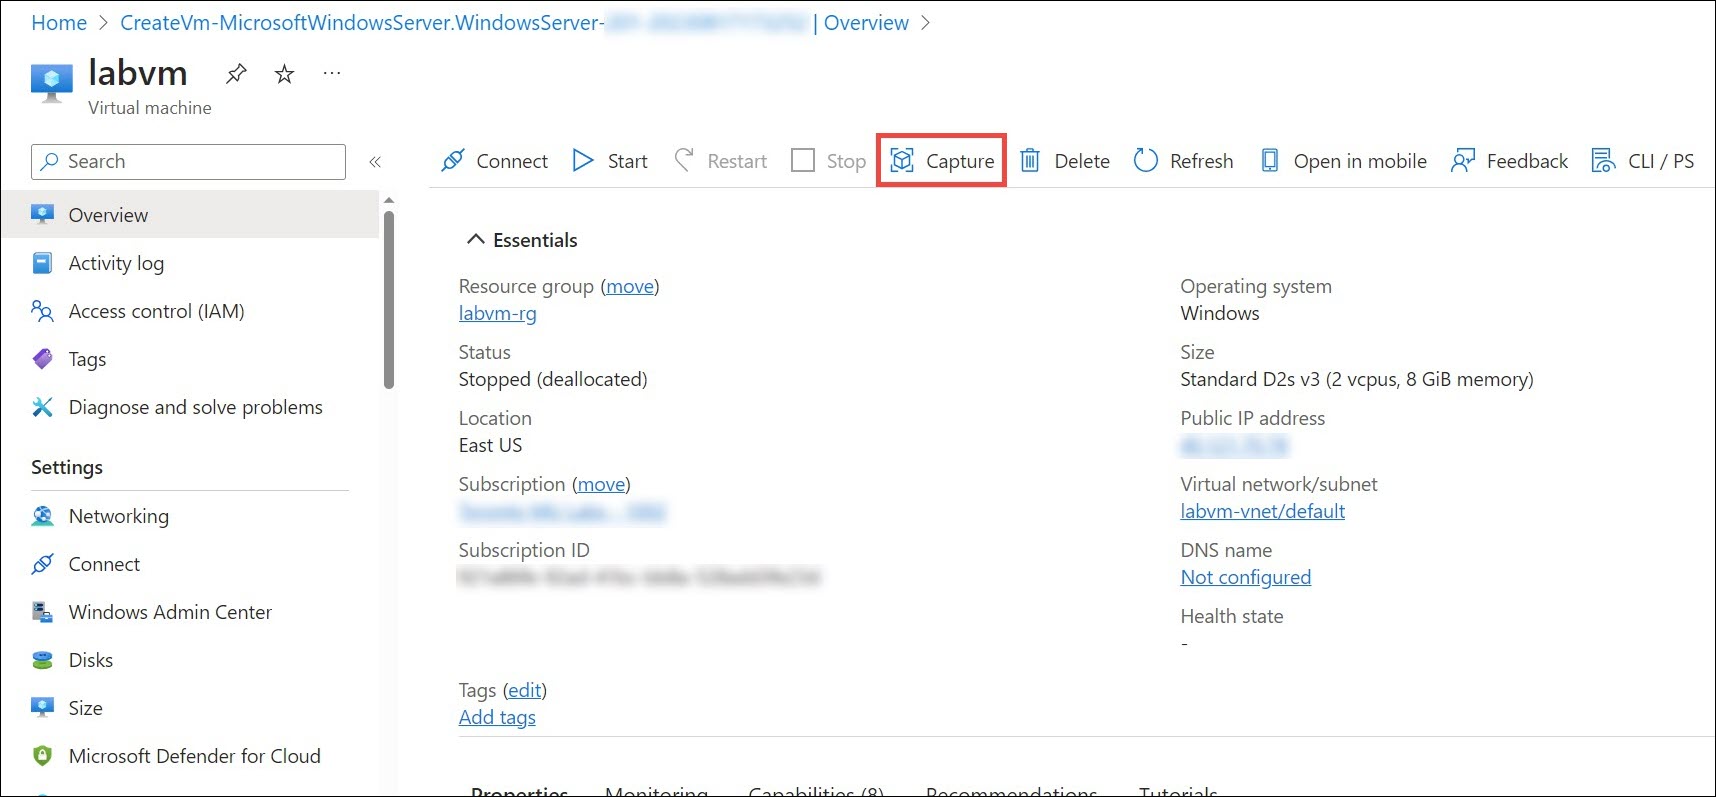
Once the VM is stopped, you can capture the VM image using the Capture button available on the VM Overview page.
You already have the Compute Gallery and now you are just creating a new Image Definition and Image Version, which will be stored in the Compute Gallery.
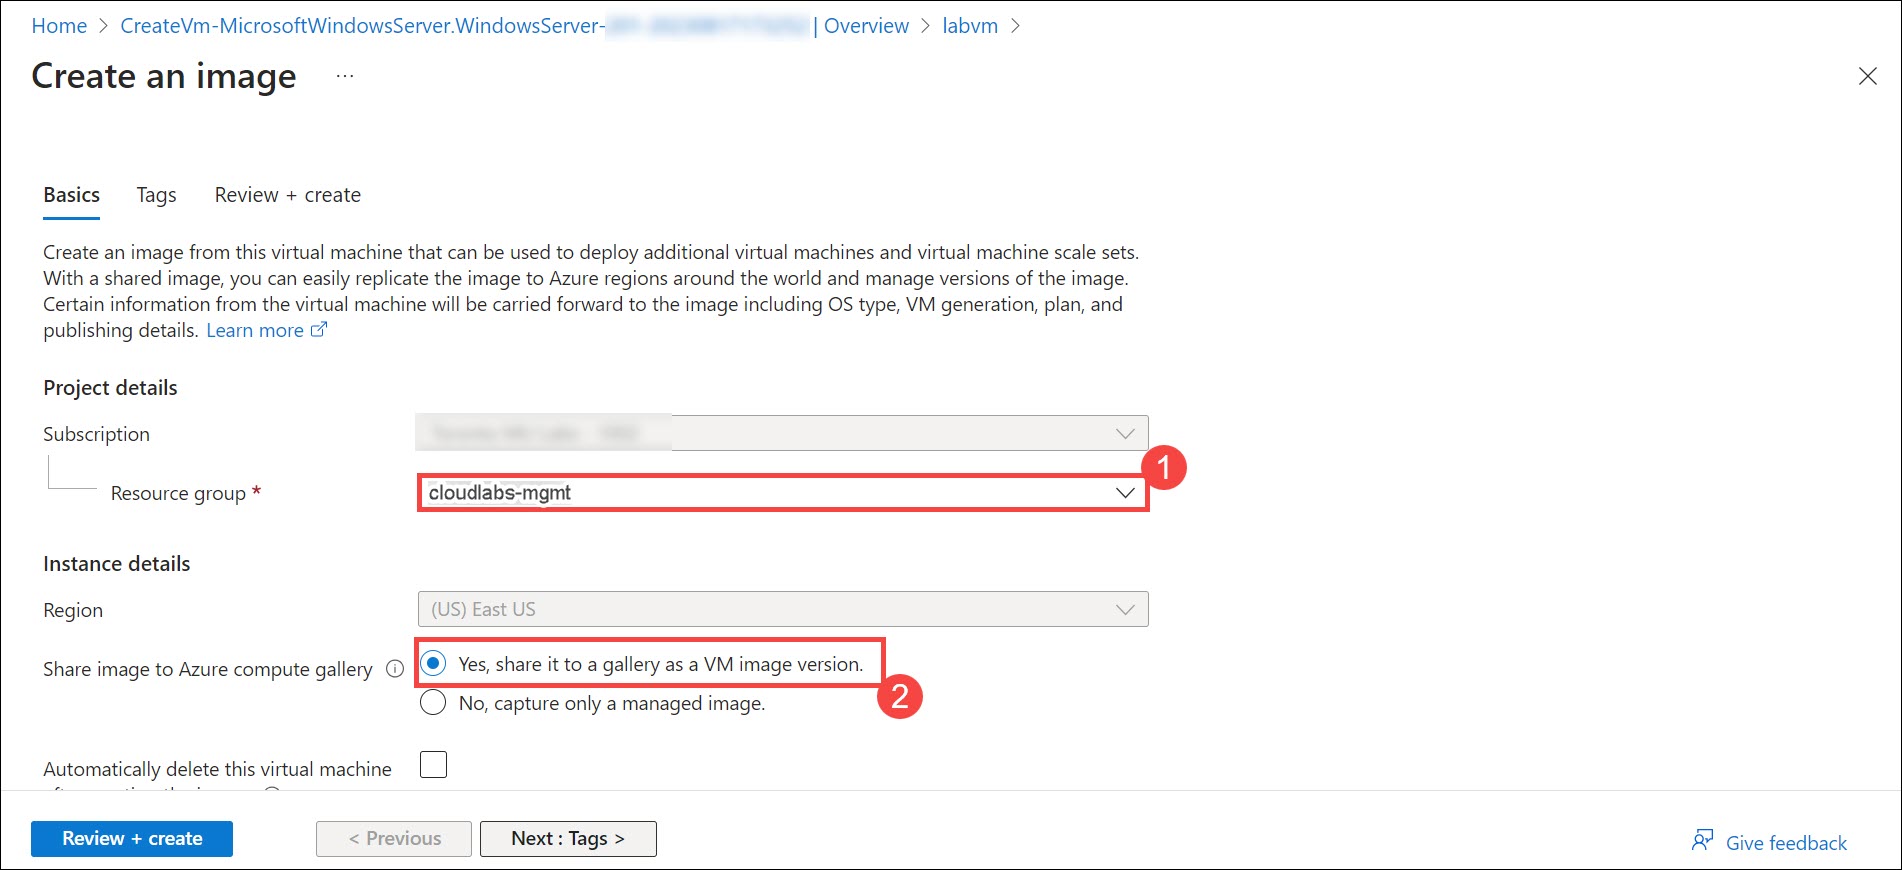
Next, in the Create an image page, you need to associate it with the Subscription and Resource Group where the Compute Gallery resides, which is cloudlabs-mgmt (1) resource group and also set the Share image to Azure compute gallery property to Yes, share it to a gallery as a VM image version (2) if it is not already there.
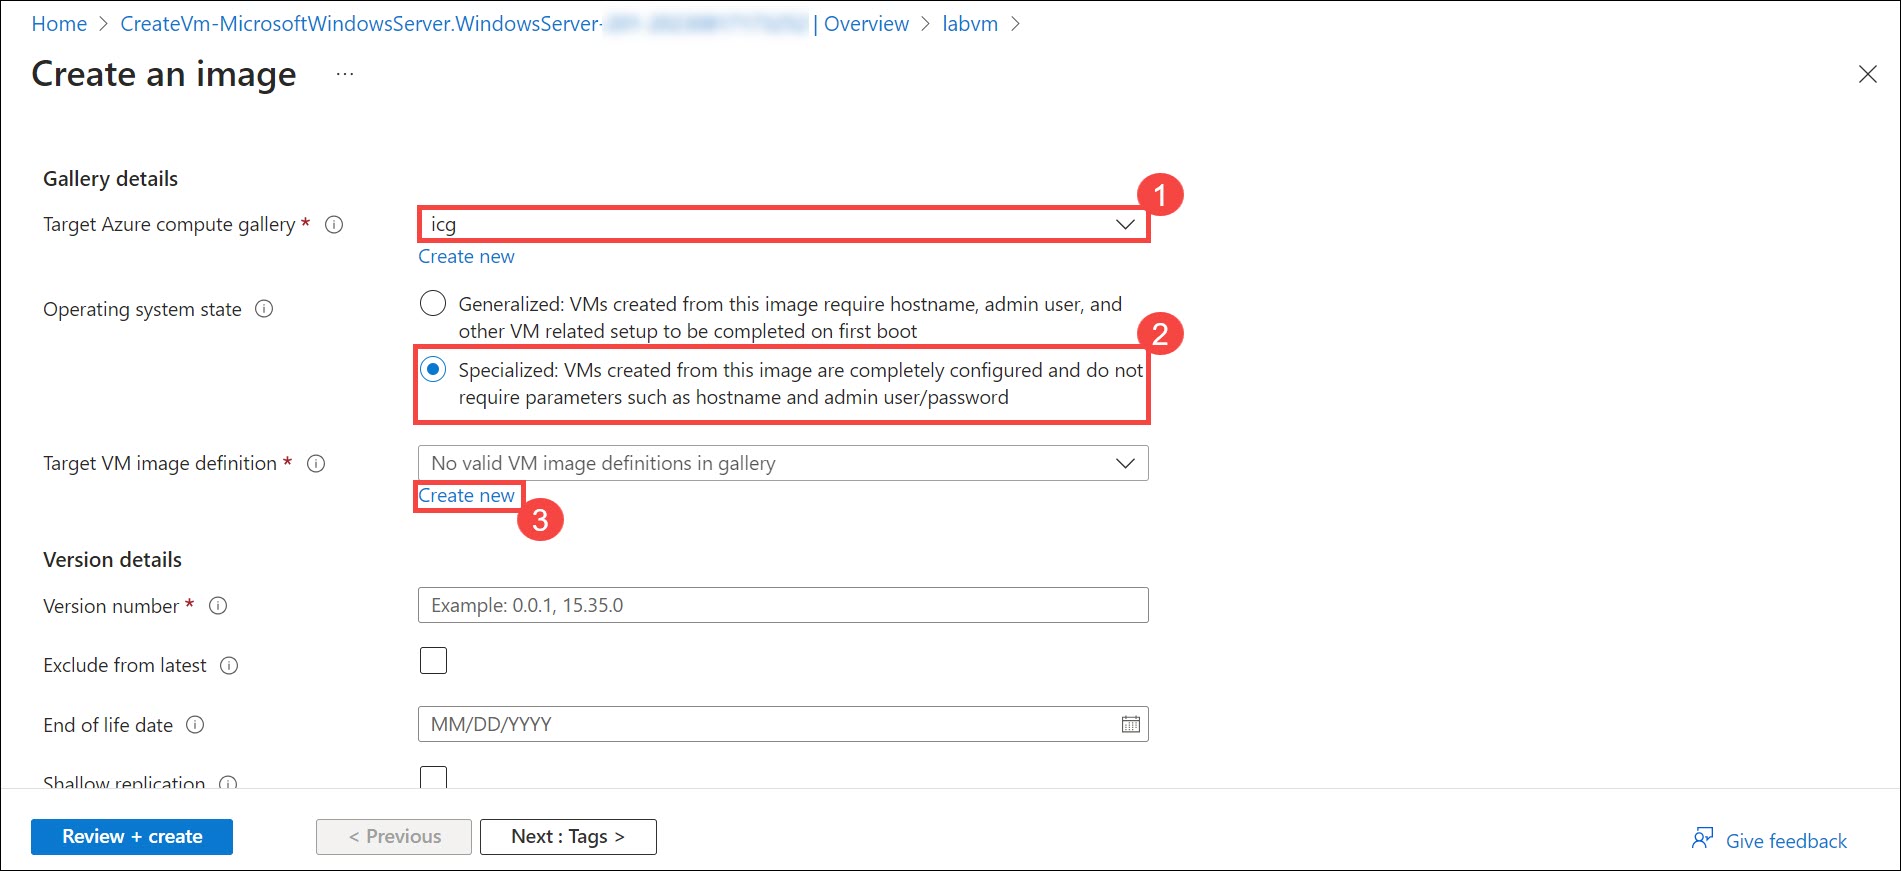
In the Gallery details section, select the Target Azure compute gallery (1) you created previously from the dropdown, and set the Operating system state property to Specialized: VMs created from this image are completely configured and do not require parameters such as hostname and admin user/password (2). Then, click Create new (3) to create a new image definition.
Note: Specialized images retain all the specific information from the original VM, including the machine name, IP configuration, user accounts, and installed applications. They are essentially snapshots of the VM and are used when you want to preserve the exact state of the VM, including its unique identity. where as Generalized images are used to create new instances (VMs) that do not retain any specific information from the original VM, such as computer name, user accounts, etc.They are meant for creating multiple instances with the same baseline configuration but without retaining unique machine-specific data. before capturing the generalize image you have to remove machine specific information by deprovisioning. for further information follow below document for how to generalize the VM. How to generalize the VM using sysprep.
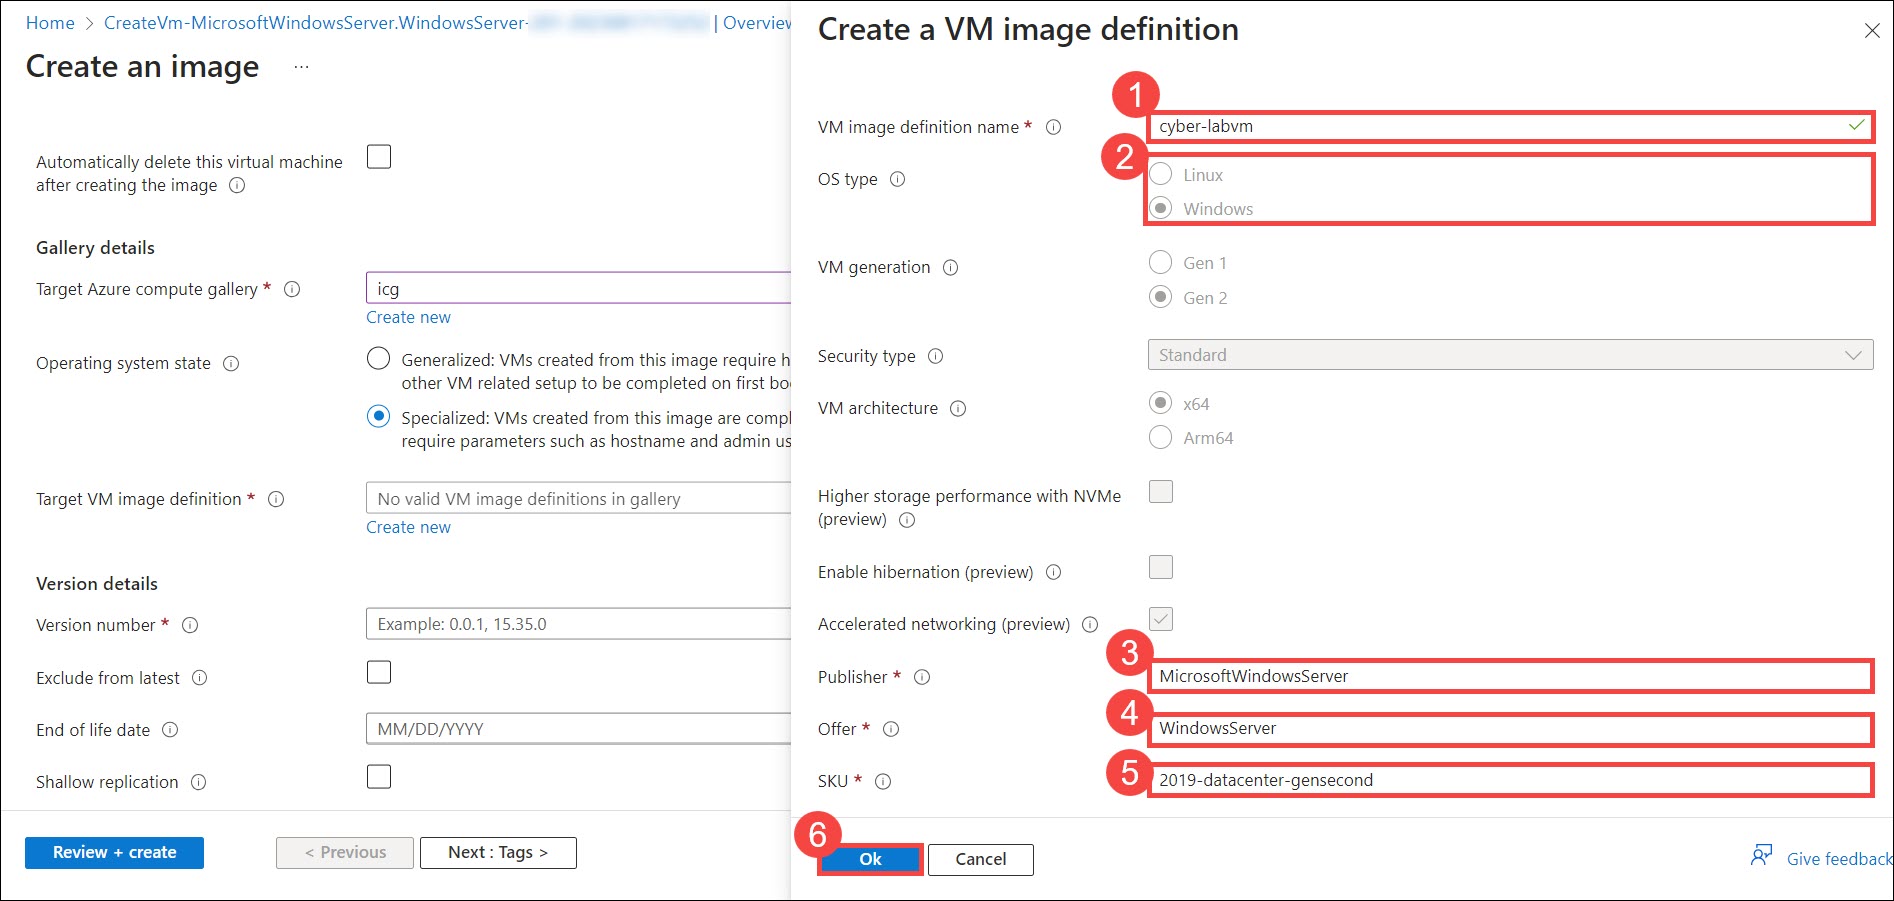
In the Create a VM image definition wizard, provide the values for the properties as below:
VM image definition (1) : Provide a name for your VM image. Ideally it should relate to lab name.
OS type (2) : Choose OS type Windows or Linux, if not auto populated.
Publisher (3) : Provide the image Publisher name.
Note: If you are capturing the image of a VM created from Azure Marketplace image, then the Publisher, Offer & SKU details will be auto populated for you. In case you want to find them, you can go to the respective VM page, select Export template in the VM blade and search for imageReference, under which you can find the image details. For non-Azure Marketplace image you can provide custom details.
Offer (4) : Input the image Offer name.
SKU (5) : Enter the image SKU.
After entering the above details, click on OK (6) to save the details.
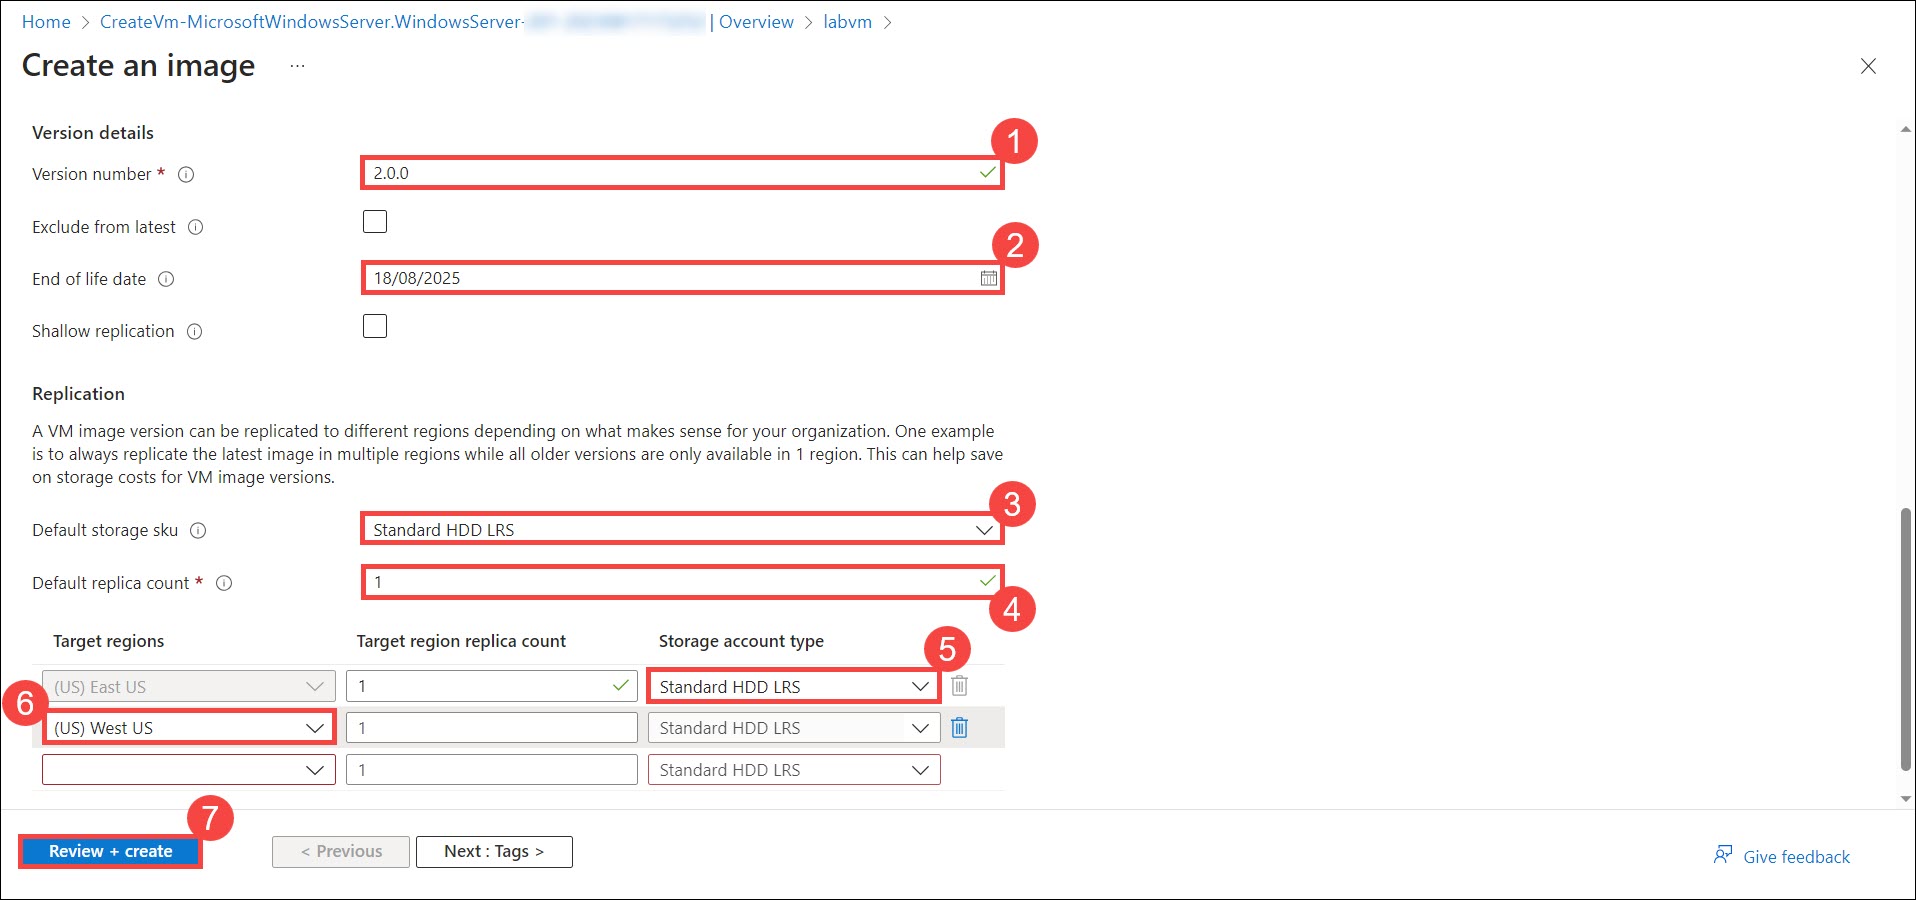
Scroll down, and in the Version details section, you need to provide version and image replication details as below:
Version number (1) : Provide the version number. The VM image version number should follow Major(int).Minor(int).Patch(int) format. For example: 1.0.0, 1.2.2
End of life date (2) : Here you can add an End of life date for image, such as one or more years. It is just informational and doesn't restrict the VM creation from the image.
Default storage sku (3) : Choose Standard HDD LRS as it will optimize the storage cost.
Default replica count (4) : Keep it as 1, as one copy is sufficient.
Storage account type (5) : Set it to Standard HDD LRS for optimized storage costs.
Target regions (6) : Select a region from the dropdown if you want to replicate the image to an additional region.
Select Review + create (7) to proceed further.
Lastly, in the Review + create tab, verify the details and click Create to create the image definition and version.
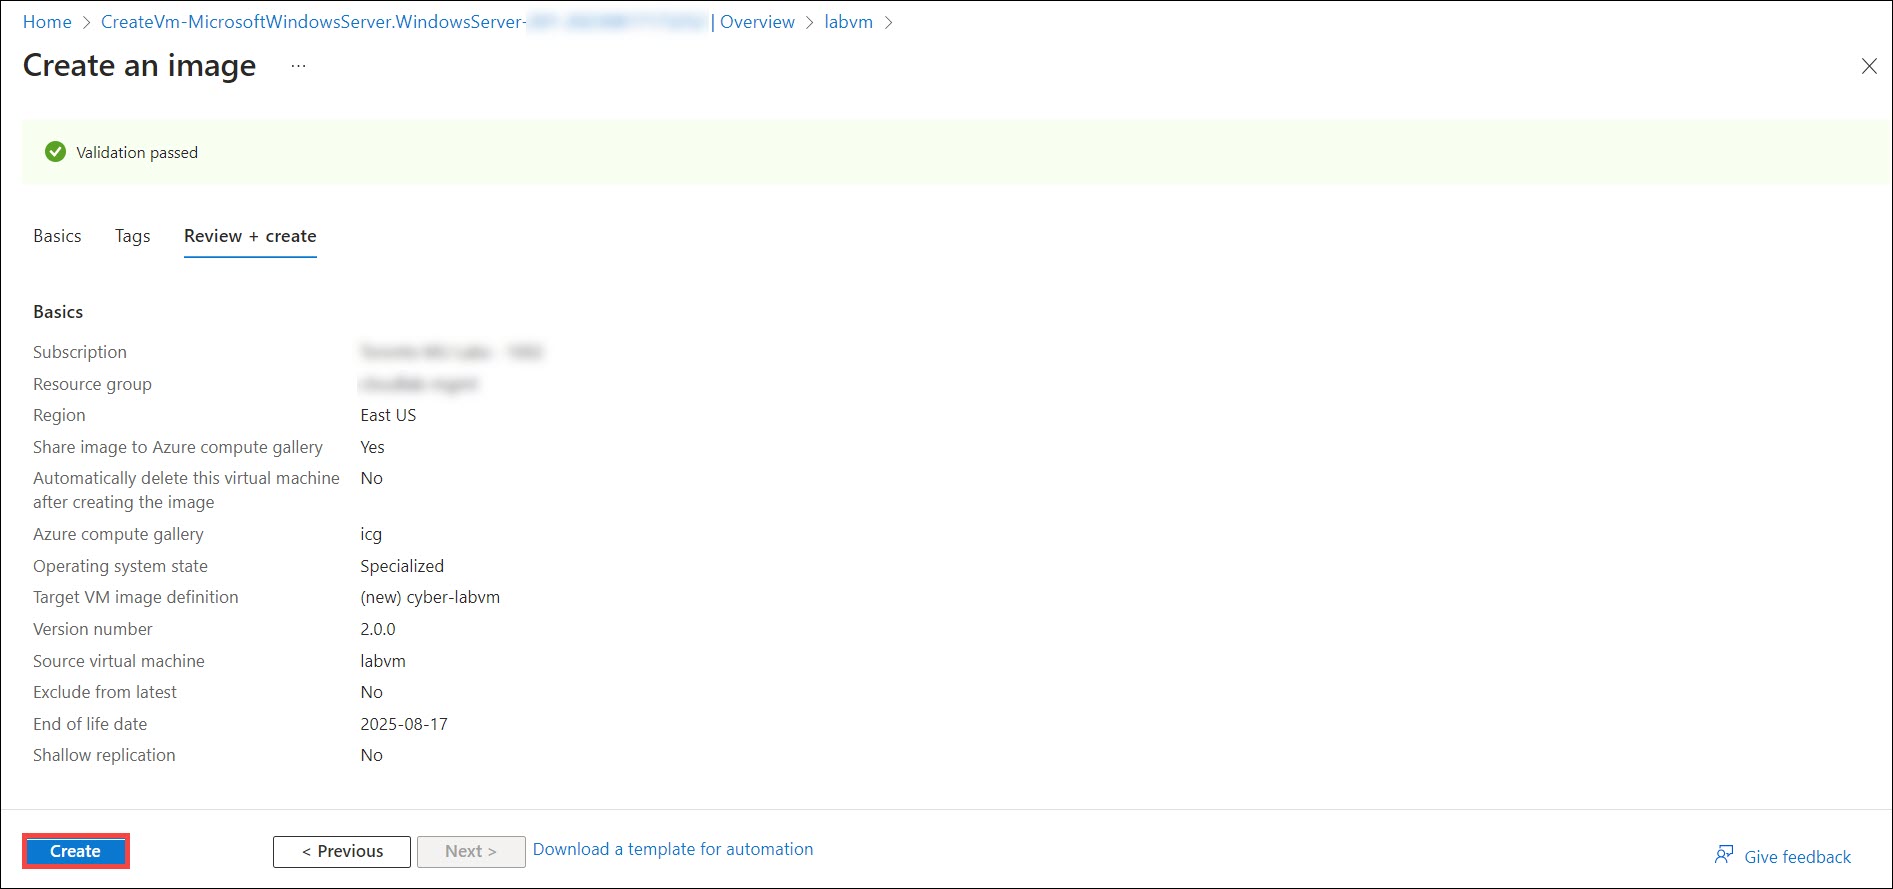
Note: Creating an image definition and version could take 15 minutes or more.
Utilizing the image
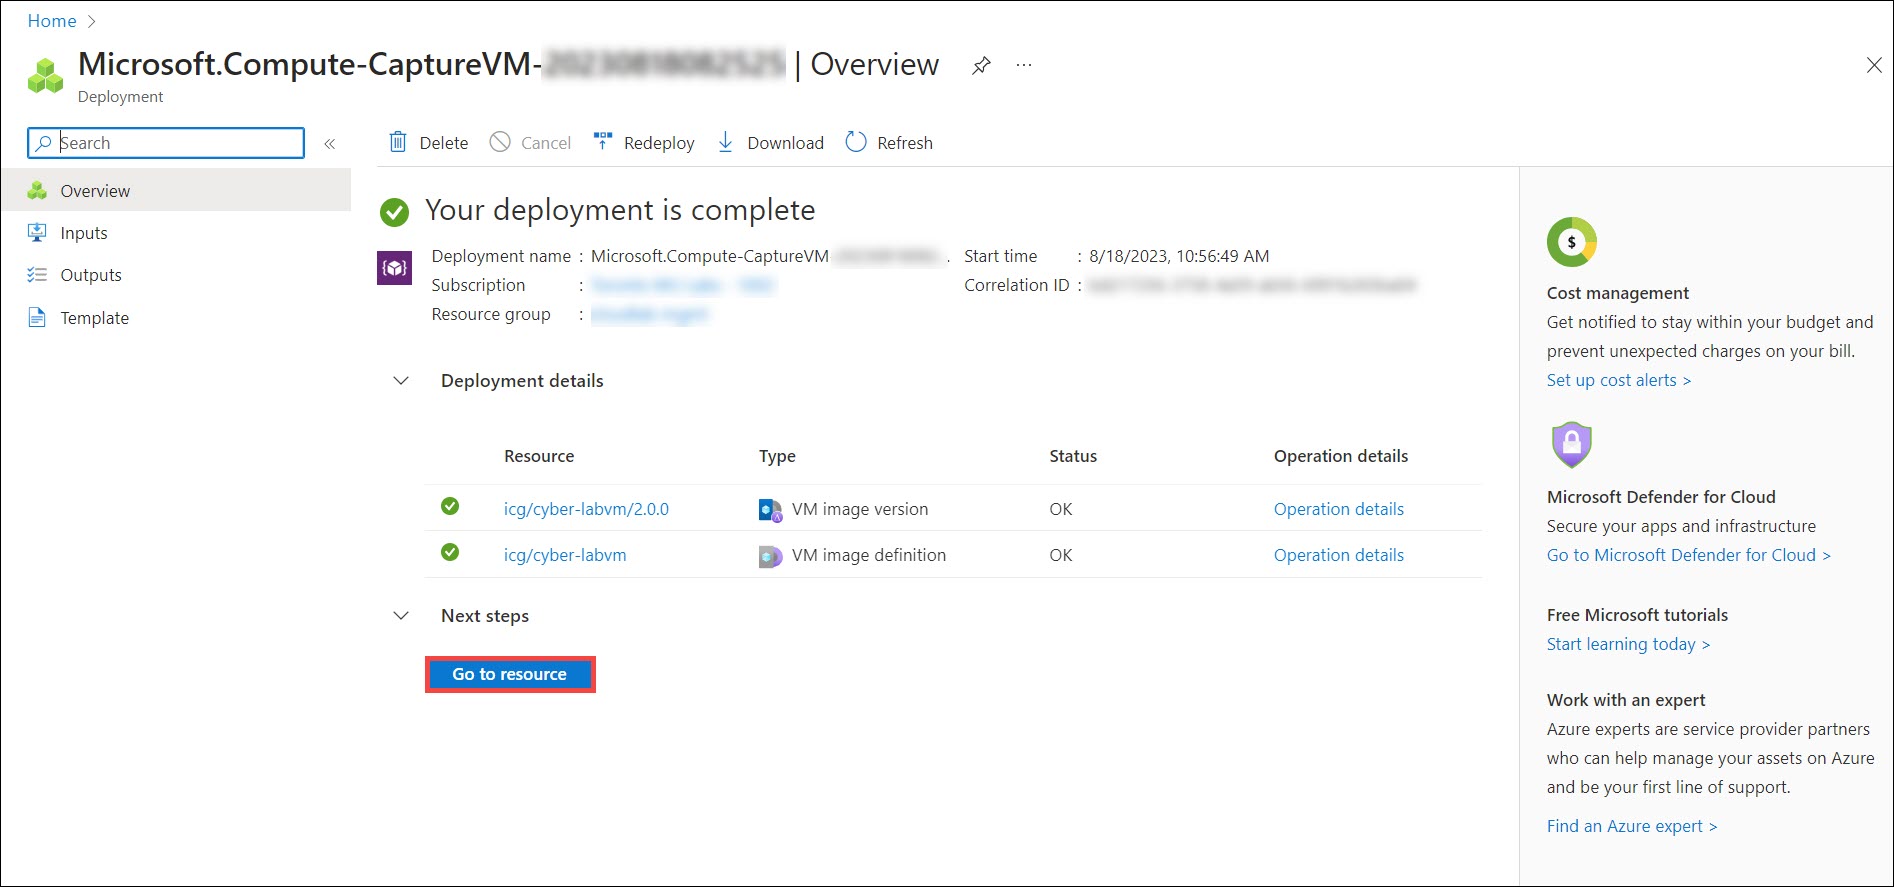
After the deployment succeeds, click on Go to resource, which will direct you to the image version you created.
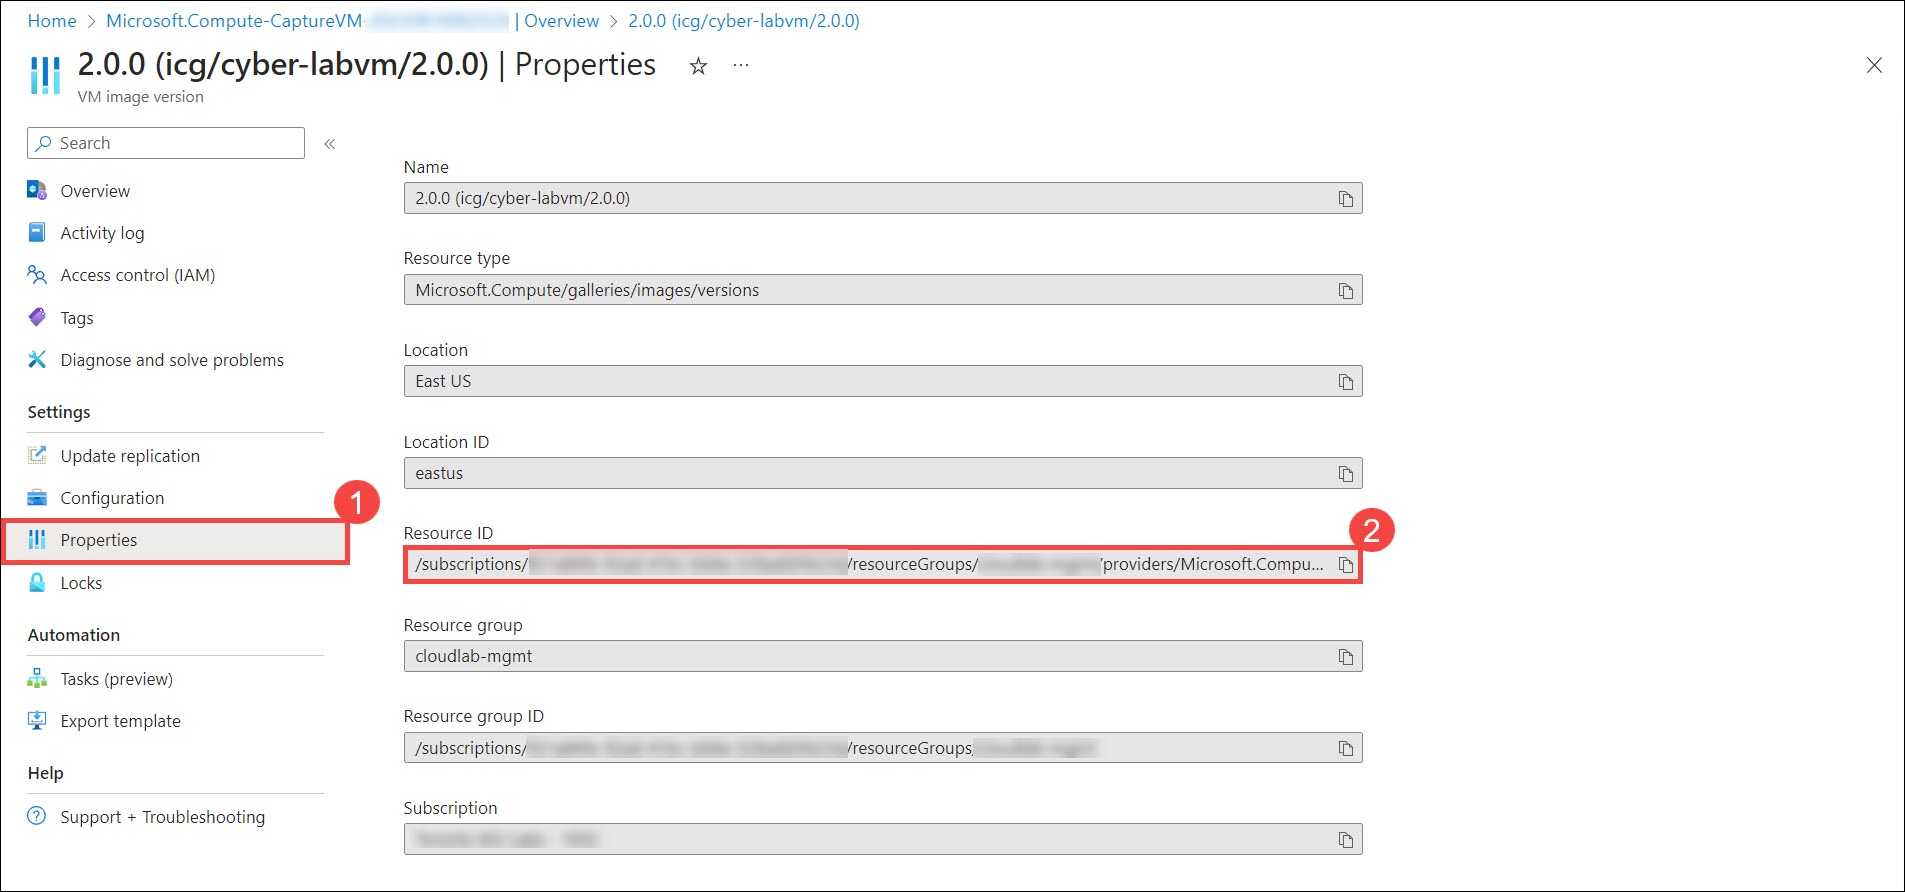
In the VM image version page, select Properties in the left blade and copy the Resoruce ID property so that we can use it in the ARM template.
In the ARM template, under imageReference, provide the image Resource ID value for id.
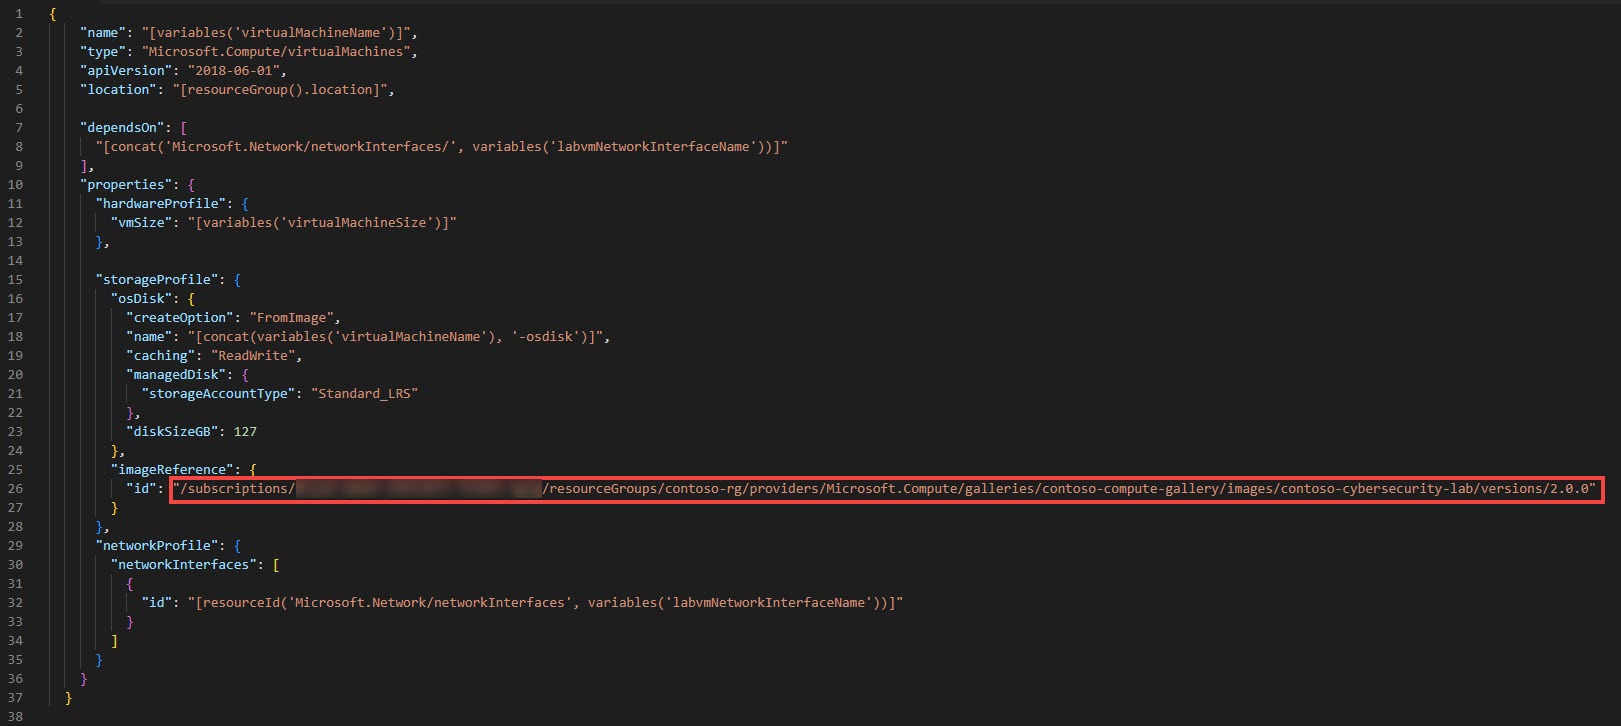
Add the updated ARM template in the CloudLabs Template and provide the same region(s) where the image is replicated in both CloudLabs Template and ODL.
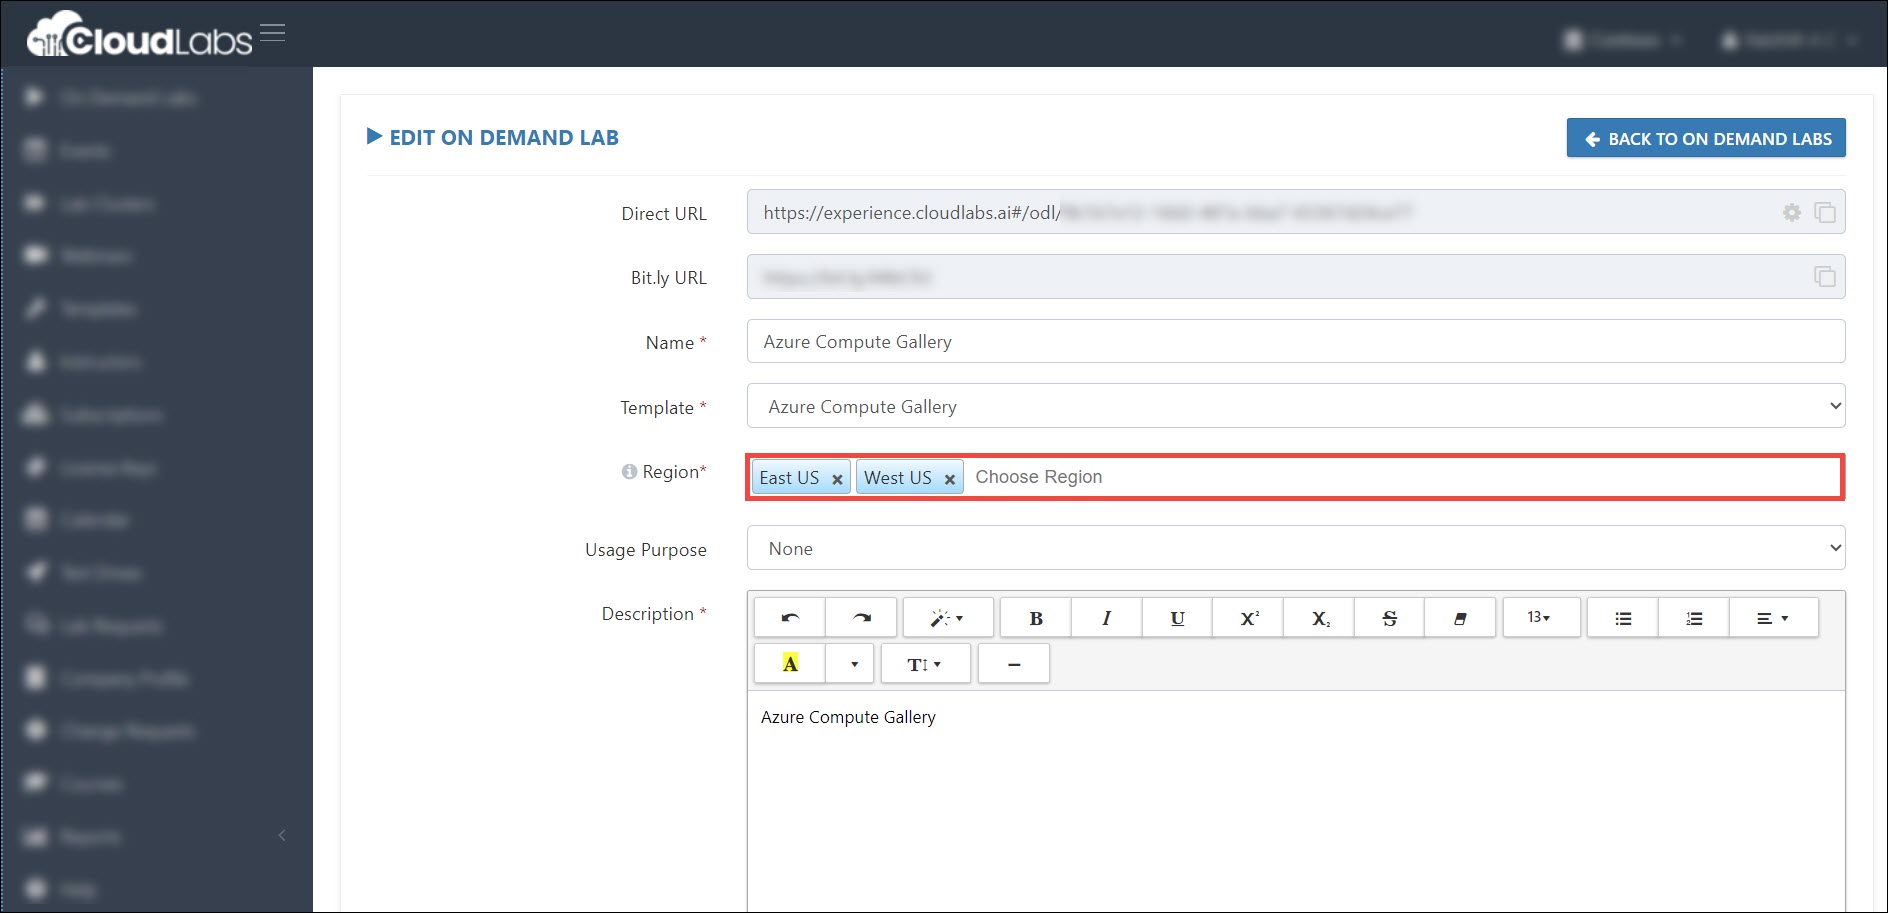
Finally, verify if the configurations are made correctly by adding a new user deployment from any existing/new On Demand Lab.
After the deployment is successful, you can connect to the VM and verify the changes. Also, please delete the Resource Group that was created to Capture a VM image after the changes have been confirmed (manually on Azure portal).
Updating image replication
If you want your VM images to be replicated to additional region(s) or you want to remove the image replication from one or more region(s), please follow the below steps.
Navigate to Azure Portal.
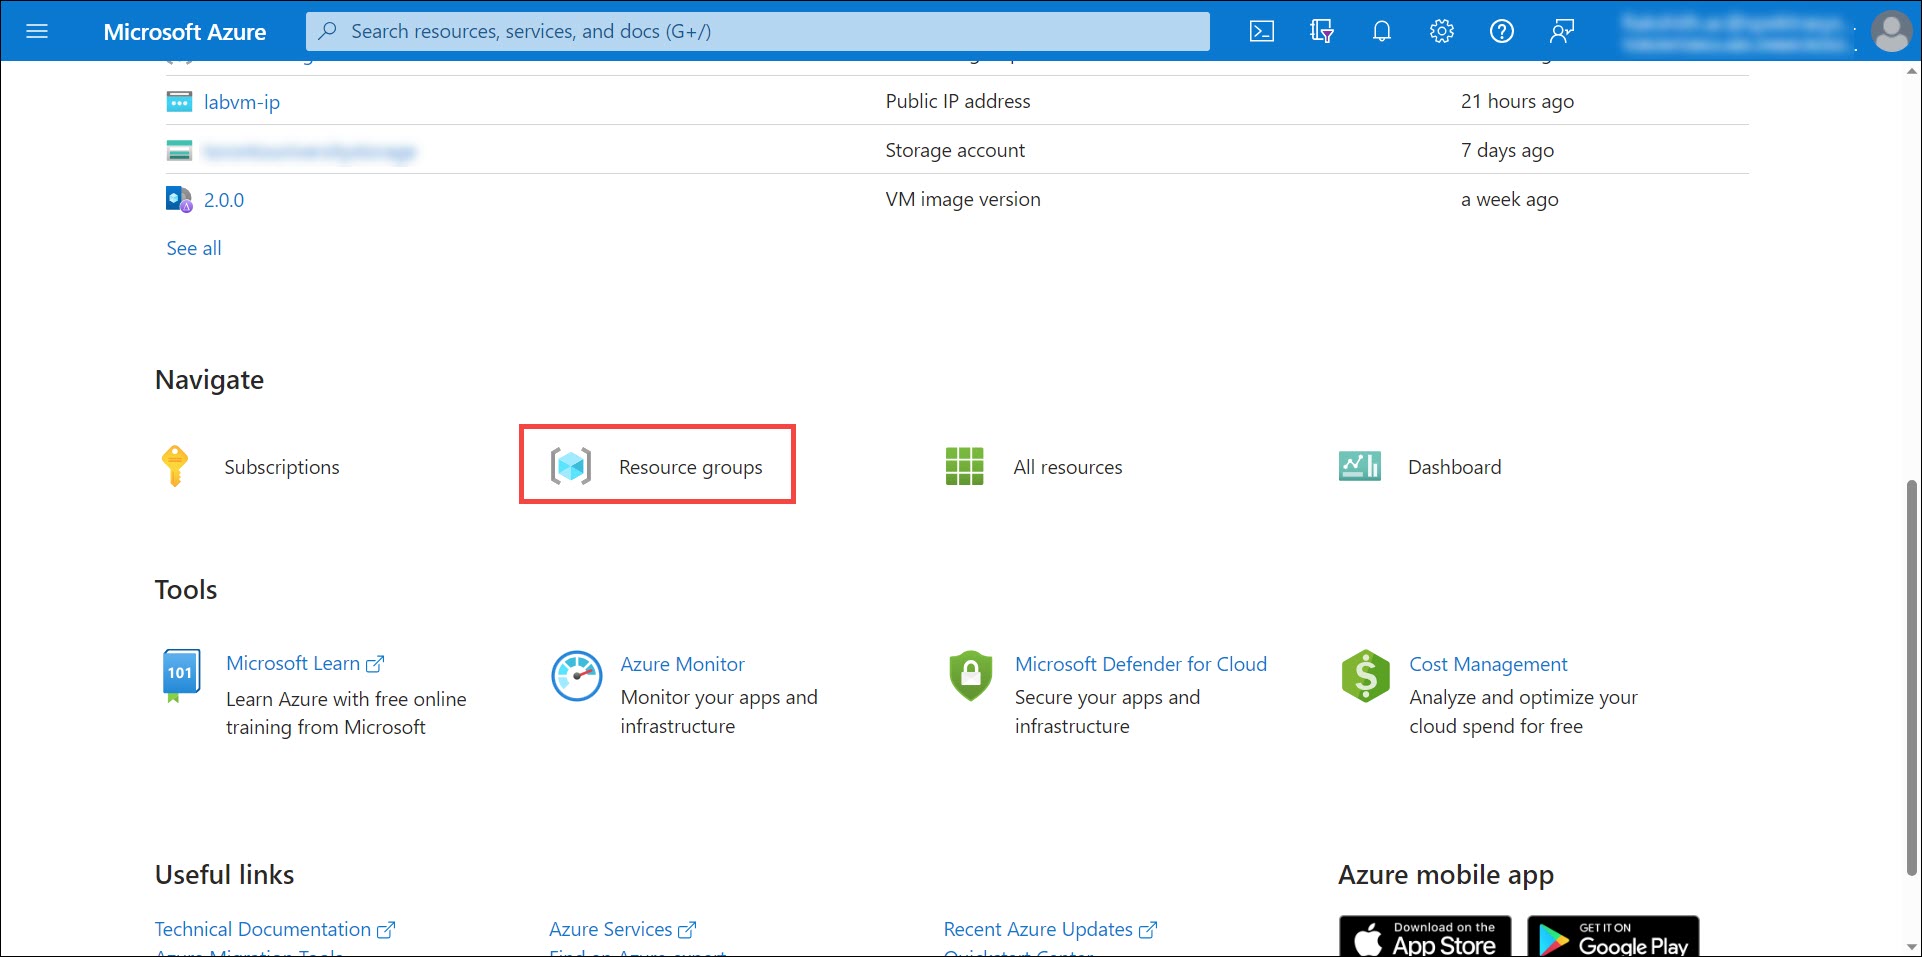
Select Resource groups under Navigate.
In the Resource groups page, select the cloudlabs-mgmt (1) resoruce group.
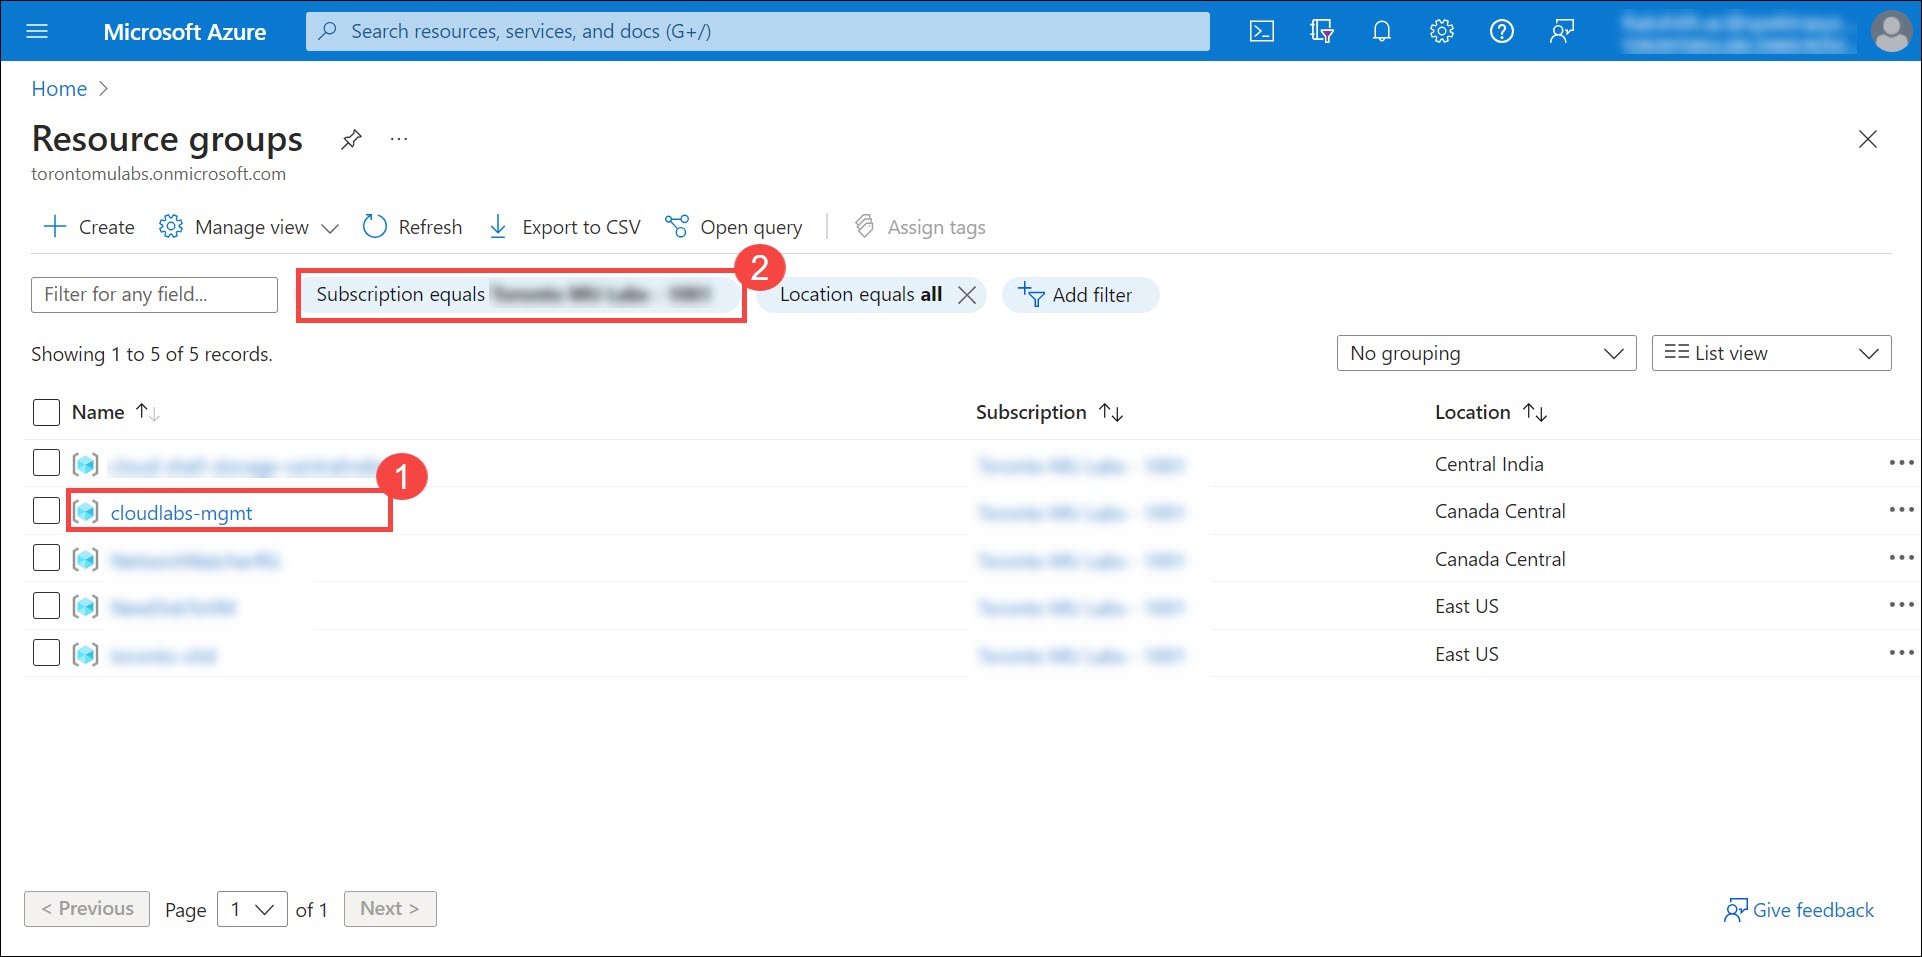
Note: If you are not able to see the cloudlabs-mgmt resoruce group, then you might need to select the respected Subscription from the filter by selecting Subscription equals (2) and clicking on Apply.
Within the resource group, select the image version (2.0.0 (icg/cyber-labvm/2.0.0)) (1) you want to update the replication for.
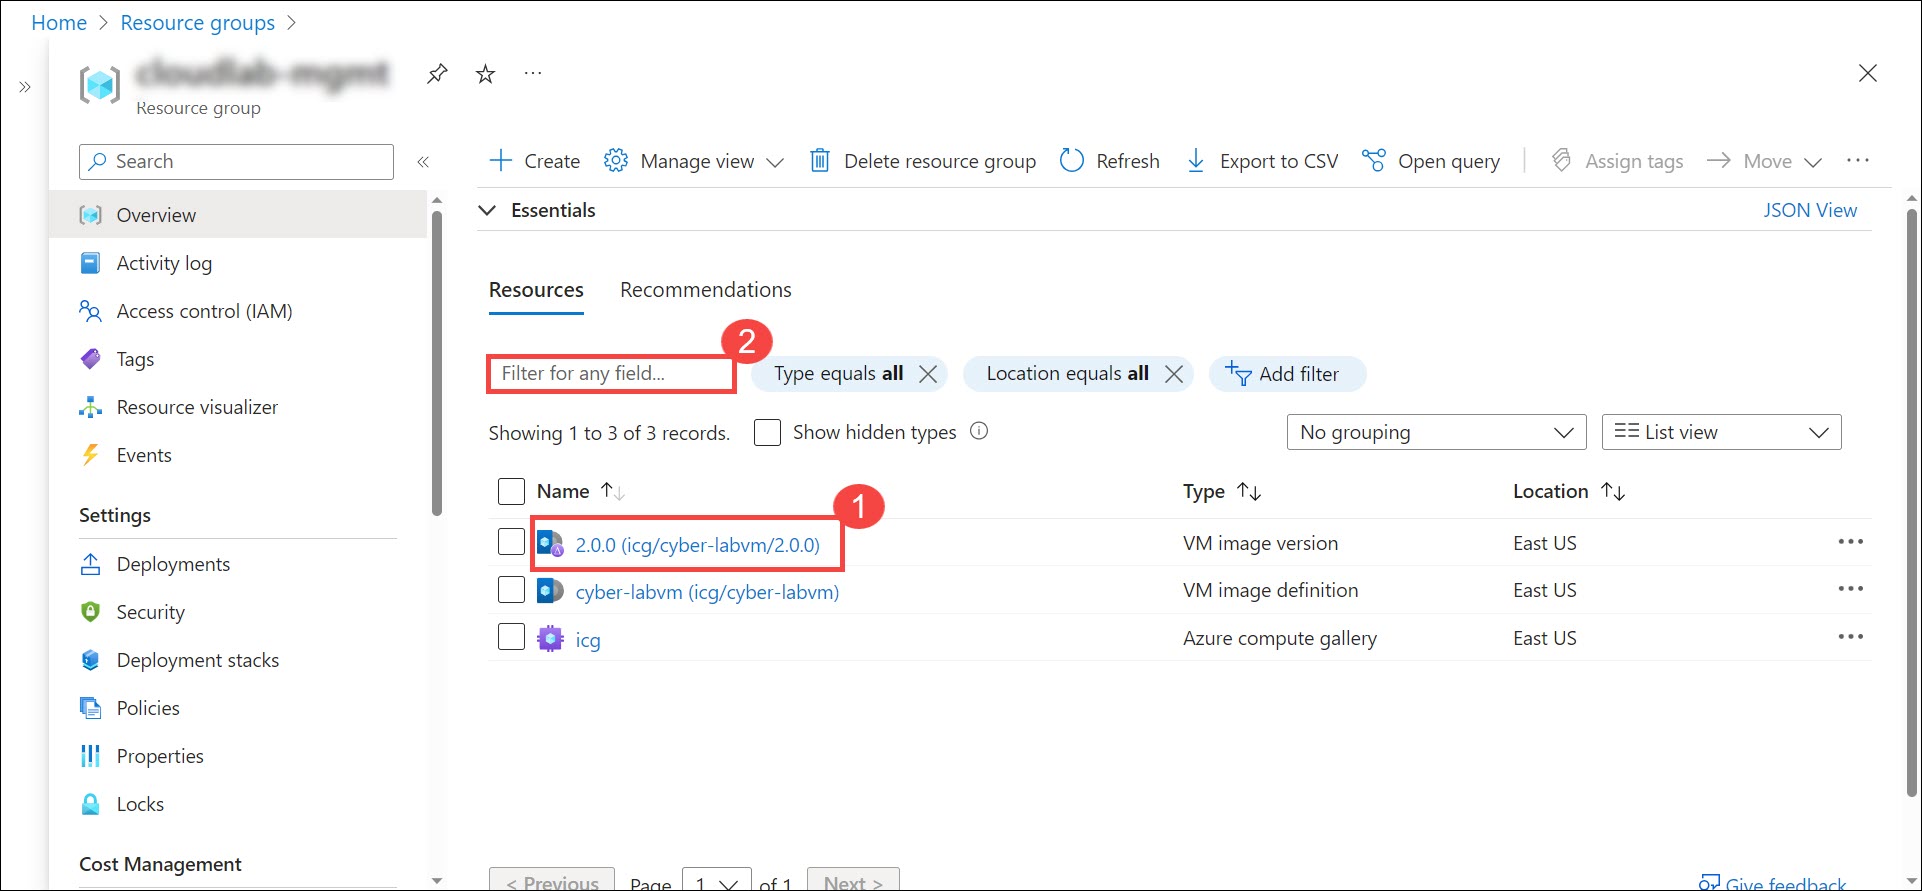
Note: You can use the Search bar (2) to search for the specific image version.
Upon navigating to the VM image version page, select Update replication (1). Following this, click on the dropdown icon (2) located under the Target regions column. From the list of regions provided, select a region in which you intend to replicate the image (3).
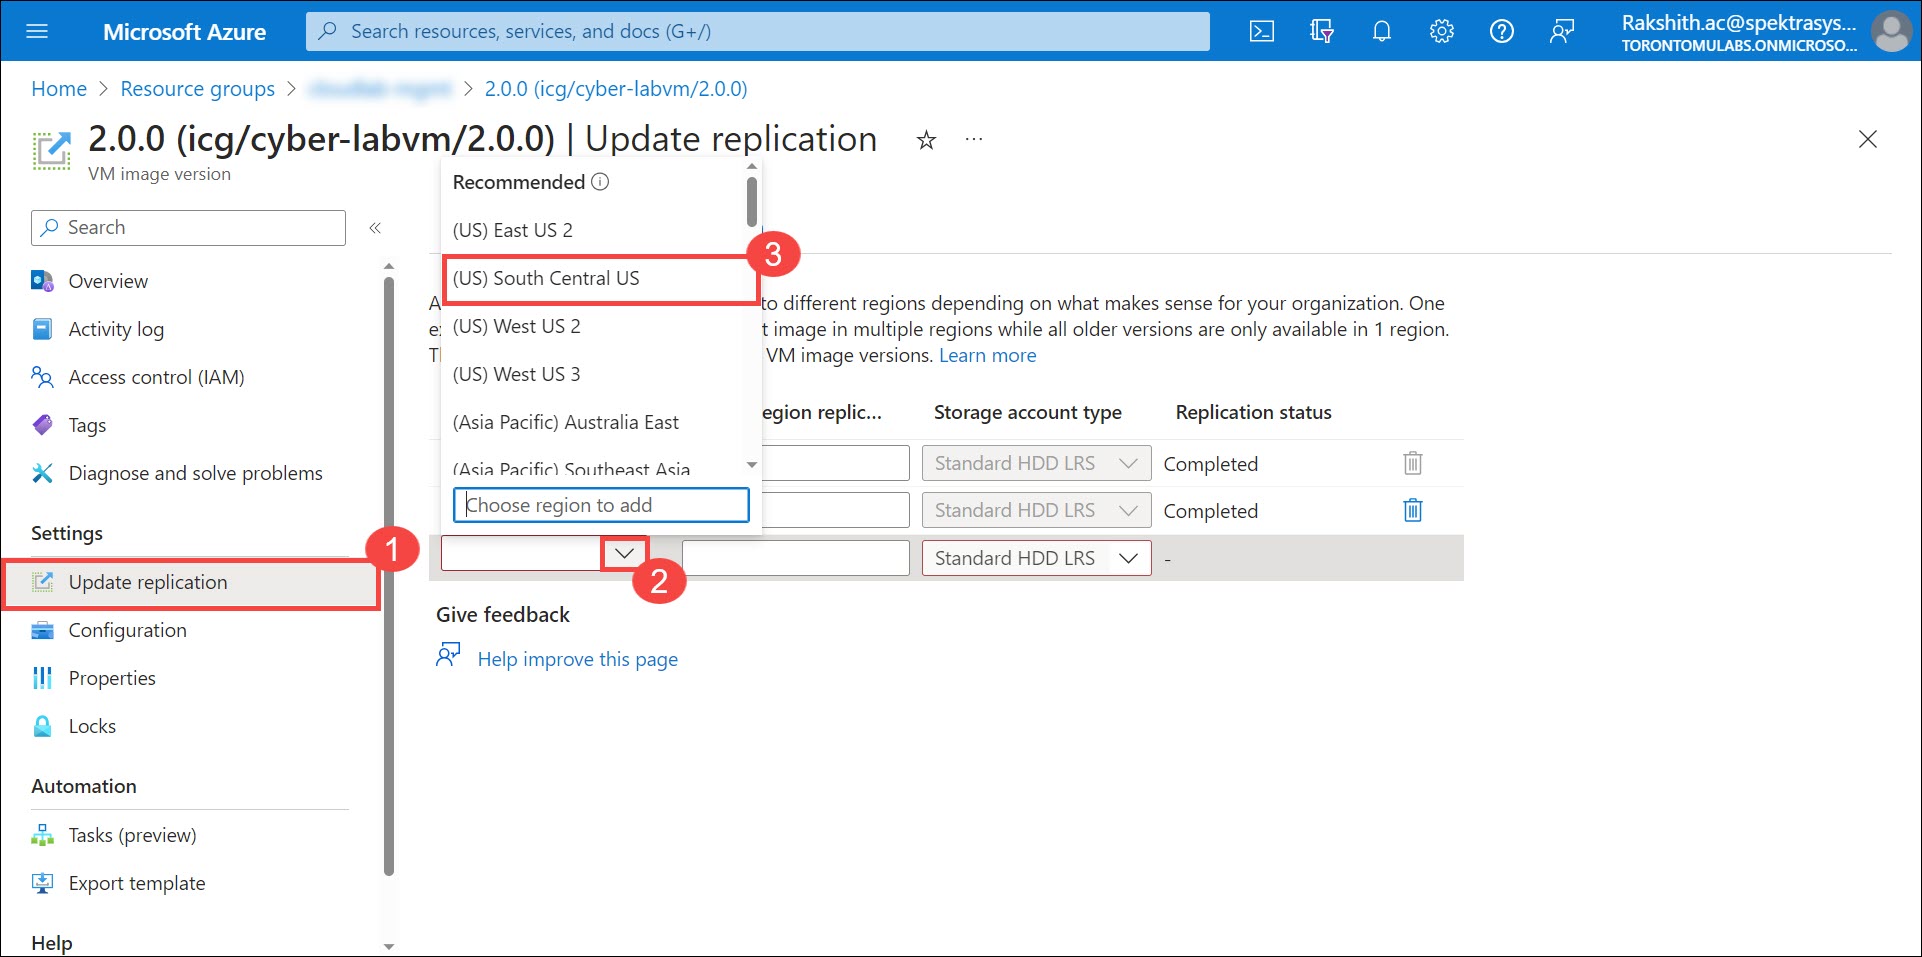
Note: Repeat Step 5 if you want to replicate the image in any additional regions.
Next, click Save to update the replication.
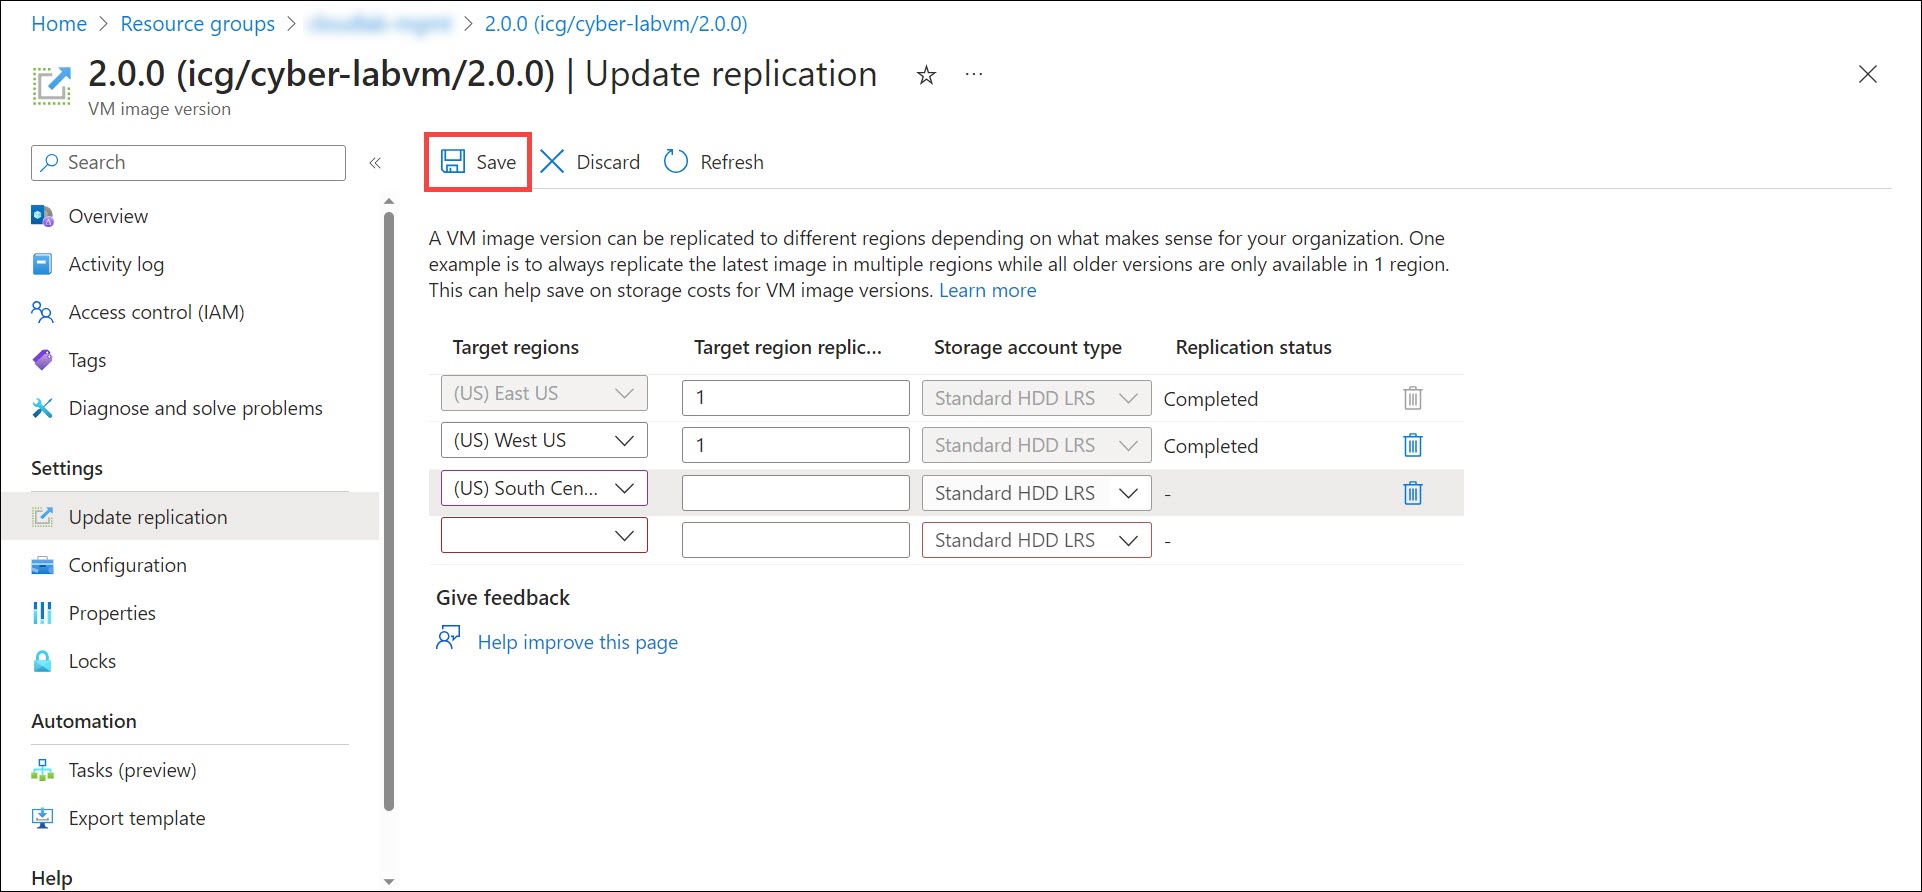
Note: It can take 5 minutes or more for an image to be replicated, depending on the image size and the number of regions replicated.
Once the replication is completed, the entry in the Replication status column will be displayed as Completed (1) for the respective region. You can even delete the replicated image in a region by selecting the Bin (2) icon and then clicking Save.
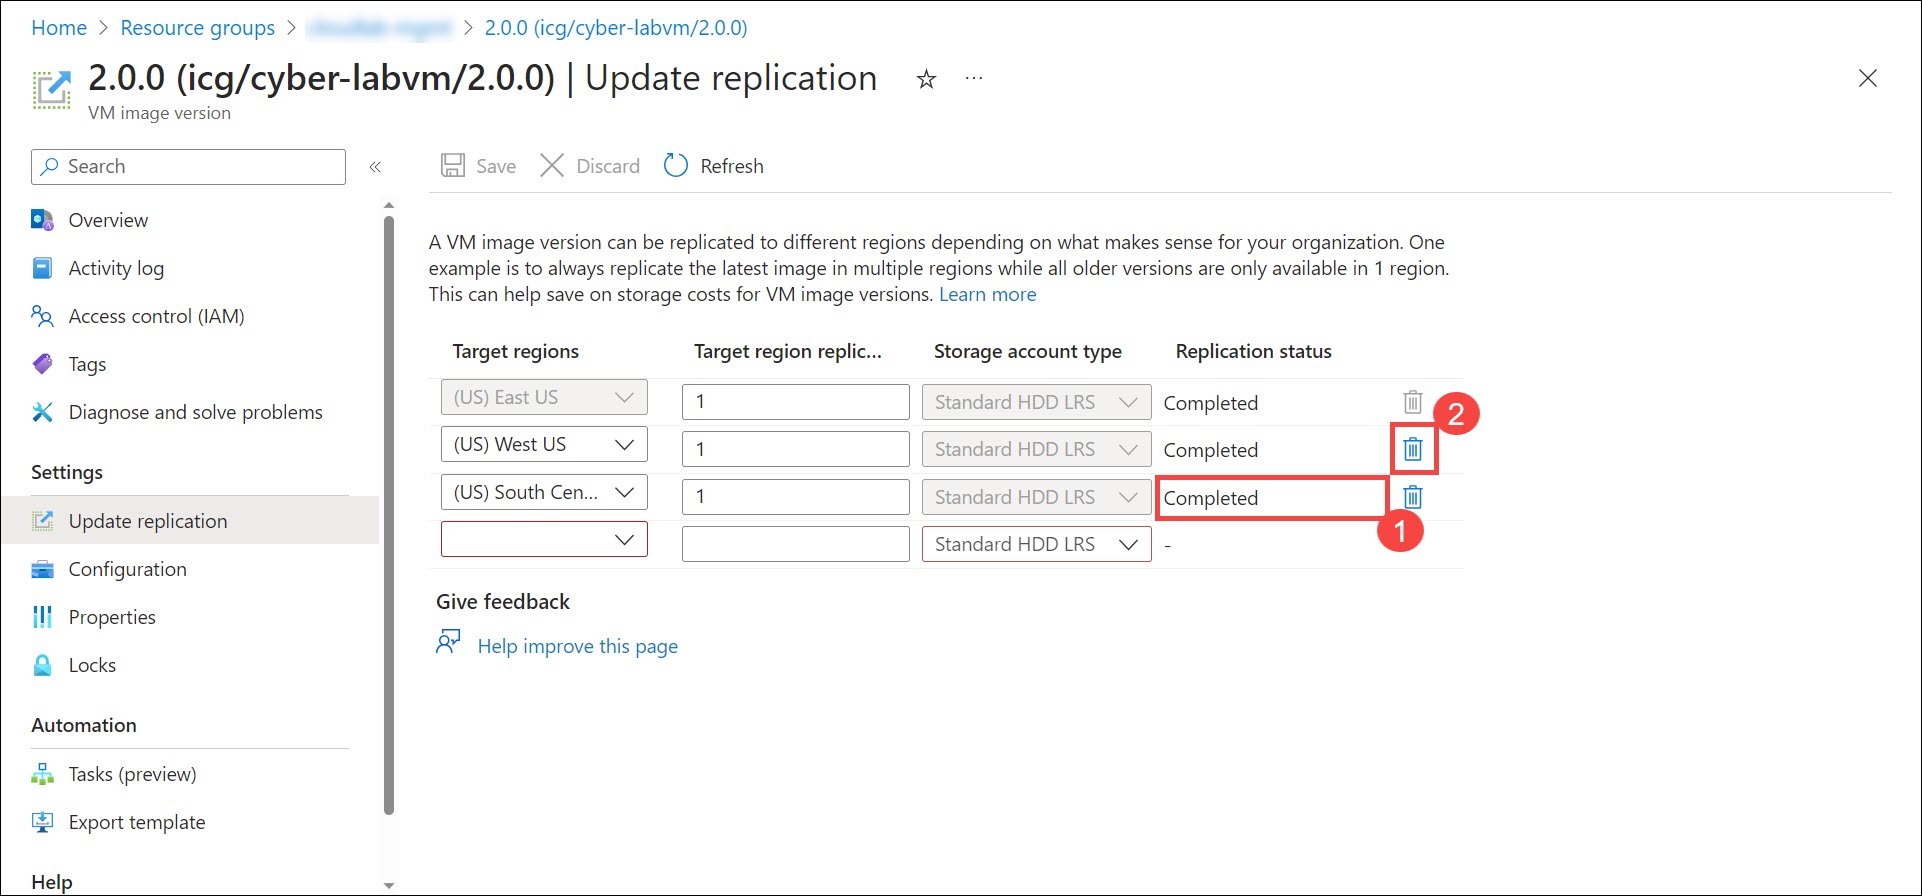
Now, you need to update the regions in the CloudLabs ODL and Template and verify if the image replication was successful in the Azure backend by adding a new user deployment from any existing/new On Demand Lab.
If you require any support, please contact the CloudLabs team.