Overview
This is a supplementary guide to getting started with the CloudLabs AI platform and managing subscriptions. You can add your subscriptions through the CloudLabs AI interface as an admin.
Subscription Overview
CloudLabs supports three different types of Azure subscriptions that can be utilized for the lab:
Shared Subscriptions
Dedicated Subscriptions
Dedicated Tenants
Shared Subscriptions: One subscription can be shared by multiple users. Depending on the lab's needs and access constraints, shared subscriptions can be utilized. Each user will be able to isolate other users' resources at the Resource Group level.
Dedicated Subscriptions: Each user gets a single subscription. We need to use dedicated subscriptions if any lab requires subscription-level access.
Dedicated Tenants: Each user gets a single dedicated tenant. We need to use dedicated tenants if any lab requires tenant-level access or Global admin access.
Pre-requisites to onboard subscriptions to CloudLabs:
Subscription Name [Below are screenshots for retrieving details from the Azure portal]
Subscription ID
Azure Tenant domain name
Azure Tenant ID
Azure Active Directory – Application ID (App registration)
Azure Active Directory – Application Secret (App registration)
Microsoft Entra ID Application should have – “Global Admin role on Tenant level”
Microsoft Entra ID Application should have “Owner” role on each subscription
Enable all required resource providers
Add Tag Replication policy to the subscriptions
These permissions are required for the App to create, delete, and reset passwords for Microsoft Entra ID users, as well as to deploy and delete Azure resources.
.png)
.png)
Instructions to create Microsoft Entra ID App and assign required permissions
Here are the instructions to create a Microsoft Entra ID App and assign the required permissions:
Navigate to Azure Portal and log in with your Azure credentials.
Go to Microsoft Entra ID.
Select App registration(1) under the manage pane and click on + New Registration (2).

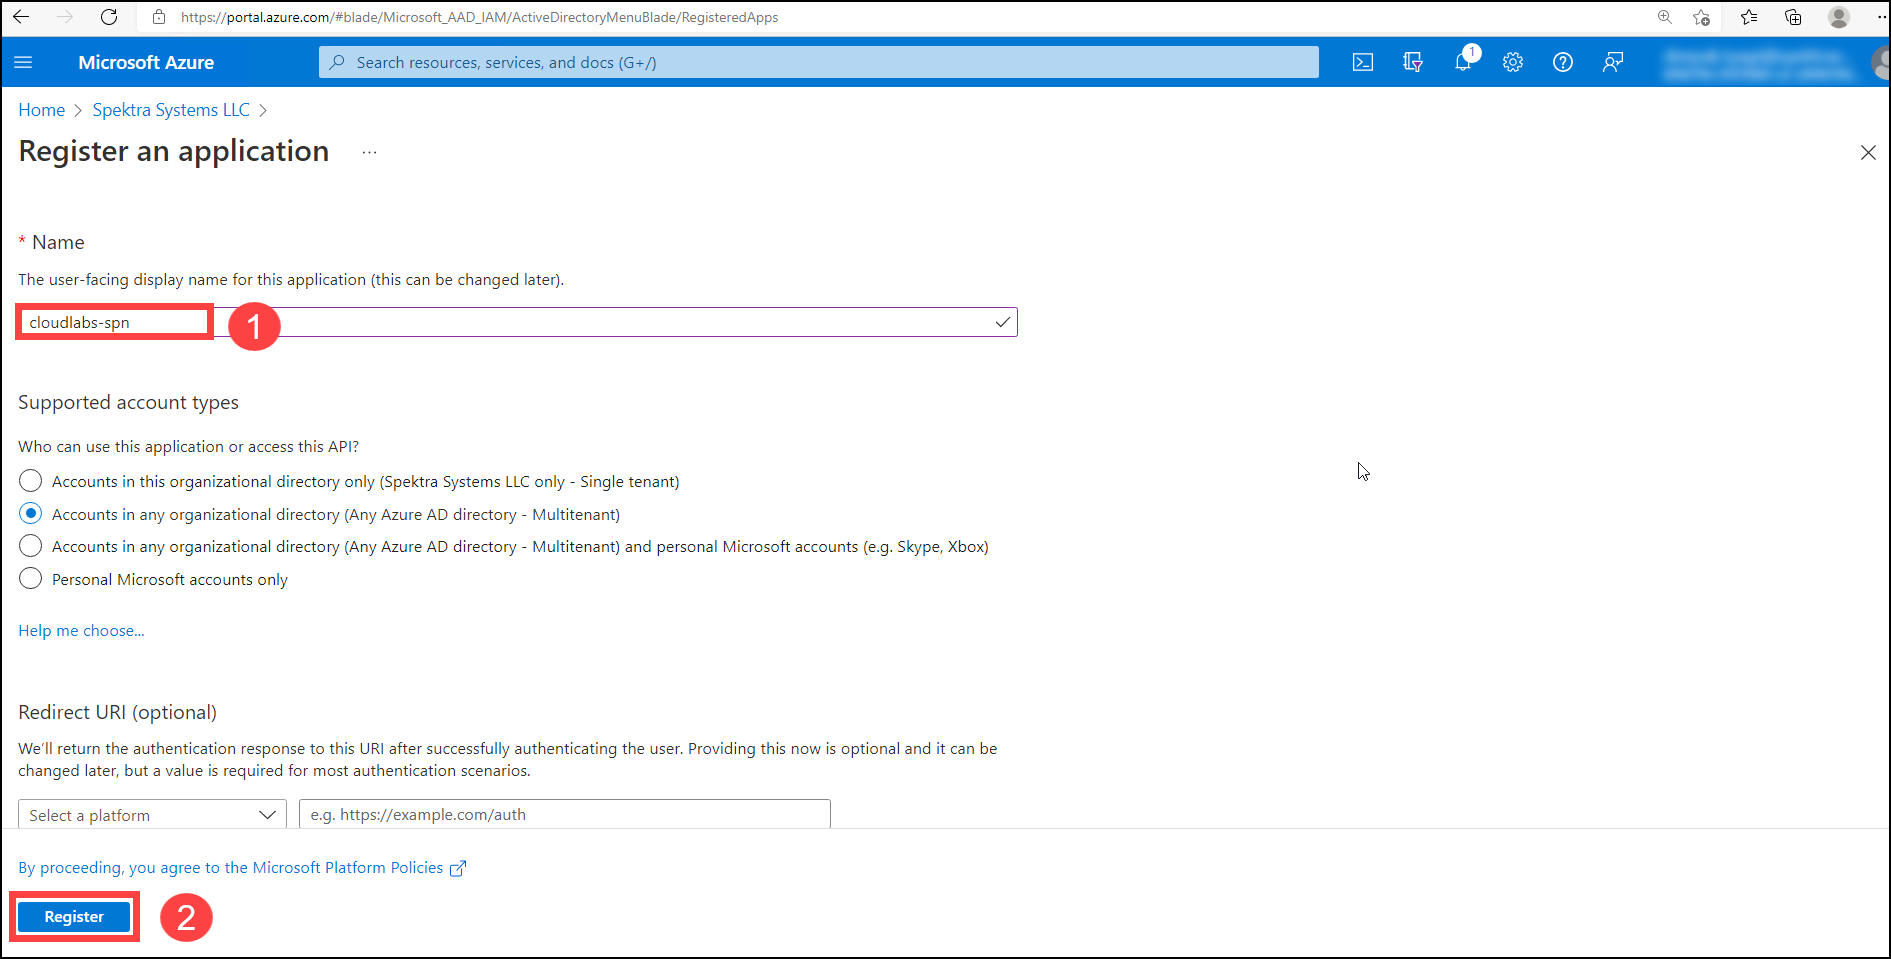
Enter a Name (1) for your App as shown below and click on Register (2).
Once the App is created, you can see the Application ID on the overview page as shown below. Copy and paste the Application ID into a text editor for further use.

Now, go to Certificates & secrets (1) under the Manage pane and click on + New client secret (2).

Enter a description, choose the expiry period according to your requirements, and click on Add.
.png)
Copy and paste the Expiry date, the value and the Secret ID into a text editor for further use (Note: Make sure to you save the secret value as you won't be able to retrieve the key later.)
.png)
Navigate to Microsoft Entra ID and search to assign the Global administrator (2) role to the application you just created.
Click on Roles and administrators (1) under Microsoft Entra ID.
Select Global administrator (3)
.png)
In Assignment, Click on + Add Assignment and select the newly created App Registration in earlier steps.
Click on Add to save.
.png)
The App should also have an Owner role on each subscription that needs to be onboarded. Follow the steps given below to assign the Owner role to your subscription:
i. In the Azure portal go to Subscriptions and open the required subscription
ii. Now click on Access control (IAM) (1)
iii. Click on +Add (2)
.png)
iv. Select Add role assignment (3)
v. Role: Select Privileged administrator roles (4) from the drop-down
vi. Select Owner (5).
vii. Finally, click on *Next (6).
.png)
viii. Select Members (7).
ix. Click on Next (8).
x. Select: Enter your App name (9).
xi. Click on Select (10).
.png)

xii. Click on Allow user to assign all roles (highly privileged) (11).
xiii. Click on Next (12).
xiv. Click on Review +assign (13).


Enable all required resource providers:
Here are the instructions to enable all resource providers:
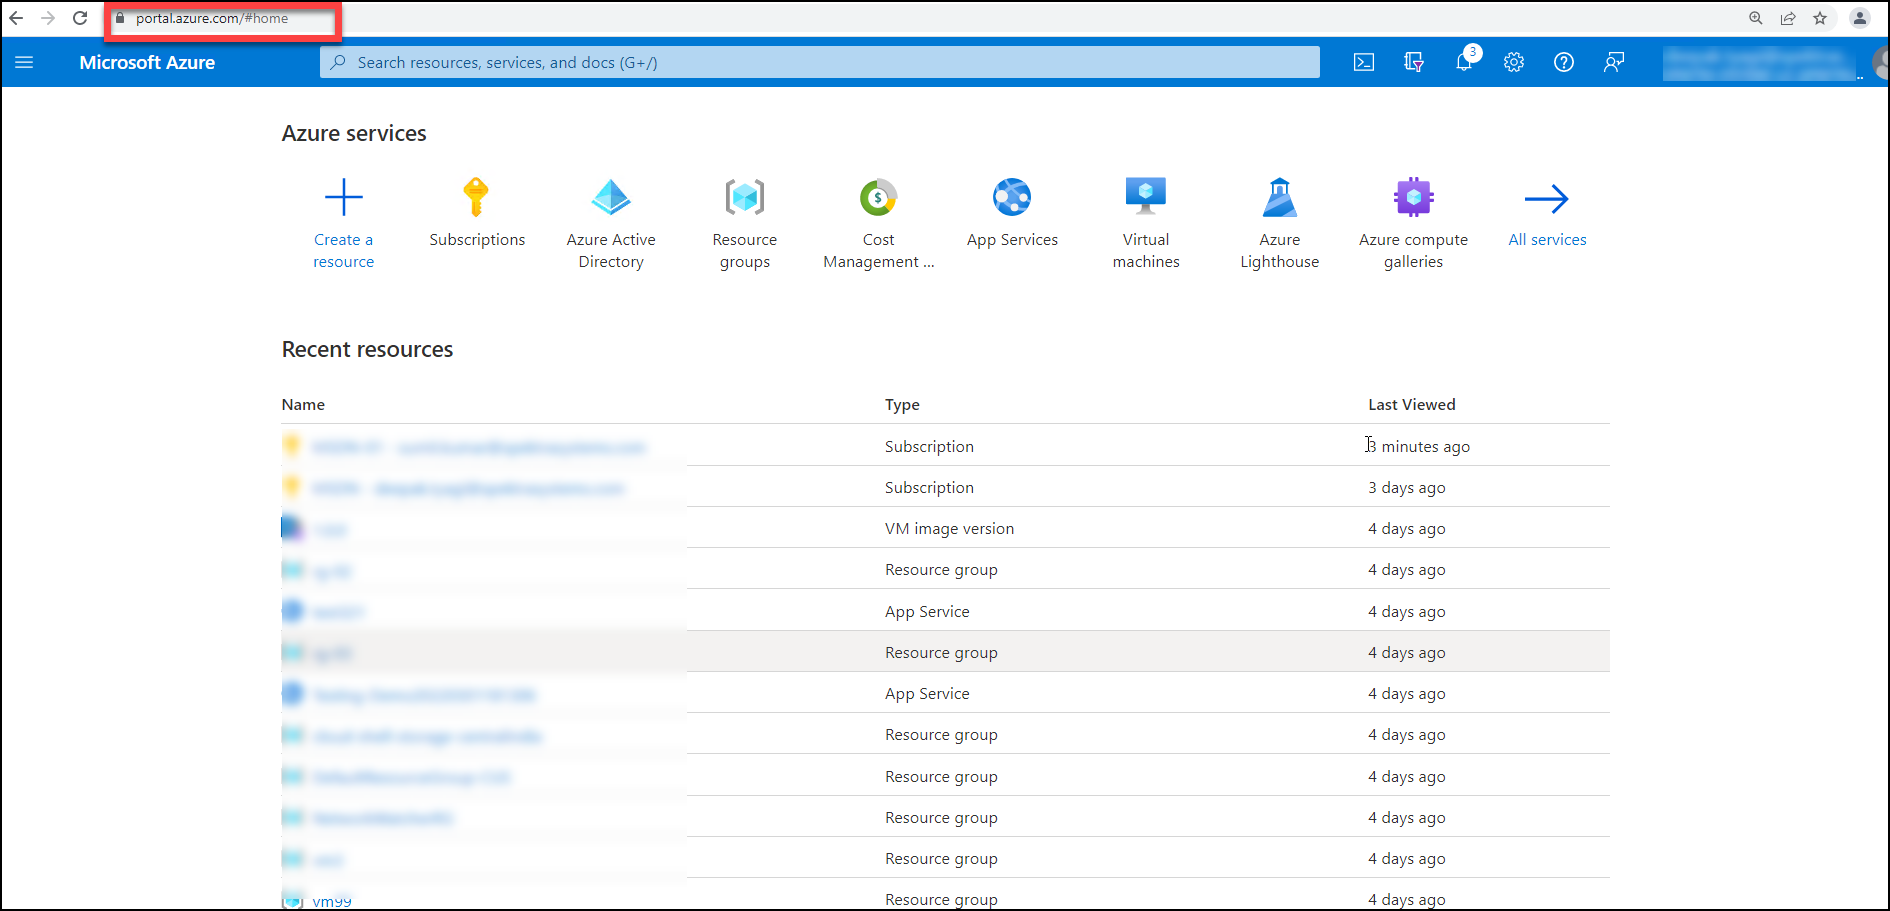
Navigate to Azure Portal and log in with your Azure credentials.
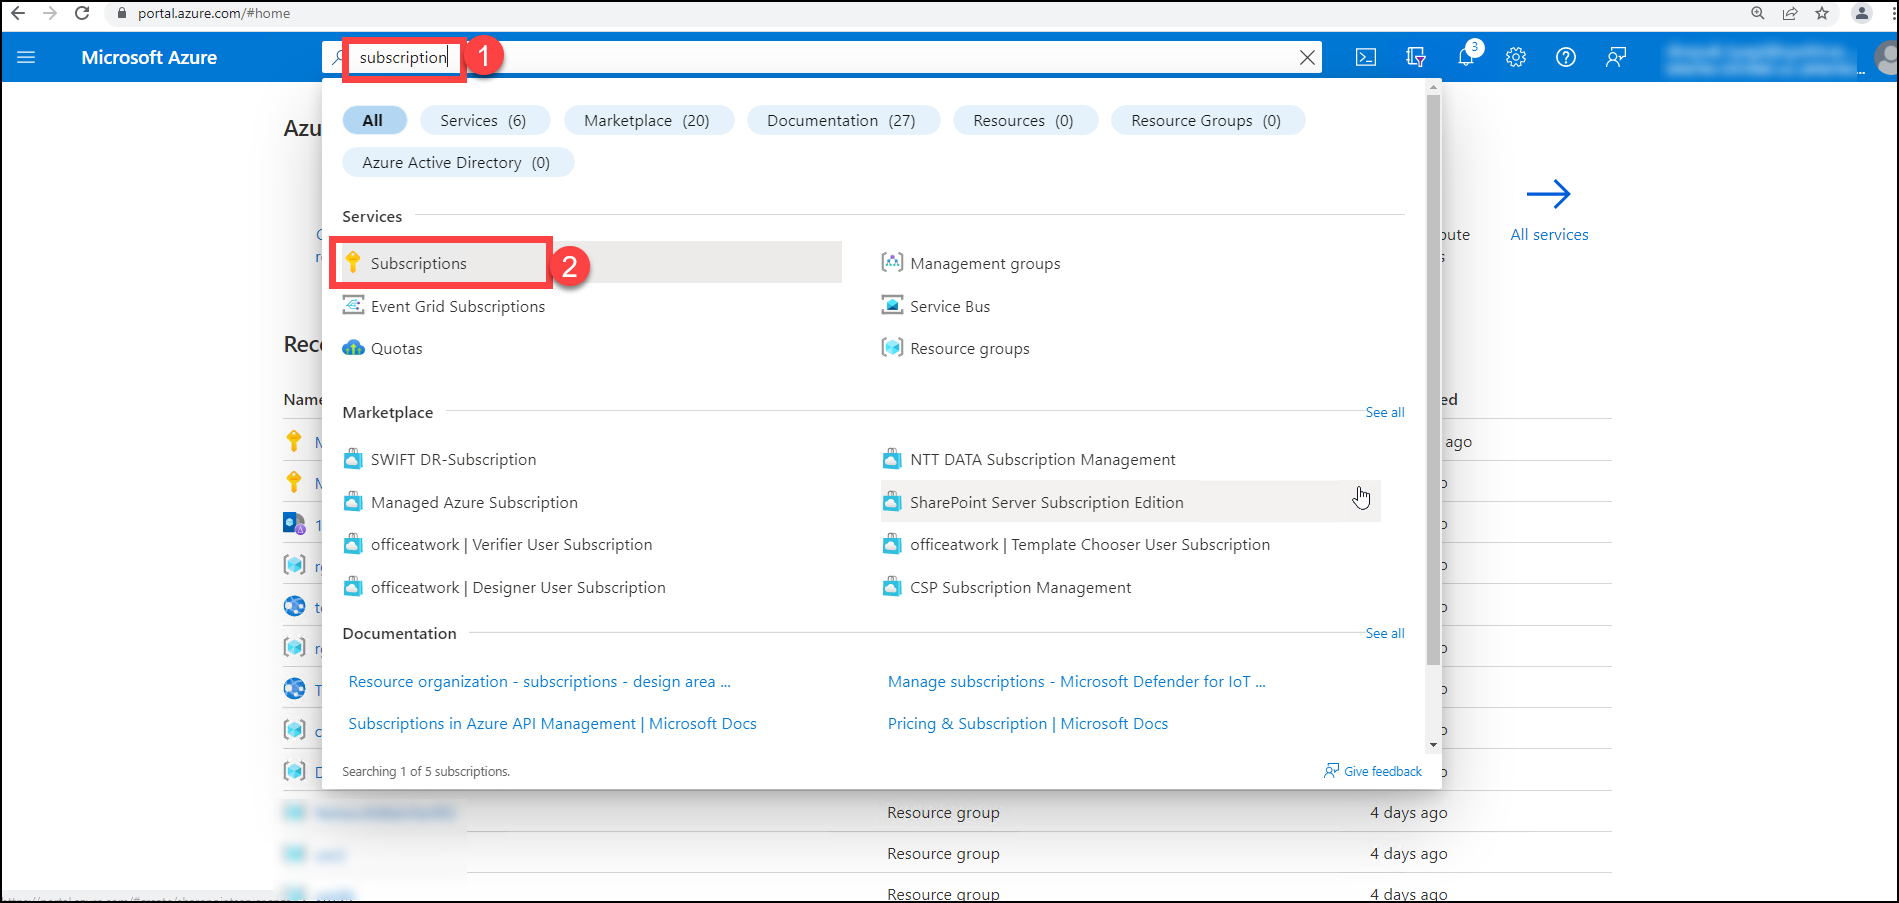
Go to search bar (1) and search for Subscriptions (2) then, click on the Subscriptions from the search result.
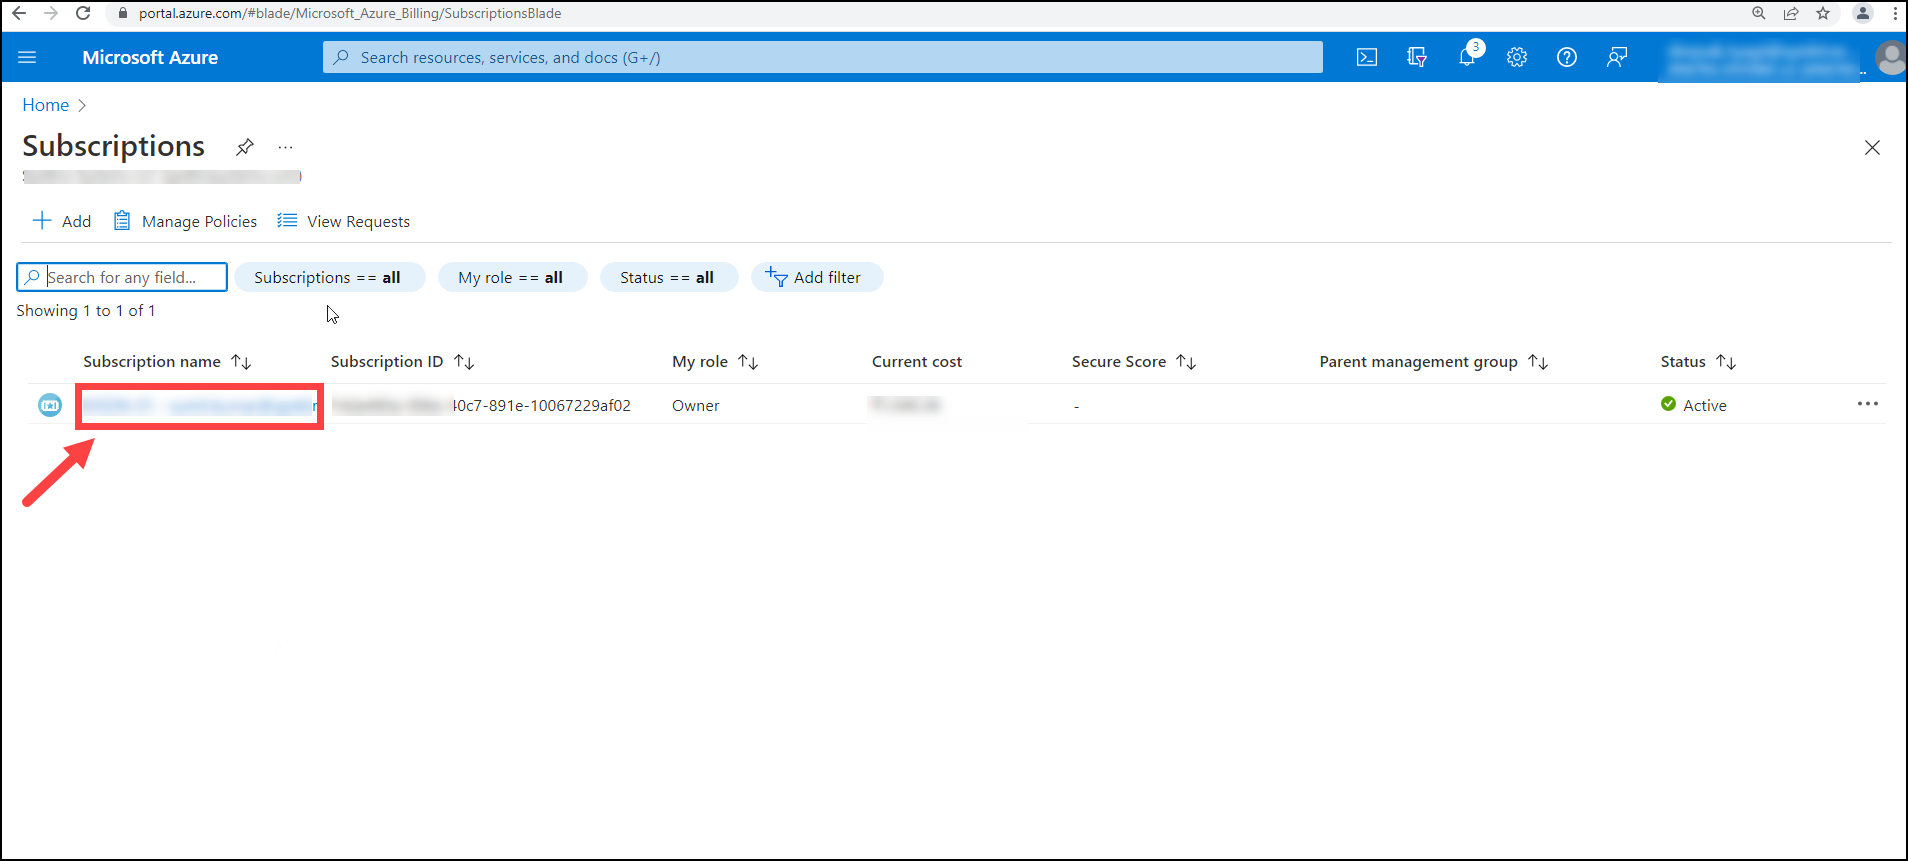
After clicking on the Subscriptions, user must click on the subscription you are onboarding to CloudLabs.
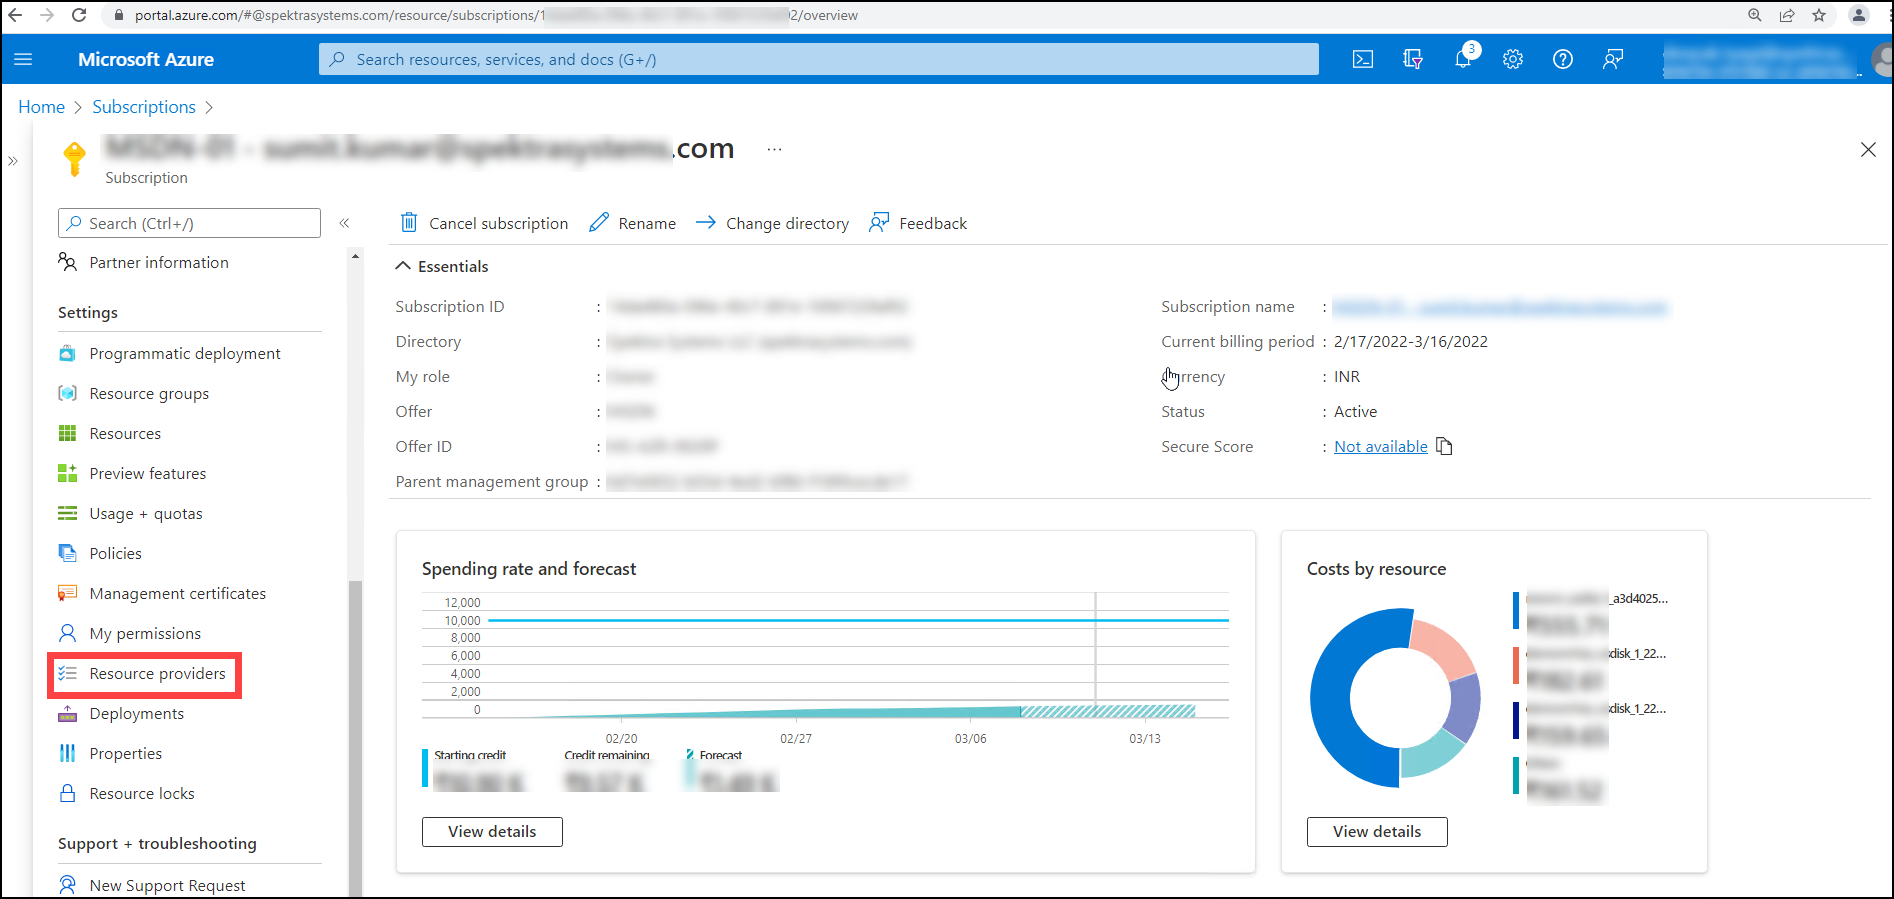
After clicking on Subscriptions, go to the Settings pane in Blade and look for Resource Providers, then click on Resource Providers.
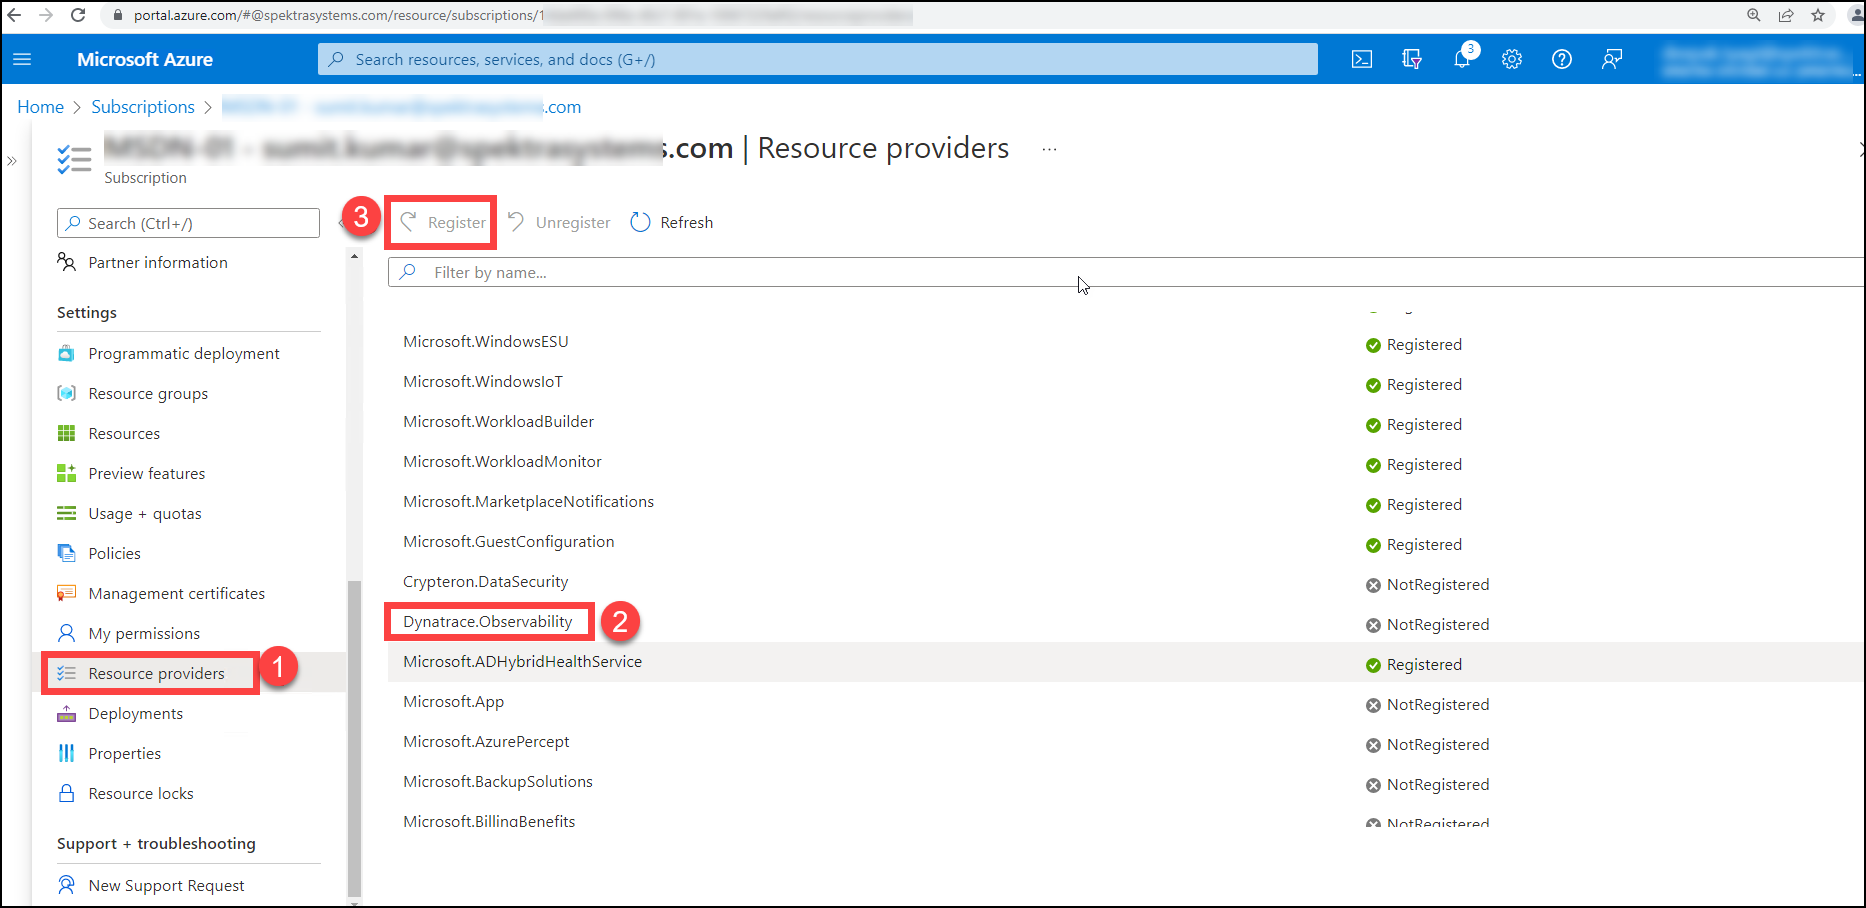
When you select Resource providers (1), you will be sent to a list of all resource providers. You must first select the resource provider (2) for which you wish to register, and then click Register after selecting the resource provider (3). When you click Register, that resource provider will be successfully registered. You have to follow the same steps to register all resource providers. Registering all Resource Providers is mandatory.
Add Tag Replication policy to the subscriptions
Here are the instructions to add Tag Replication policy:
Navigate to Azure Portal and log in with your Azure credentials.

Go to search bar (1) and search for Subscriptions (2) then, click on the Subscriptions from the search result.

After clicking on the Subscriptions, user must click on the subscription you are onboarding to CloudLabs.

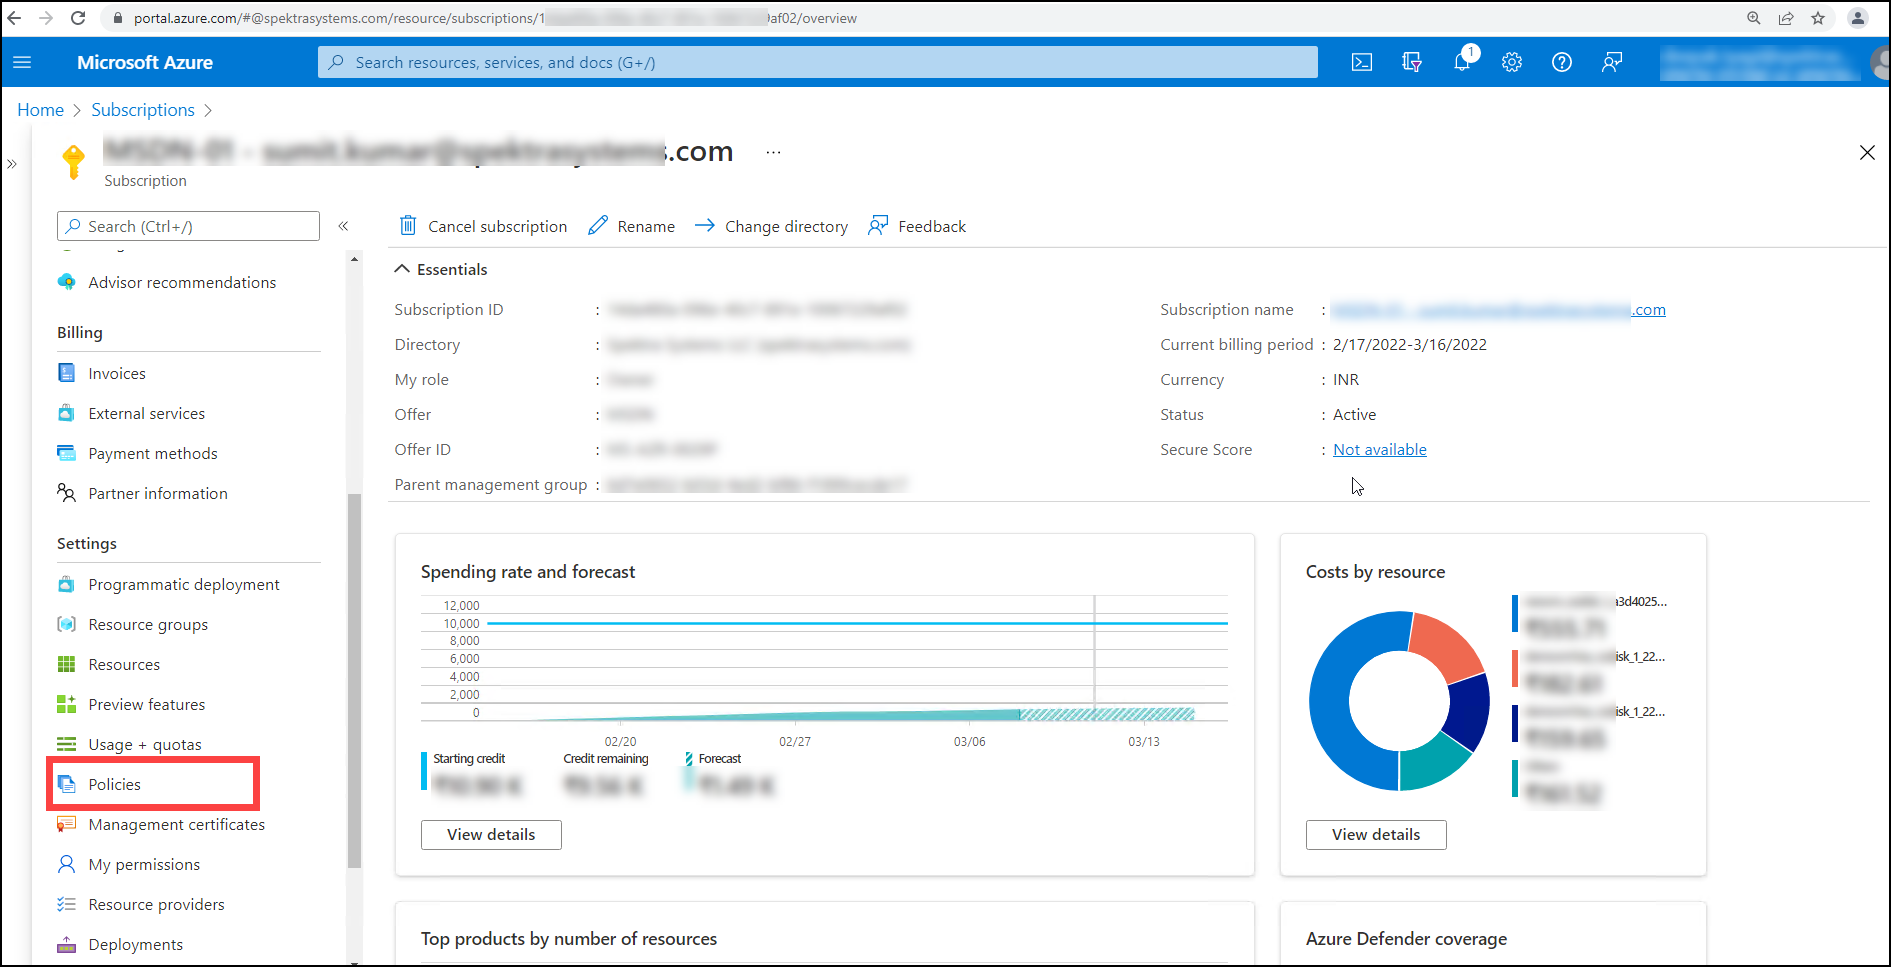
After clicking on Subscriptions, go to Blade's Settings pane on the left side and look for Policies, then click on Policies.
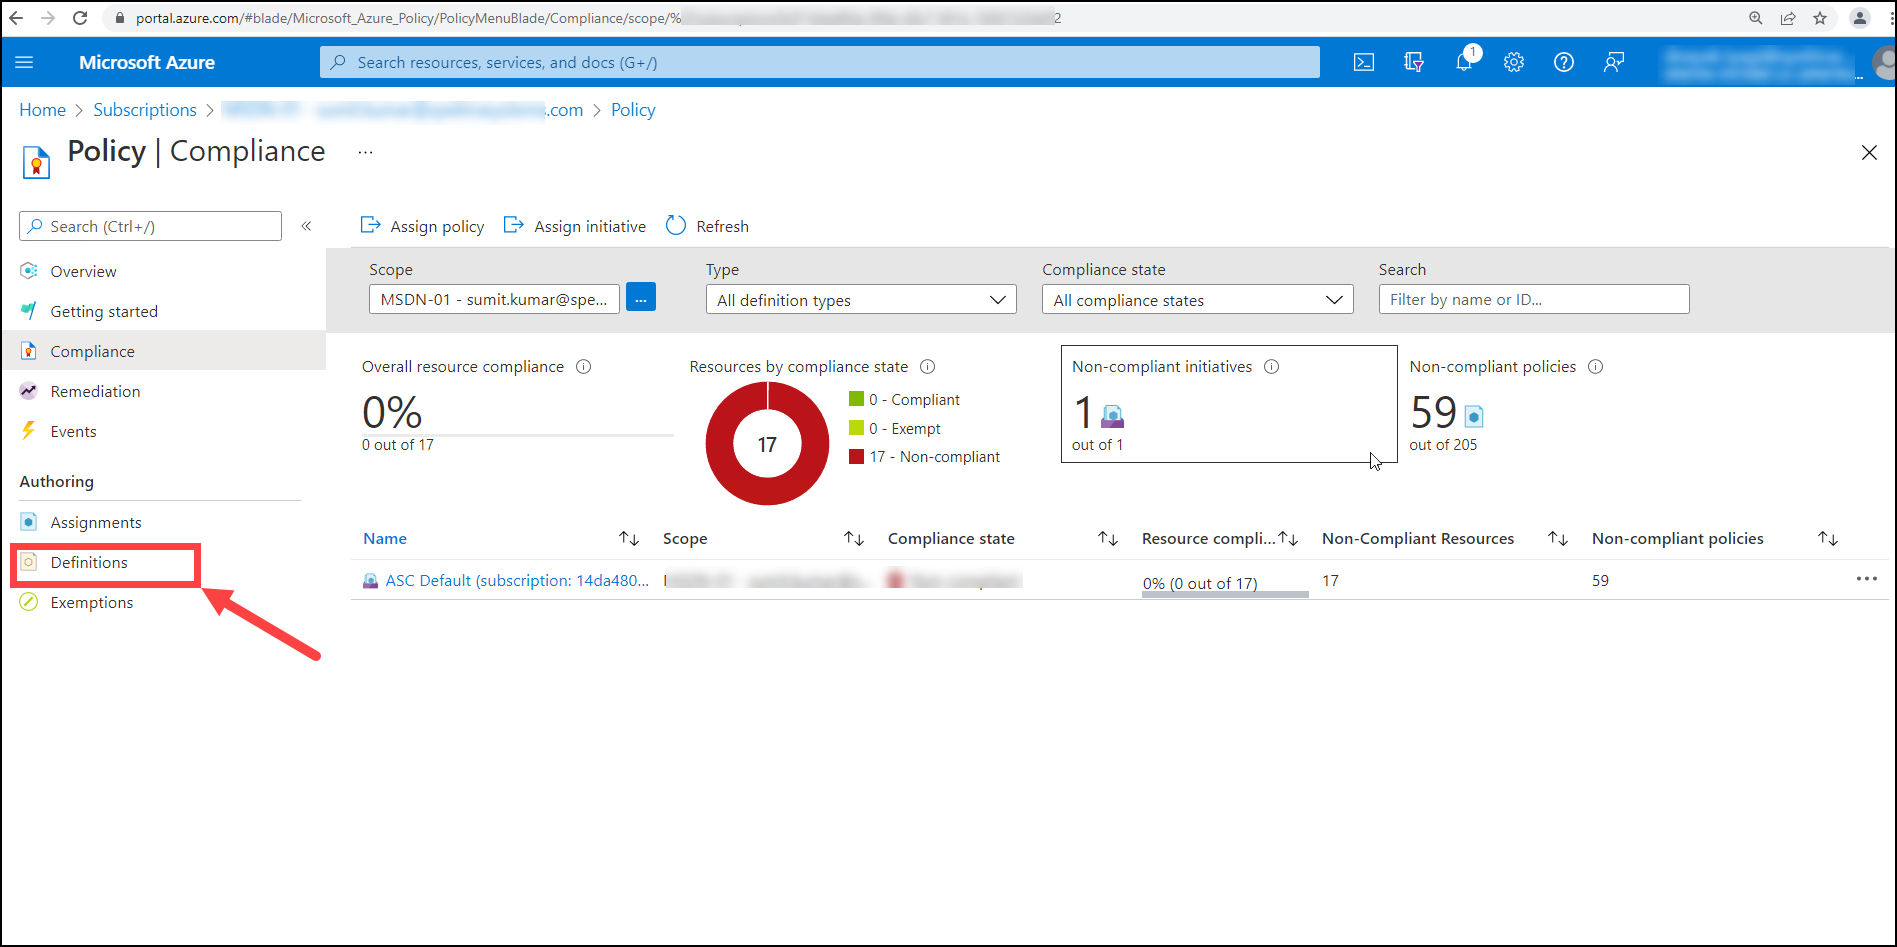
After that, under policy, the user must select Definitions.
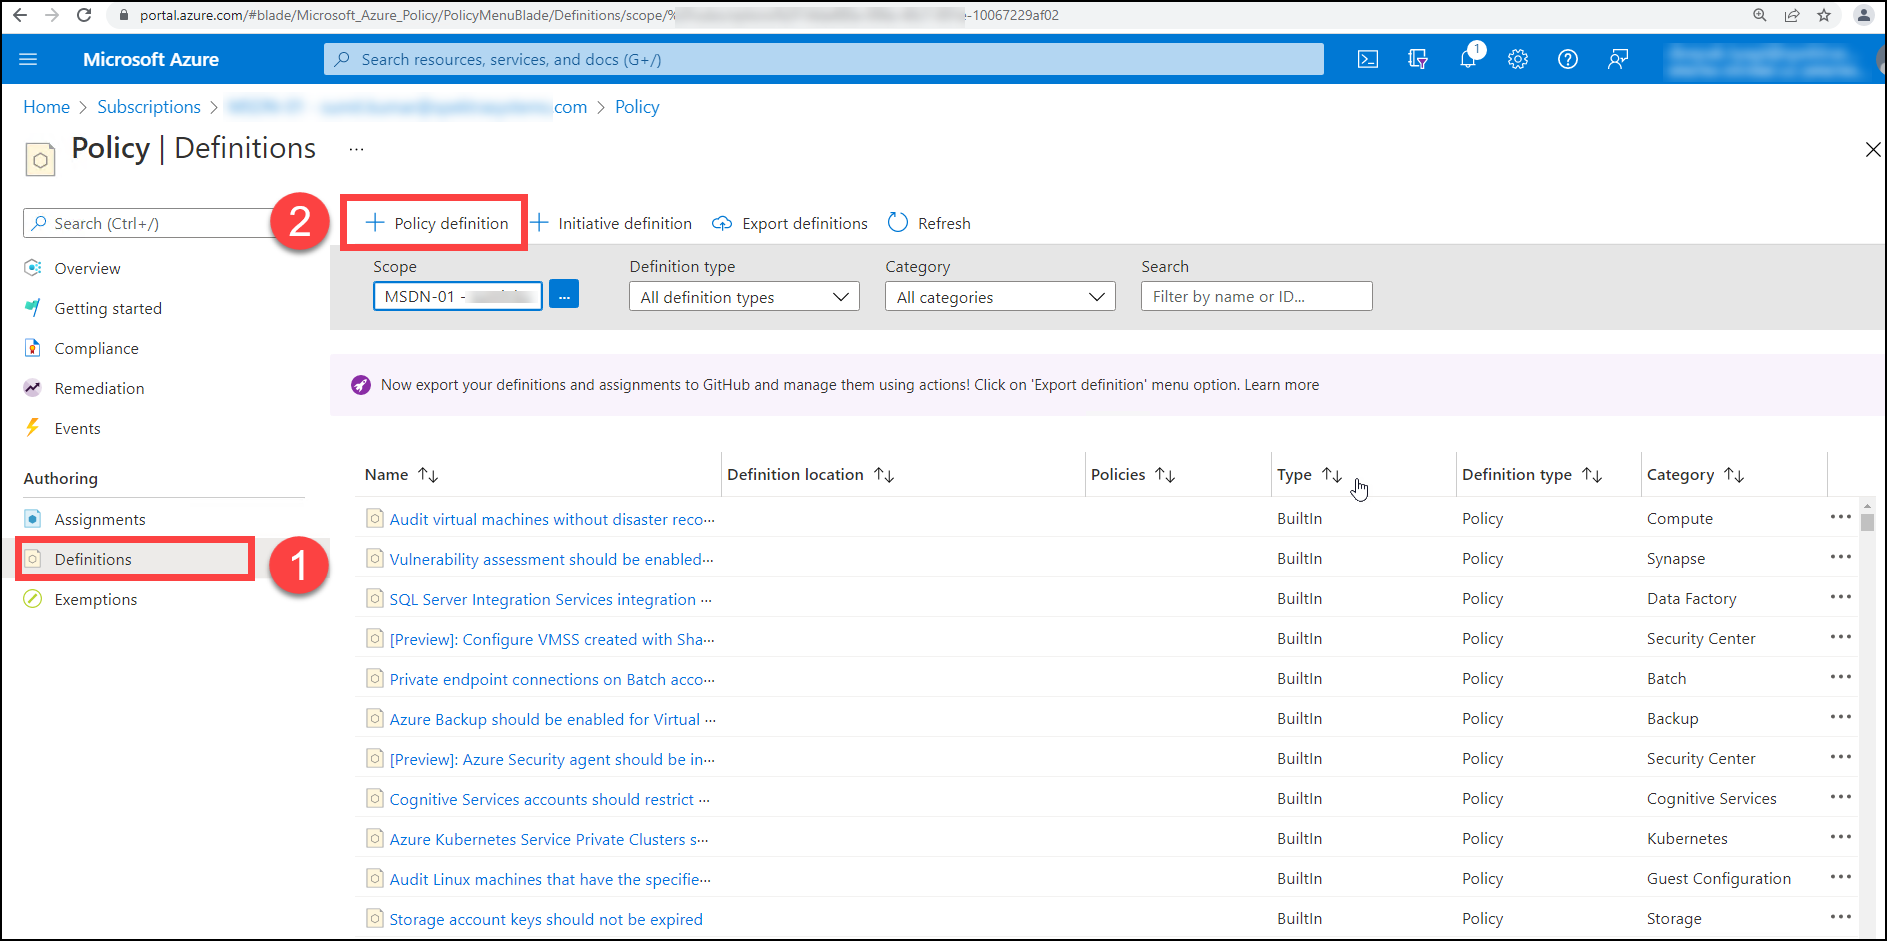
Once you've clicked on Definitions (1), you'll need to click on Add +Policy definition (2) to create the policy definition.
After selecting Add + Policy definition, you'll be sent to the policy definition page, where you must select ... (1) for the definition location. After clicking on the eclipse button (...), you must choose the definition location and then pick it. The Name (2) should be put CloudLabs Tag Replication.
Note: Please provide the exact name you want them to create.
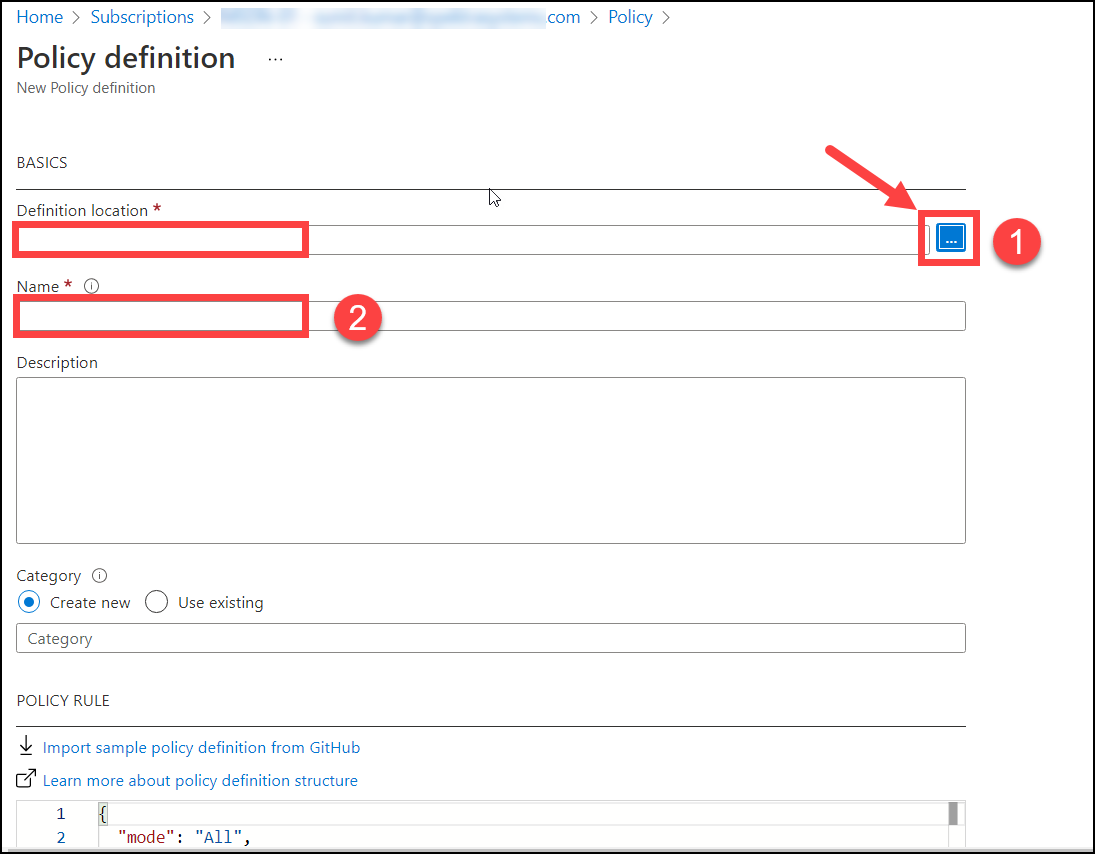
After you've entered the Name (1), you'll need to choose a category(2). You can either choose an existing category or create a new one in the category section.

Note: You can create a category as a name like CloudLabs.

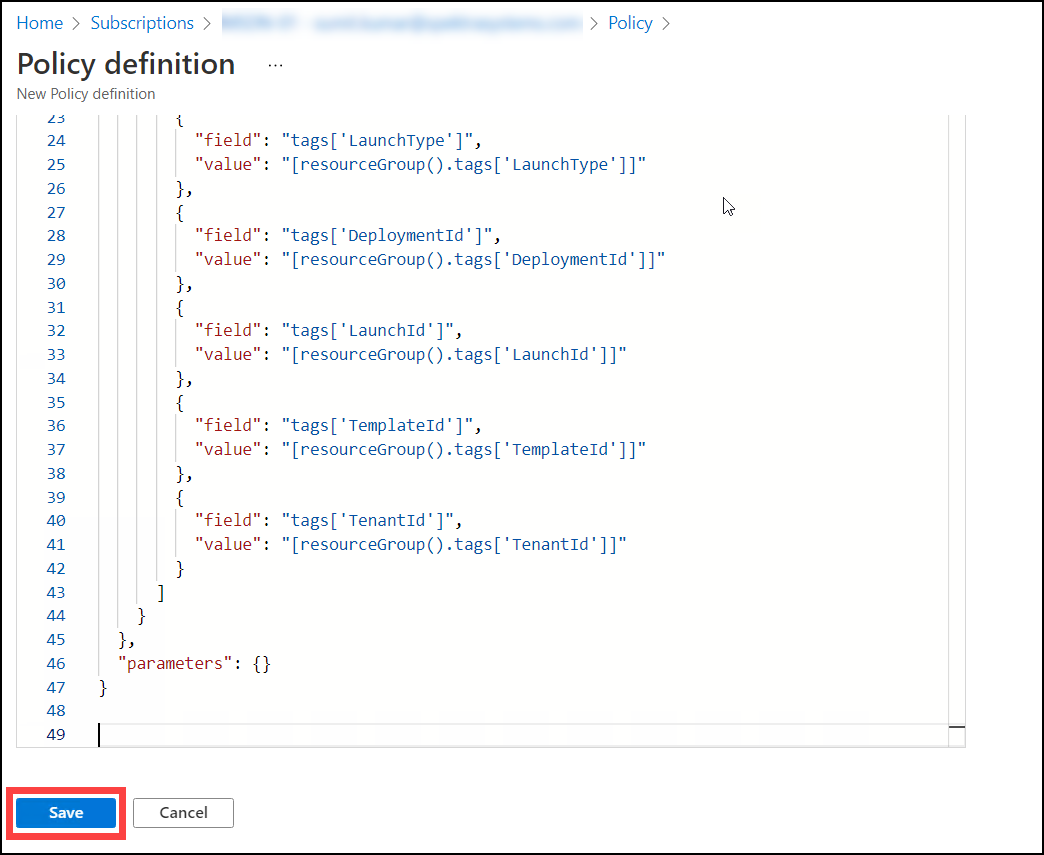
After that, you can download the Policy Rule after clicking here and then copy and paste the Policy rule below. Then, to save the policy definition, click the save button.
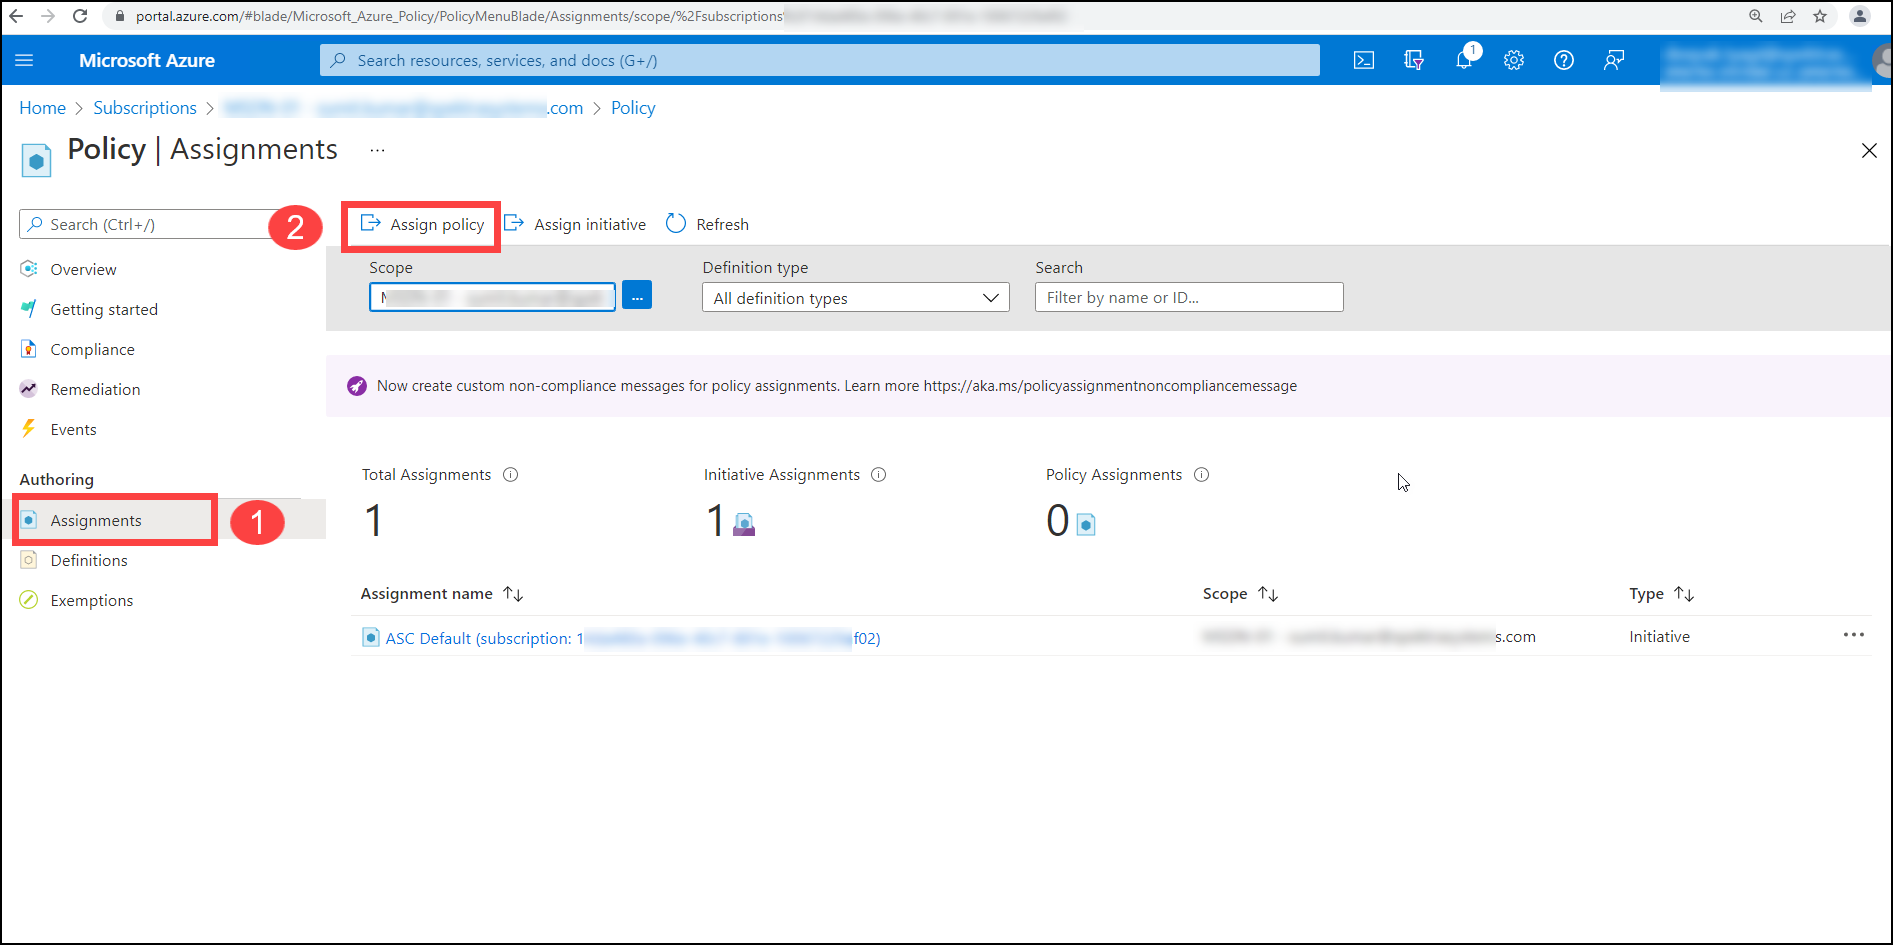
You must assign the policy after it has been created. To assign the policy, go to the Policy tab and select Assignments(1). After that, you must go to ->Assign Policy (2).
To assign the policy again, first, choose the policy's scope, then the policy definition (1), and finally the assignment name.
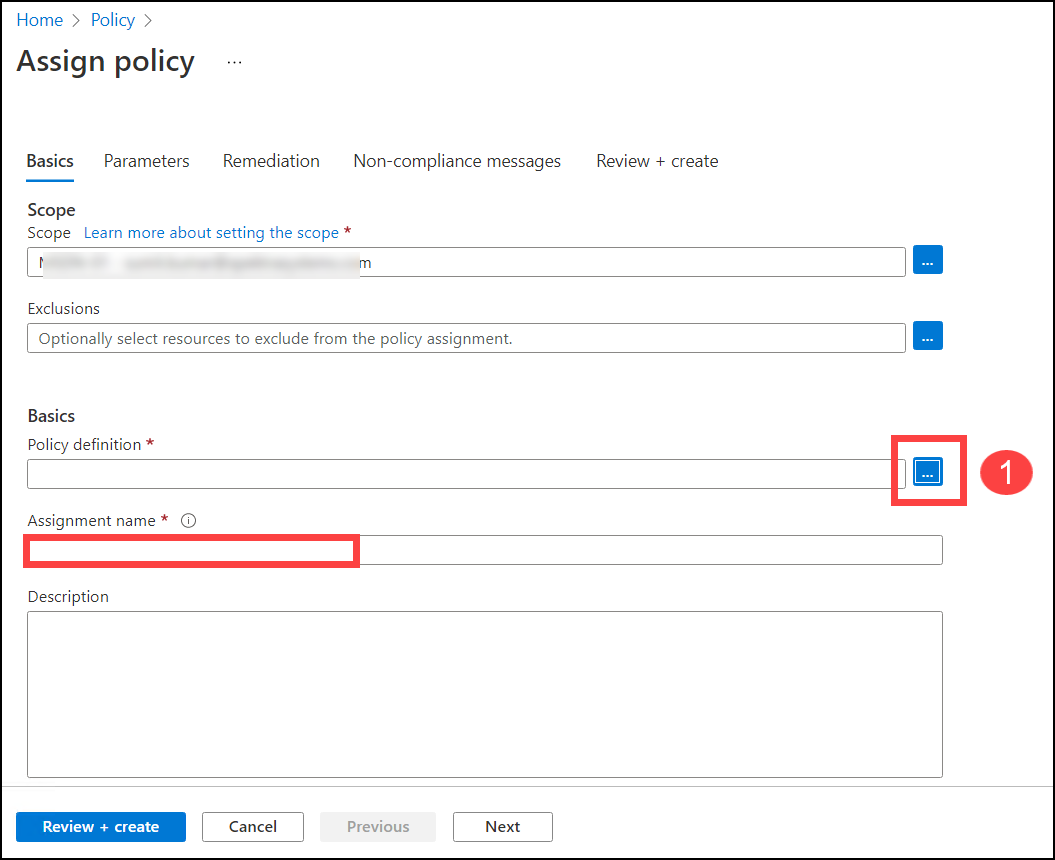
When looking for a policy definition, you must first click on the 3 dots [...] button, then search for tags (2) under category filter (1) and apply (3) then under search box (4) write down CloudLabs, click on the searched definition, and then click on Add button.

After clicking on the select button of the policy definition you will navigate to Review + create button.
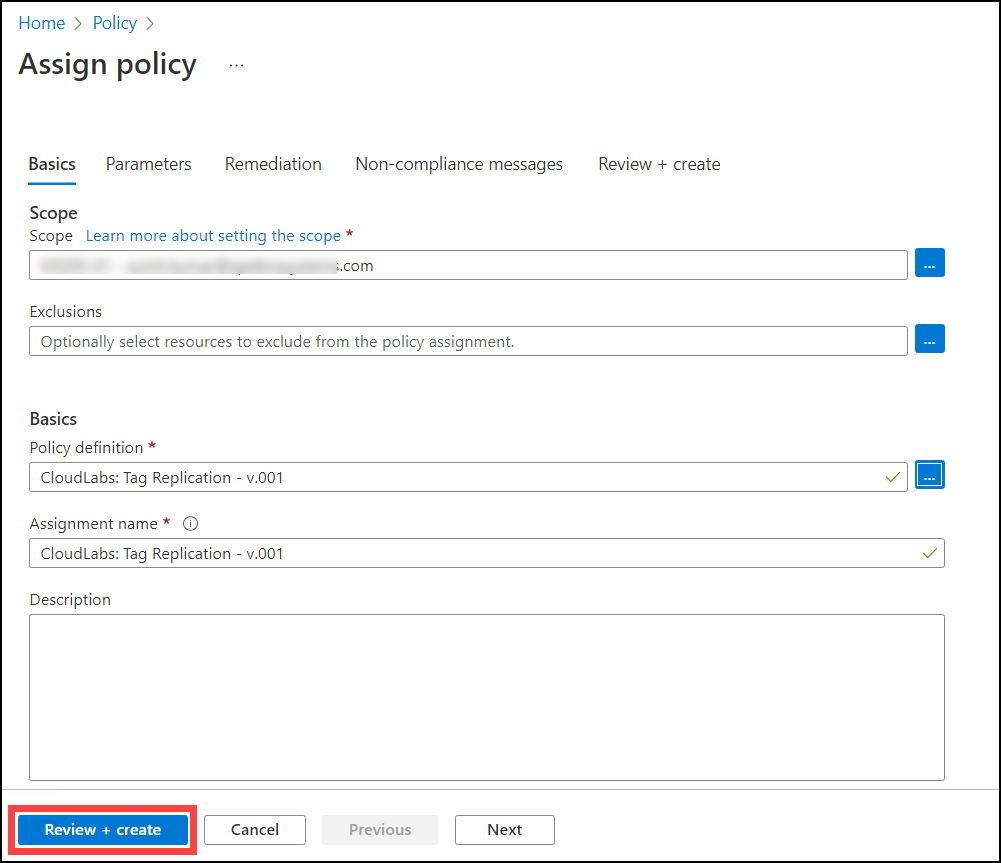
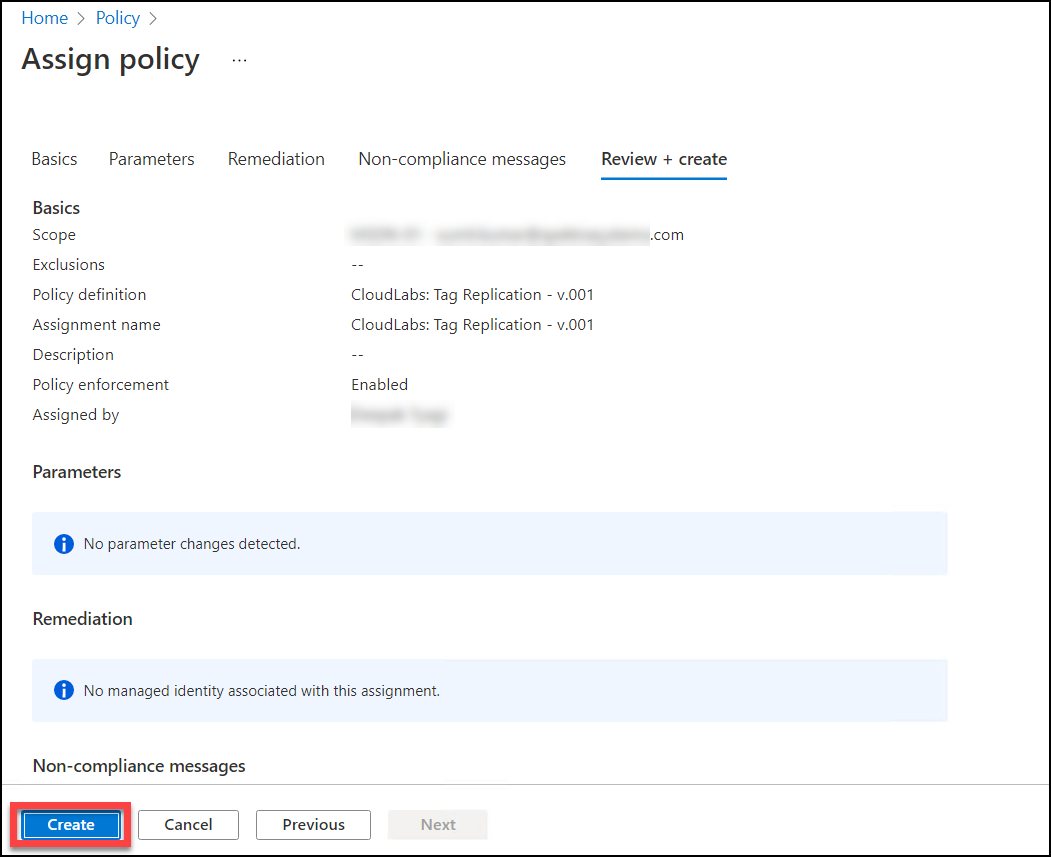
Now you must click the Create button. Your newly created policy has now been successfully assigned.
How to set up the subscriptions group and subscriptions
Once all of the permissions have been added to the Application, go to the CloudLabs AI interface and set up the subscriptions group and subscriptions as shown below:
i. Select the Subscriptions tab from the right-hand menu and then click on the + ADD button
.png)
ii. Next, create a subscription group by filling in the details as shown in the screenshot below:
Group Name: You can give any Group Name when you are going to add a subscription.
Description: If you want to give any description for that particular field you can.
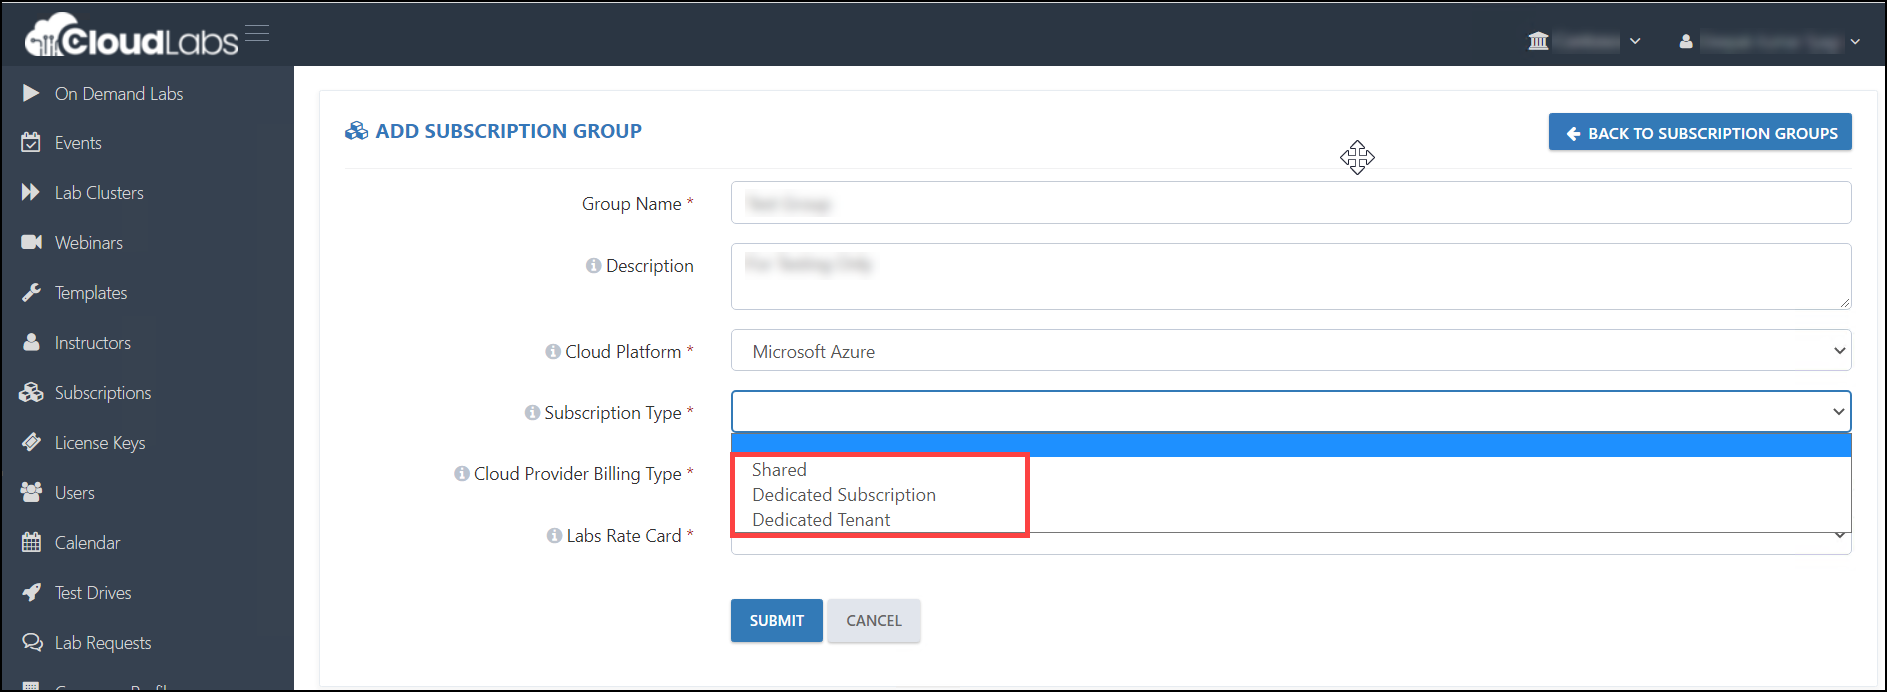
Subscription Type: Here you have three different types of subscriptions-
a) Shared Subscription
b) Dedicated Subscription
c) Dedicated Tenant
From all above the subscriptions, you have to select as per your requirements.
Cloud Provider Billing Type: From here you can choose your billing type. There are eight different types of billing types. You can choose accordingly.

a) Pay-As-You-Go: If it's your subscription, please proceed with selecting this option. b) BizSpark: If the Microsoft Offer ID is MS-AZR-0064P, then proceed with this option. [Screenshot below to find Offer ID on the subscription page] c) Microsoft Azure Sponsorship Offer 2: if the Microsoft Offer ID is MS-AZR-0143P, then proceed with this option. d) Azure Sponsorship: if the Microsoft Offer ID is MS-AZR-0036P, then proceed with this option.

e) AWS: If Amazon Accounts are to be onboarded, please select this option. f) GCP: If Google Cloud Accounts are to be onboarded, please select this option. g) OCI: If Oracle Cloud Accounts are to be onboarded, please select this option. h) Azure Plan [CSP]: If the Spektra team is onboarding Azure subscriptions, we will select this option.
Lab Rate card: Here, you have to select a rate card as per the requirements.

Note: If you are selecting Cloud Provider Billing Type from the drop-down list as an Pay-As-You-Go/Azure Sponsorship then Lab Rate card will be selected from the drop-down list as Cloud Passthrough.
Submit: After filling in all the required fields, you have to click on the Submit button.
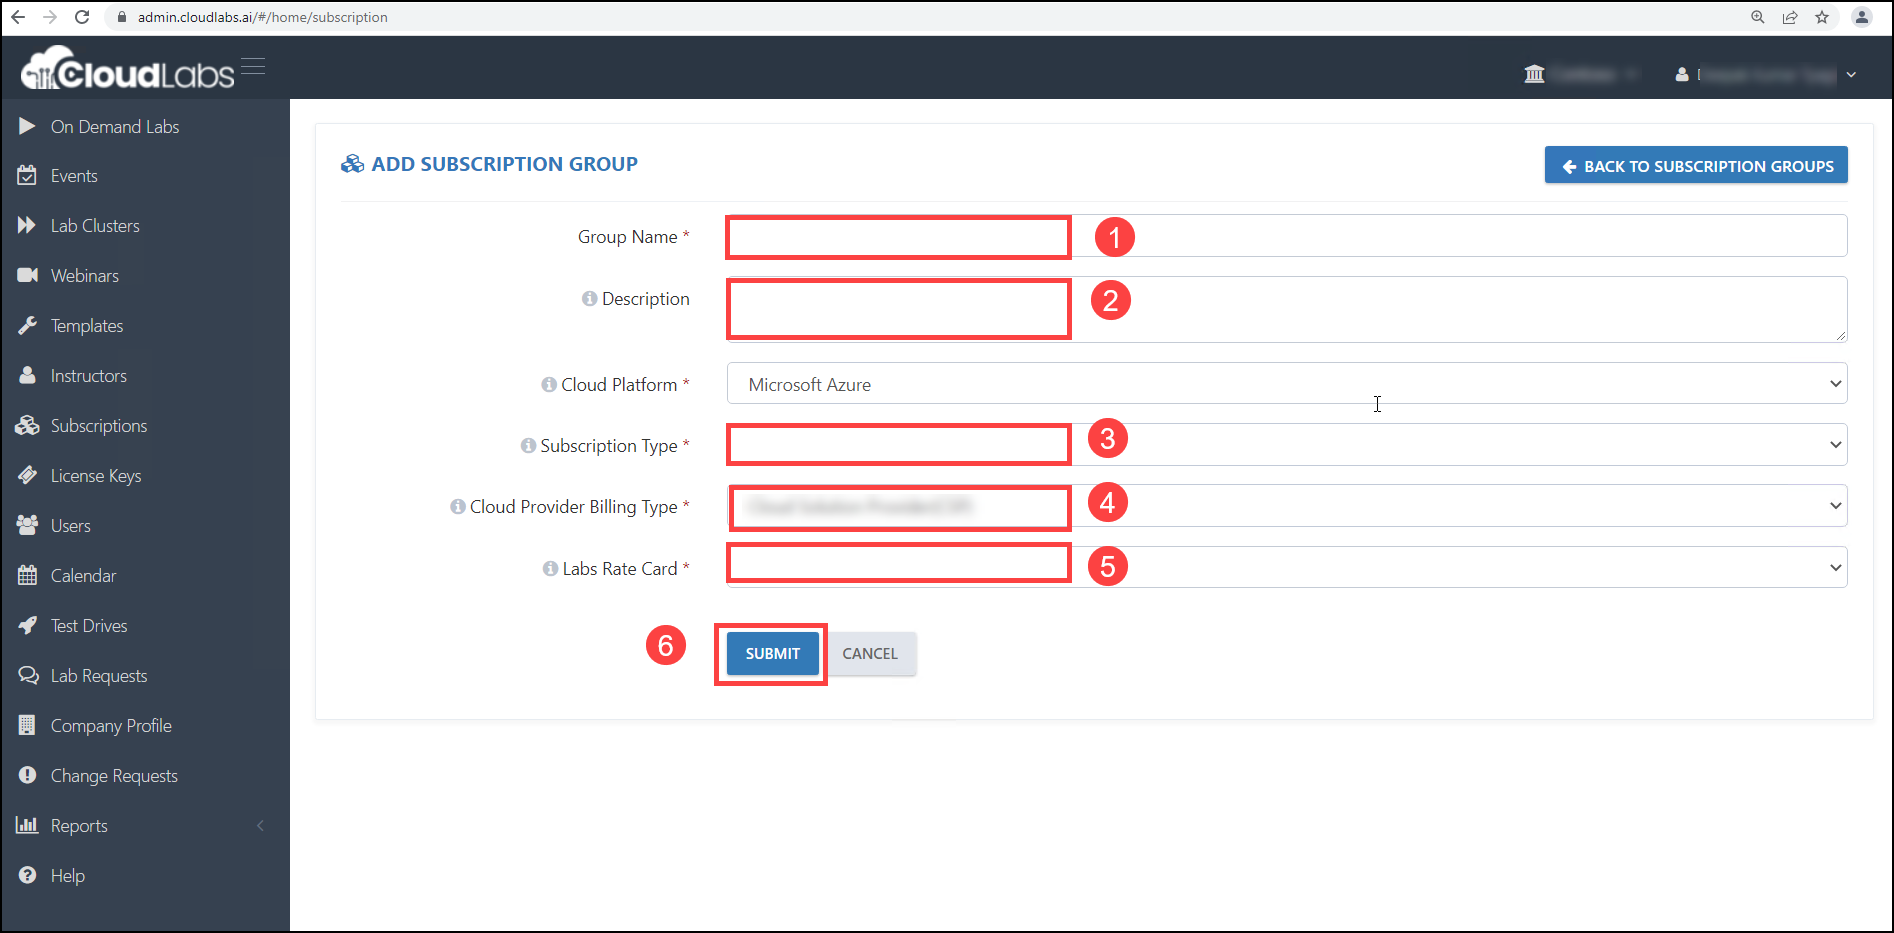
Cloud Platform: Choose Microsoft Azure from the dropdown.
In this form, you will have the option of selecting a subscription type [Shared subscription / Dedicated subscription / Dedicated Tenant] based on the lab's requirements.
iii. You can add subscriptions to the Subscription group once it's created.
a. To add the subscriptions to the group, click the action button (1).

b. Click on the + ADD SUBSCRIPTION(2) button.

c. Copy and paste the details from Text Editor into the respective fields:
Subscription Friendly Name
Subscription Guid [ID]
Tenant Name
Tenant Guid [ID]
App Id
App Secret [Value]
Cloud Provider Billing type [Pay-As-You-Go]
App Secret Expiry Date
App Secret Key Identifier [Secret ID]
Is Reserved: Can be kept unchanged. [This option is used only when the onboarded subscription is not intended for deployment purposes].
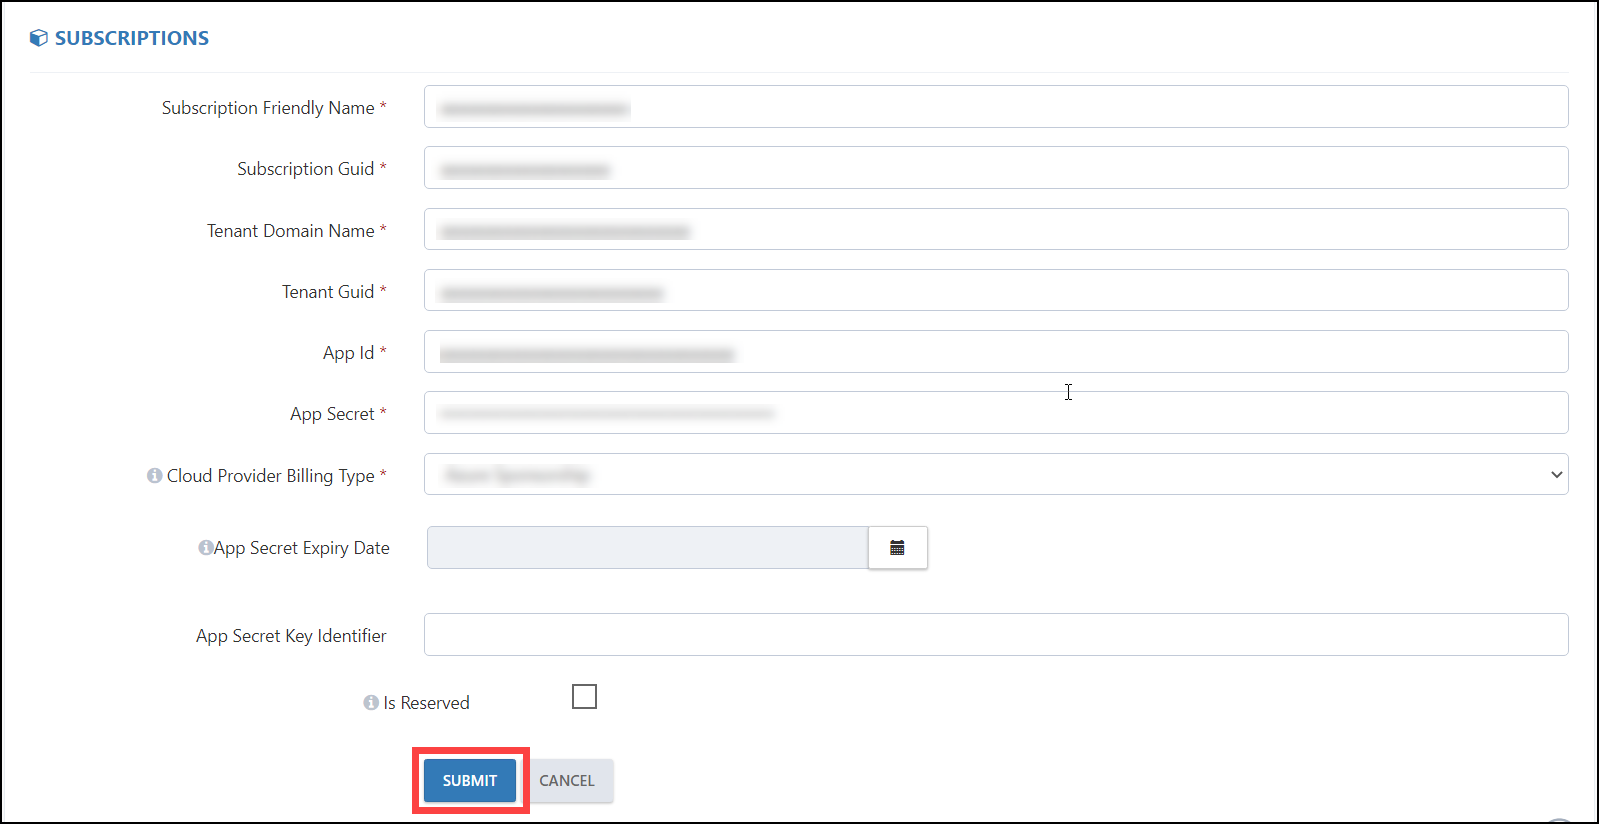
d. To save the data, click Submit.
Repeat the above steps from a to c if you have more subscriptions to onboard.
Limitations of bringing own Subscription in Azure:
For the Azure subscription that is within the tenant that is managed by a different CSP, here are the restrictions:
Licenses cannot be purchased and allocated directly through the CloudLabs Platform.
The Global Administrator role cannot be assigned from the platform if the tenant is under a different CSP.
If the subscription is not managed through Spektra CSP, then access would need to be provided to the CloudLabs team explicitly to assist/monitor.
Note: If you need to onboard the subscriptions in BULK, you can share these details with us, and we'll be happy to assist you with the backend onboarding.