Overview
We will learn how to set up and onboard GCP accounts to CloudLabs AI platform.
Subscription Overview
CloudLabs supports two types of GCP subscriptions that can be utilized for the lab:
Dedicated Tenants: Each user gets a single dedicated Organization. We need to use a dedicated Organization if any lab requires organization-level access.
Dedicated Subscriptions: Each user gets a single Project. We need to use dedicated subscriptions if any lab requires Project-level access.
Pre-requisites:
A valid domain, eg: cloudlabsgcporg01.com
A valid Google account to log in to the Console and set up an Organization
Getting Started
Setting up a Google Account
A Google account can be set up by visiting the Google Account Sign-in Page.
For detailed steps on setting up a Google account, follow Creating a Google Account
Purchasing a domain
The domain purchase & set-up can be carried out through different Cloud Providers. You can refer to the below mentioned links below to set up a custom domain in various Clouds:
Creating a custom domain in GCP
Creating a custom domain in AWS
Creating a custom domain in Azure
In case of any issues in purchasing or registering for a domain, please reach out CloudLabs Team, we will be happy to assist.
Once the domain is purchased, we will proceed with the next steps of setting up a GCP organization.
Setting up an Organization in GCP
To begin with, the setup of the Organization, navigate to Google Cloud Platform
Log in to the Google Cloud Platform Console with a valid Google account.
.png)
Navigate to the left side of the page to check on the IAM (Identity & Access Management)(1), locate & click on Identity & Organization(2)
.png)
Select Go to Checklist(1) & click on Begin The setup(2)
.png)

.png)
Select I am a new customer & click on Sign up for Cloud Identity
.png)
It will take you to a new page to fill in your Business details. Provide the required details (Business name(1), Number of Employees(2), Region(3)) and then click on Next(4)
.png)
Provide the contact details. First Name(1), Last Name(2), Current Email Address(3), Business Phone Number(4), and then click on Next(5)
.png)
Provide the details of the valid domain.
.png)
Confirm the domain & click Next.
.png)
Create an Admin-user(1), Password(2), and Click on Agree and Continue(3). Save these credentials, as this username & password will be used to access the new Organization.
.png)
Verify the Cloud Identity account creation & click on Continue to setup
.png)
After clicking on Continue to Set-up, you will be redirected to the new GCP organization recently set up, where you need to click on Protect.
.png)
Here you will find the instructions to navigate to Domain Host, scroll down & click on Go to Step 2
.png)
.png)
In this step, you will receive the TXT record details. You will need to add these record details in the newly purchased domain. Once the record is added, navigate back to the record verification tab & click on Protect Domain
.png)
.png)
Once the above step is initiated, it may take up to 5 minutes for domain verification. Once the domain is verified, you will be able to see a green check on the Screen stating that your Domain is verified. Post Verification, click on Continue.
.png)
You would be redirected to the Google Admin Console, where you would be required to add users (this is optional), but important to verify that the admin user is present in the console.
.png)
Now use the credentials which were set up in Step-9 to log in to the GCP console & navigate to the left side of the page and locate IAM >> Identity & Organization & continue with the next steps
.png)
Set-Up Users & Groups. Adding groups helps you to manage users at a scale, & defining users helps you to grant granular access to specific Google Cloud resources and helps prevent access to other resources.
.png)
Select default users & groups & continue:
.png)
Next, you will be asked to set up access for the users, where you must grant administrative access on all services to the admin user while providing restricted fine-grained access to the other users created in Step 15.
.png)
.png)
.png)
.png)
Once the Admin user has been granted all administrative access, click on Mark Task As Completed
.png)
Organization Set Up is Done. Next, we will learn about enabling a billing account & creating projects in GCP.
Sign in to the Manage billing accounts page in the Google Cloud console.
.png)
Click Create account.
Enter the Name of the Cloud Billing account.
Depending on your configuration, you will also need to select one of the following:
Organization: If prompted, select an Organization from the drop-down menu.
Country: Select the country corresponding to your billing mailing address.
Currency
Business, the billing account will pay for.
Note: The selected country determines payment options and currency. This choice is permanent.
Click Continue.
.png)
Choose the Google Payments profile that will be associated with this Cloud Billing account. A payments profile is shared and used across all Google products (such as Google Workspace, Google Cloud, Google Fi, and more). You can choose an existing Google Payments profile or create a new payments profile. If you choose to create, follow the instructions on the screen to set up your Google Payments profile.
Selecting Account Type
If you are creating a new Google Payments profile, when setting your Account type, be aware that this setting is permanent and may be used for tax (such as value-added tax (VAT)) and identity verification.
If this is for a business, organization, partnership, or educational institution, or if you want more than one person to have access to the profile, select Business. Otherwise, select Individual.
If you are choosing an existing Google Payments profile to be associated with this Cloud Billing account, select a Business profile for the Cloud account.
.png)
Specify the payment method - DebitCard or CreditCard, which will be used for billing purpose, then click on Submit and Enable Billing
.png)
Now you can see the newly created billing account under the billing >> manage account
.png)
Creating Projects in GCP
A project organizes all your Google Cloud resources. This project forms the basis for creating, enabling, and using all Google Cloud services, including managing APIs, enabling billing, adding & removing collaborators, and managing permissions. We will learn more about different ways to create a GCP project.
Creating Projects using GCP Console
Log in to the GCP Console & Navigate to the Project Selector Tab (1) & click on New Project (2).
.png)
Fill in the required details given below, including the Billing Account details, and click on Create.
Project name: Give a name like: cloudlabs-spadmin
Billing account: Select the billing account from the drop-down, which we created earlier
Organization: Select the parent organization
Location: Select the parent organization.png)
Creating Projects using Cloudshell
To create projects in Cloud Shell, you need to activate Cloud Shell from the top-right corner of the GCP console.
.png)
Once Cloudshell opens, modify the following commands with the actual names and details, then run them.
gcloud projects create PROJECT_ID --organization=ORGANIZATION_ID gcloud projects create PROJECT_ID --folder=FOLDER_ID gcloud billing projects link my-project --billing-account 0X0X0X-0X0X0X-0X0X0XThe first command you need to run when you wish to create a project directly under an organization. The second command you need to run is when you wish to create a project under a folder. The third command will associate your newly created project with the billing account.
.png)
Note: You can create projects in bulk by creating a shell script file with the above commands for all the projects, saving it in the editor then directly running it in the terminal.
Creating prerequisites for the GCP Project
Create a service account in the CloudLabs admin project.
Note: The dedicated service account creation is required by CloudLabs to manage the GCP Organization and perform actions such as user creation, deletion, monitoring, and overall management.
Select the admin Project that we created earlier. Search for Service Accounts using the top search bar, and select the Service Accounts option.

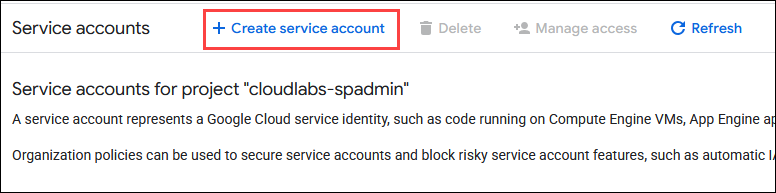
Click on + Create service account.
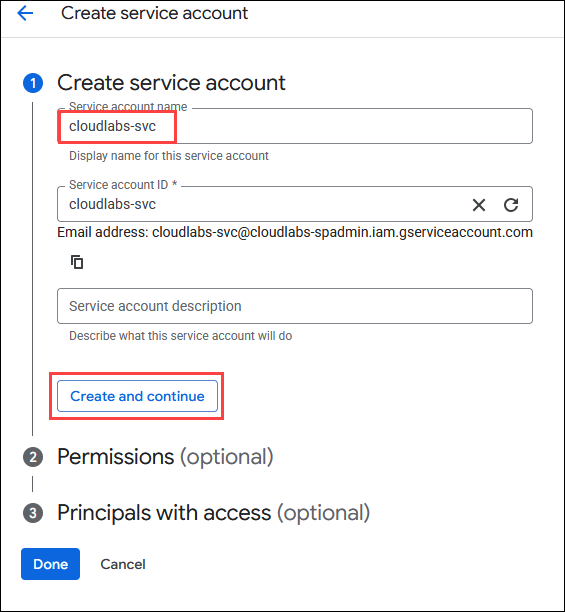
Provide the service account name as cloudlabs-svc and then click Create and Continue.
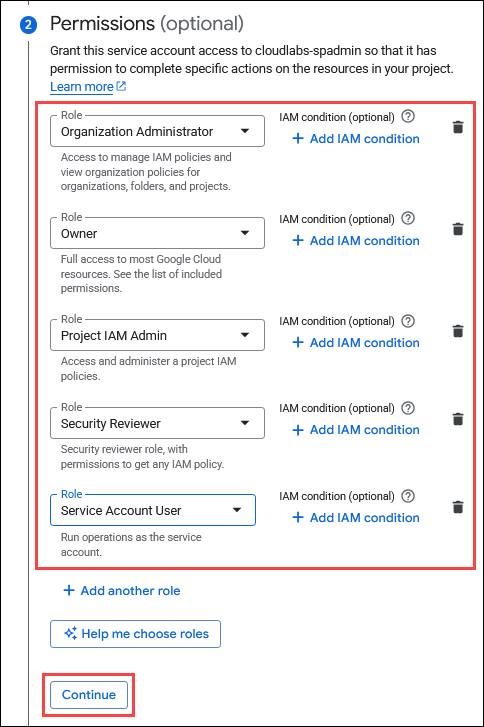
Then, provide the permissions listed below and click on Continue.
Then leave it as it is and click on Done.
Create an access and secret key for the service account.
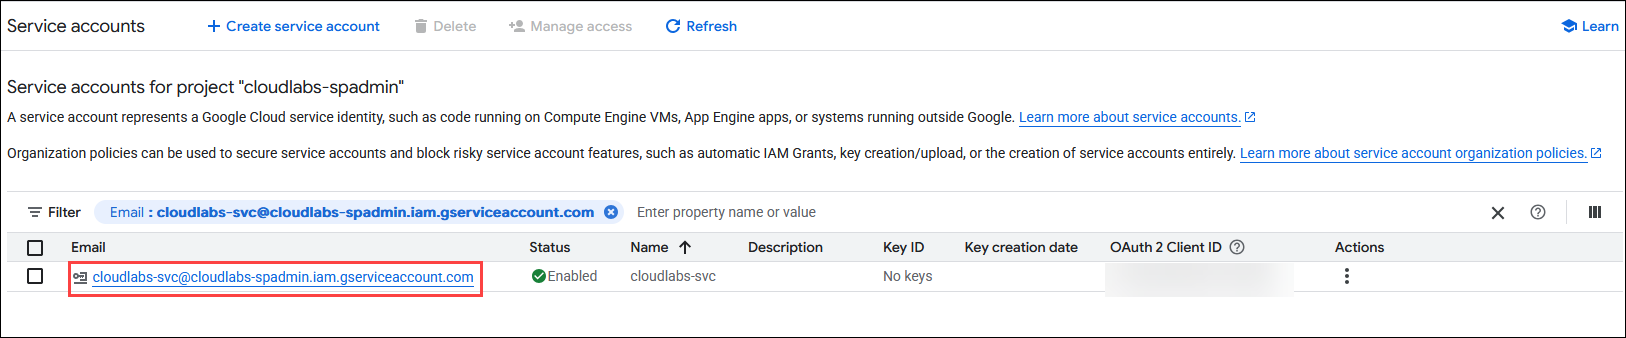
Click on the service account that we created in the earlier steps.
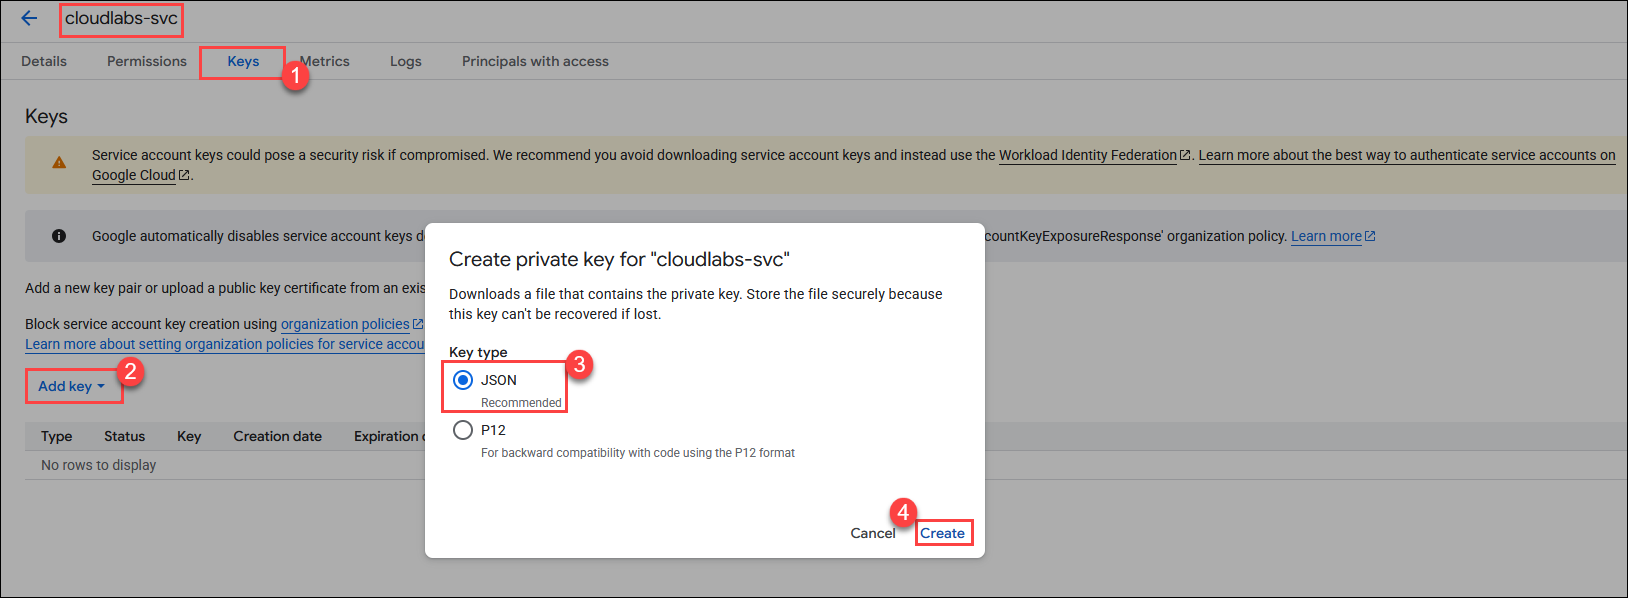
Once inside the service account, click on the Keys (1) section, then click on Add Key (2), choose JSON (3) as the key type, and then click on Create (4).
Once the keys are downloaded, please share the entire downloaded file with the CloudLabs team.
Add domain-wide delegation
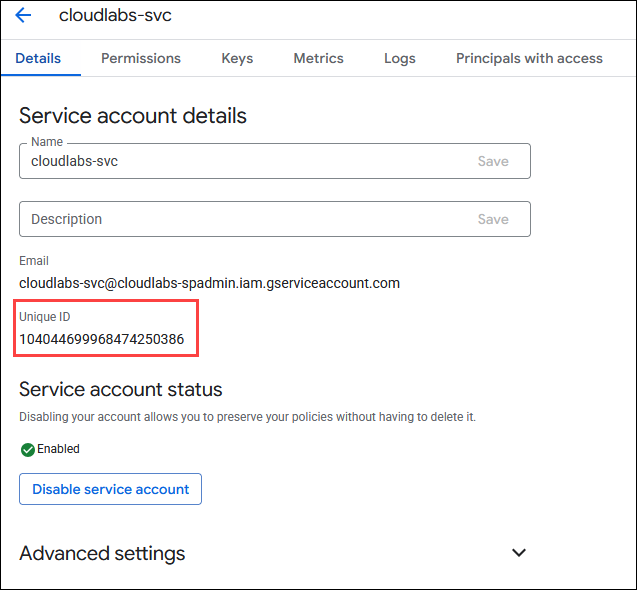
First, go to the service account we created and copy the Unique ID shown there. Note it down somewhere, as it will be used in the upcoming steps.
Log in to the GCP Admin Console using the same parent organization credentials used to create all the projects above.
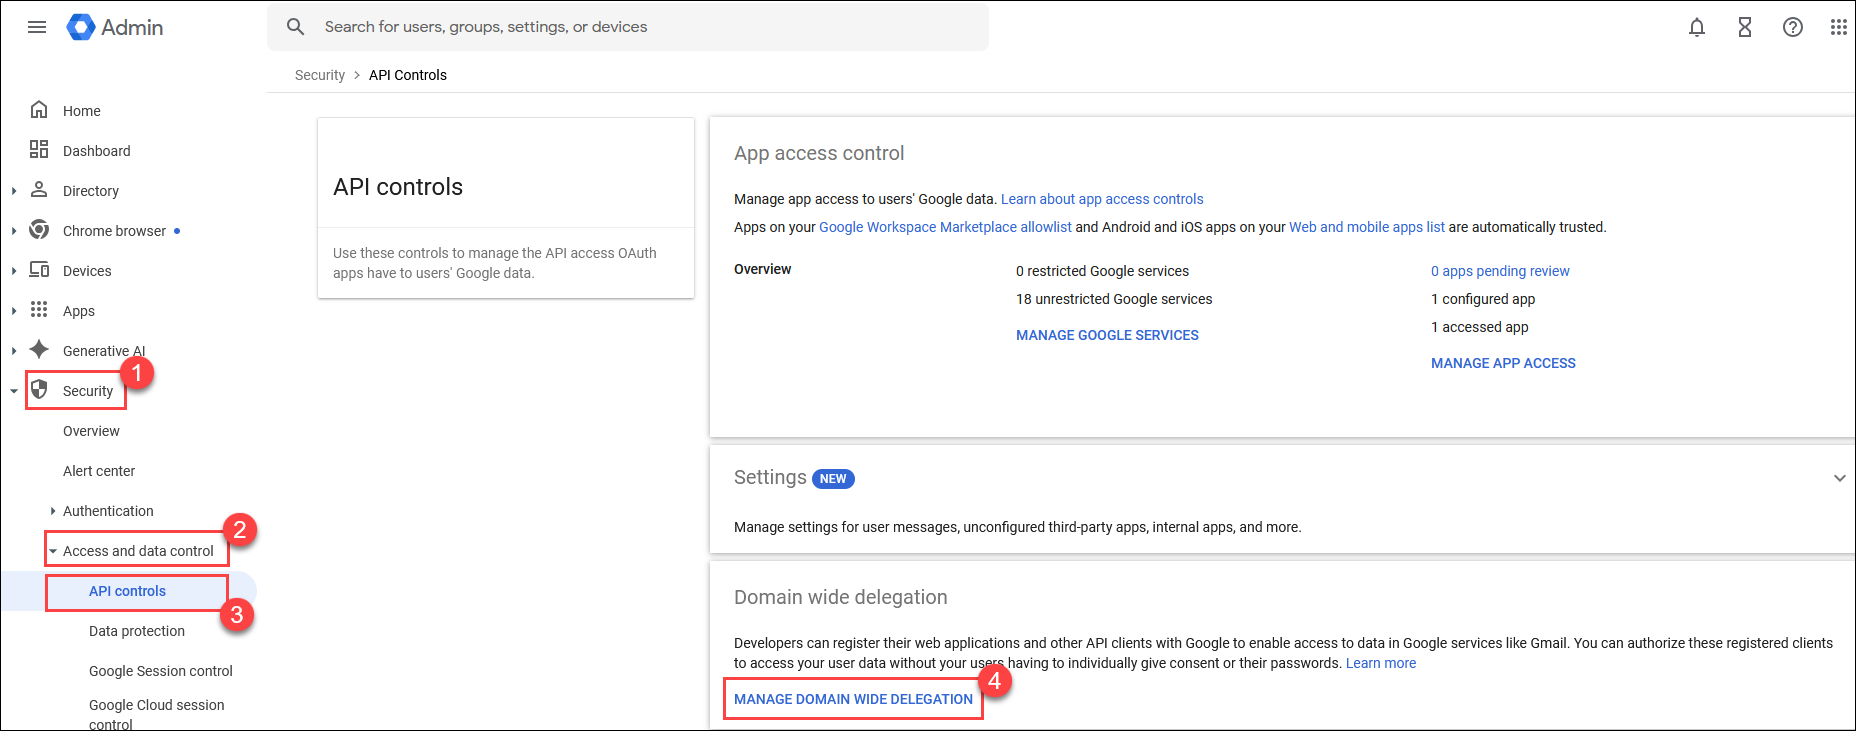
Then select Security (1) from the left side, then choose Access and data control (2), and then select API controls (3). Click on Manage domain-wide delegation (4).
Once inside, provide the details below:
Client ID (1): Paste the unique ID you noted down from step 1.
OAuth scopes (comma-delimited) (2): https://www.googleapis.com/auth/admin.directory.user
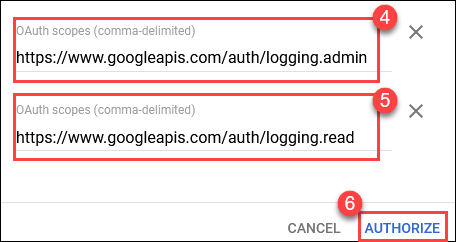
OAuth scopes (comma-delimited) (3):https://www.googleapis.com/auth/cloud-platformOAuth scopes (comma-delimited) (4): https://www.googleapis.com/auth/logging.admin
OAuth scopes (comma-delimited) (5): https://www.googleapis.com/auth/logging.readNow click on Authorize (6).

Onboarding GCP Organization to CloudLabs
Select the Subscriptions tab from the right-hand menu and then click on the + ADD button to add a subscription group for GCP accounts.
.png)
Create a subscription group by filling in the details, like the image below:
Group Name: Test-GCP-xxx
Description: Provide the Description of the Subscription group.
Cloud Platform: Choose Google Cloud Platform from the drop-down.
Subscription Type: Choose the Subscription type as Dedicated Subscription.
Cloud Provider Billing Type: Choose Google Cloud Platform(GCP) from the drop-down.
Labs Rate Card: Choose GCP from the drop-down.
Then, Click on the Submit Button.
Click on the settings Icon to the right of the Subscription group name you just created.
.png)
Click on + ADD ACCOUNT to add subscription to the subscription group.
.png)
Here we are required to add the Project Name, Organization Id, Organization Domain Name, Billing Account Id, Admin User Name, Service Account Key, App Secret Expiry Date, App Secret Key Identifier, once these details are provided click on SUBMIT. You can repeat the steps (1) to (5) if you have more subscriptions to onboard.
.png)
Note: If you need to onboard the subscriptions in BULK, you can share these details with us, and we'll be happy to assist you with the backend onboarding.
Steps to Create a Billing Report in GCP
Log in to GCP Console
In the Search bar, search for Billing and navigate to the billing dashboard.
.png)
Select the appropriate billing account.
.png)
Locate & select Billing Export (left panel)(1), choose the admin project, select the Dataset ID (2) option, click on “Create new dataset (3)” & then click on Ok(4).
.png)
Enter the DatasetId: cloudlabsds, then click on “Create Dataset”.
.png)
Click on “Save”.
.png)
Confirm the details provided related to the Dataset.
.png)
Please create an Excel file with the details below and send it over to CloudLabs so we can start generating reports. OrganisationId: [root account ID] AccessKey: [access key of database user] SecretKey: [secret key of database user] DatasetId: [Dataset ID of Project]
Navigate to the Admin Project.
.png)
.png)
Once the reports are generated, you can search for BigQuery in the search bar and click on BigQuery.
.png)
.png)
In the BigQuery dashboard, locate your admin project(1), expand Dataset(2), find & click on Table(3) where your cost details are exported and saved.
.png)
You can Query your Dataset and fetch the required details. Click on Query, select the option In new tab.
.png)
Enter the SQL Query based on your requirements and then click on Run to get the details.
.png)
Important Customizations in the Admin Console
Google Cloud Platform has a very strict monitoring process over any unusual activities or account compromise, so there is a set of rules specified by Google that sends out alerts to their alert centres on encountering any such activity. Since we provide GCP sandbox environments to the users, there are multiple user creations & deletions of users performed daily, which is again detected as a suspicious activity by Google. To avoid any such issues occurring, we need to disable a few of the alerts in the admin console. We will learn more about disabling these alerts in the upcoming steps.
Enabling/Disabling alert rules
Log in to the GCP Admin Console
Navigate to the left side of the page & locate & click on Rules.
.png)
Here we need to disable alerts for some rules as given below:
User suspended due to suspicious activity.
Suspicious login.
User suspended.
User's Admin privilege revoked.
User suspended(by admin).
User granted Admin privilege.
User deleted.
TLS failure.
Suspended user made active.
Smarthost failure.
Rate-limited recipient.
New user added.
Mobile settings changed.
Exchange journaling failure.
Email settings changed.
Drive settings changed.
Calendar settings changed.
Apps outage alert.
Note: The above-mentioned rules have been listed based on our requirements for hosting GCP sandbox environments. Based on your requirements, you can update these rules accordingly.
.png)
.png)
.png)
.png)
.png)
.png)
As an example, here we would be disabling one alert rule, i.e., User suspended due to suspicious activity. Select this rule click on Edit Rule.
.png)
.png)
Click on Next: View Conditions.
.png)
Click on Next: Add Actions.
.png)
Here you will find two options:
Send to alert center: Selecting this option will send out alerts to the Google alert center & Google might block the Organization due to suspicious activity detected in the Organization.
Send email notifications: Selecting this option will send out email notifications to all super administrators or other recipients added in this rule.
We can enable or disable these options as per the requirements, but it is advisable to always disable the Send to alert center Option.
.png)
.png)
Disabling 2-step authentication
Navigate to the left side of the page & locate Security(1), find Authentication(2), click & open 2-step verification(3).
.png)
Uncheck the Allow users to turn on 2-step Verification(1) & click on Save(2).
.png)
.png) Troubleshooting login issues
Troubleshooting login issues
In GCP, sometimes even if we have disabled the 2-step verification, users might face a login challenge. To troubleshoot this issue, follow the below given steps.
Navigate to the user-facing issues with login.
.png)
Under Recovery Information, you can find a recovery e-mail ID that can be used to log in to the GCP console.
.png)
Alternatively, under the 2-step verification, you will get an option called Login challenge, you need to select this option & disable it. This would allow users to bypass the authentication for 10 minutes & users would be able to log in without any issues.
.png)
The GCP Admin console is one stop for managing all your Google Workspace services. You can add or remove users, manage billing, set up mobile devices & much more. To get more familiar with the GCP Admin console, follow this link: About GCP Admin Console
Full Flow (End-to-End Process)
Domain Purchase → GCP Organization Setup → Admin Project Creation → Additional Project Creation → Admin Project Prerequisites Setup → Onboarding GCP Organization to CloudLabs → Billing Report Configuration → Admin Console Customizations
For Dedicated Tenants type: The above process must be repeated every time we need a dedicated tenant.
For Dedicated Subscriptions type: The above process needs to be repeated only once. After creating the main admin project, the additional projects should be created as needed, depending on the number of dedicated subscriptions required.