Overview
Advanced Networking enables you to connect the VMs in the lab to your network by simply peering the CloudLabs VM network to your network. This guide allows you to easily configure advanced networking in CloudLabs by simply specifying a few basic virtual network details required for peering. Using the details, CloudLabs pre-creates a virtual network for you, ensuring seamless lab creation without delay, and peers it with your network. This expedited process allows you to effortlessly set up labs and commence your tasks promptly, streamlining your workflow and maximizing productivity.
With CloudLabs' advanced networking for your labs, you can implement various network architectures and topologies. Following are a few different networking scenarios and their support in CloudLabs.
Enable distant license servers, such as on-premises and cross-region: Add a user-defined route (UDR) that points to the license server. If the lab software requires connecting to the license server by its name instead of the IP address, you need to configure a customer-provided DNS server. If multiple services need access to the license server, use them from multiple regions, or if the license server is part of another infrastructure, you can use the hub-and-spoke Azure networking best practice.
Access to on-premises resources, such as a license server: You can access on-premises resources with these options:
Configure Azure ExpressRoute or create a site-to-site VPN connection (bridge the networks).
Add a public IP to your on-premises server with a firewall that only allows incoming connections from the Virtual machines of your lab.
In addition, to reach the on-premises resources from the lab VMs, add a user-defined route (UDR).
Alternatively, if your license server is on the public internet, you do not need advanced networking. You can configure the labs without setting up advanced networking.
Prerequisites
You must have at least network contributor privileges on your virtual network to manage your virtual networks.
Azure users who are going to perform network peering will be provided with network contributor privileges on the virtual network created in the CloudLabs Managed subscription on request.
Premigration Checklist
Identify and gather the following information on the virtual network that needs to communicate with the lab’s network:
Address Space: You need to ensure that the address space of the lab’s network does not overlap with the address space of your existing network.
Region of the Virtual Network: Global virtual network peering (connecting virtual networks across Azure regions) is costlier than virtual network peering within the same region. So, we recommend you create the lab’s network in the same region as the existing virtual network.
Existing Virtual Network Resource ID: You will also need your existing virtual network resource ID to peer the network.
Identify the AD user who is going to perform the virtual network peering so that the CloudLabs manager can provide the Network Contributor privileges accordingly.
Steps to Setup Advance Networking
Login to https://portal.cloudlabs.ai/.
Once you have identified the network to peer with the CloudLabs Managed network, start creating a virtual network in a CloudLabs-managed subscription using the CloudLabs portal. Note that the lab VMs will be deployed in this CloudLabs-created virtual network. Navigate to Manage VM Lab > Settings > Virtual Networks and click on Create Virtual Network.
.png)
You need to provide the following details to CloudLabs for virtual network deployment:
Name: Name of the CloudLabs virtual network.
Region: Provide the region where you want your CloudLabs virtual network to be hosted. Note that if you provide a different virtual network from the existing one in your subscription, then the cost of peering will be higher.
Address Space: Provide an address space to be used for the virtual network. Please make sure that the address space does not overlap with the address range of your existing virtual network.
Once the virtual network is created successfully, click on the option for peering requests. CloudLabs will generate a mail draft. You can edit the mail with the required details, like adding the usernames to whom CloudLabs needs to provide network contributor roles on the CloudLabs virtual network and send it to cloudlabs-support@spektrasystems.com. This email will have all the details required for the CloudLabs team to provide the network contributor role on the network. You will be informed as soon as the role is assigned to the user.
Now, you can follow the steps below to peer your virtual network with CloudLabs managed virtual network.
Navigate to the Microsoft Azure portal and log in with a user account that has the required permissions mentioned above.
From the Azure portal home page, search for virtual networks using the search bar and select your virtual network from the list.
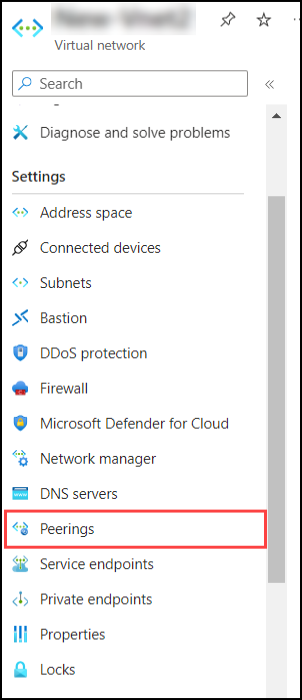
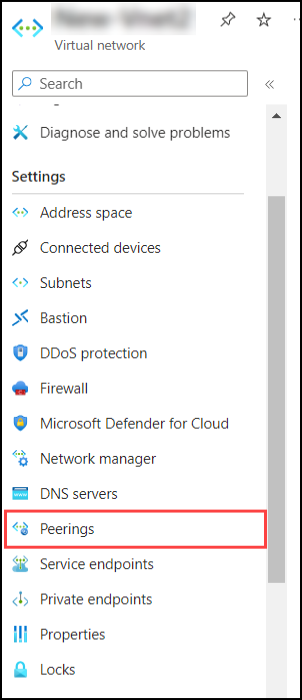
Once you are on the virtual network page, click on the Peerings option under Settings in the left pane.

Click on Add on the Peerings page.
Provide a peering link name for the peering between your virtual network and the CloudLabs managed virtual network.
Leave the Peering link name under the Remote virtual network blank.
Check the option I know my resource ID and then click provide the resource ID provided to you.
Select the CloudLabs managed directory and click on Authenticate.
This will open a new window for authentication.
Once the authentication is successful, Click on Add.
Now wait for a couple of minutes for the peering to complete successfully.
Now, you can follow the steps below to peer CloudLabs managed virtual network with your virtual network.
Navigate to the Microsoft Azure portal and log in with a user account that has the permissions mentioned above. Now, switch to the CloudLabs managed tenant by clicking on Settings in the top right corner.
From the Azure portal home page, search Virtual Networks using the Search Bar and select your virtual network.
Once you are in the virtual network page, click on Peerings under Settings in the left pane.

Click on Add on the peerings page.
Provide a peering link name to the peering between CloudLabs managed virtual network and your virtual network.
Leave the Peering link name under the Remote virtual network blank.
Check the option I know my resource ID and then click provide the resource ID of your virtual network.
Select your directory and click on Authenticate.
This will open a new window for authentication.
Once the authentication is successful, Click on Add.
Now wait for a couple of minutes for the peering to complete successfully.
Once the peering is completed from both sides, you will see that the peering status as Connected on the peering page. This confirms that both networks are fully synchronized.