Overview
AMI (Amazon Machine Image) is a supported and maintained image provided by AWS that provides the information required to launch an instance. You must specify an AMI when you launch an instance. You can launch multiple instances from a single AMI when you require multiple instances with same configuration. You can use different AMIs to launch instances with different configurations.
An AMI includes the following:
One or more Amazon Elastic Block Store (Amazon EBS) snapshots, or, for instance-store-backed AMIs, a template for the root volume of the instance (for example, an operating system, an application server, and applications).
Launch permissions that control which AWS accounts can use the AMI to launch instances.
A block device mapping that specifies the volumes to attach to the instance when it's launched.
We can create custom AMIs as per our requirements from the base AMIs provided by AWS having different Operating Systems (OS), for example Centos, Ubuntu, RHEL, Windows Server 2016, Windows Server 2019, Windows Server 2022, etc.
Note: Each AMI is region specific, so when we build a Custom AMI, it gets created for the same region where our EC2 instance is deployed, but we can copy the AMI from one region to another. To fine more details on copying an AMI image from one region to another which we will learn later in this document.
Steps for creating a custom EBS backed AMI from an EC2 Instance Using AWS Console
Create an EC2 Instance from a base AMI provided by AWS (here we will be creating a Windows Server 2019 virtual machine).
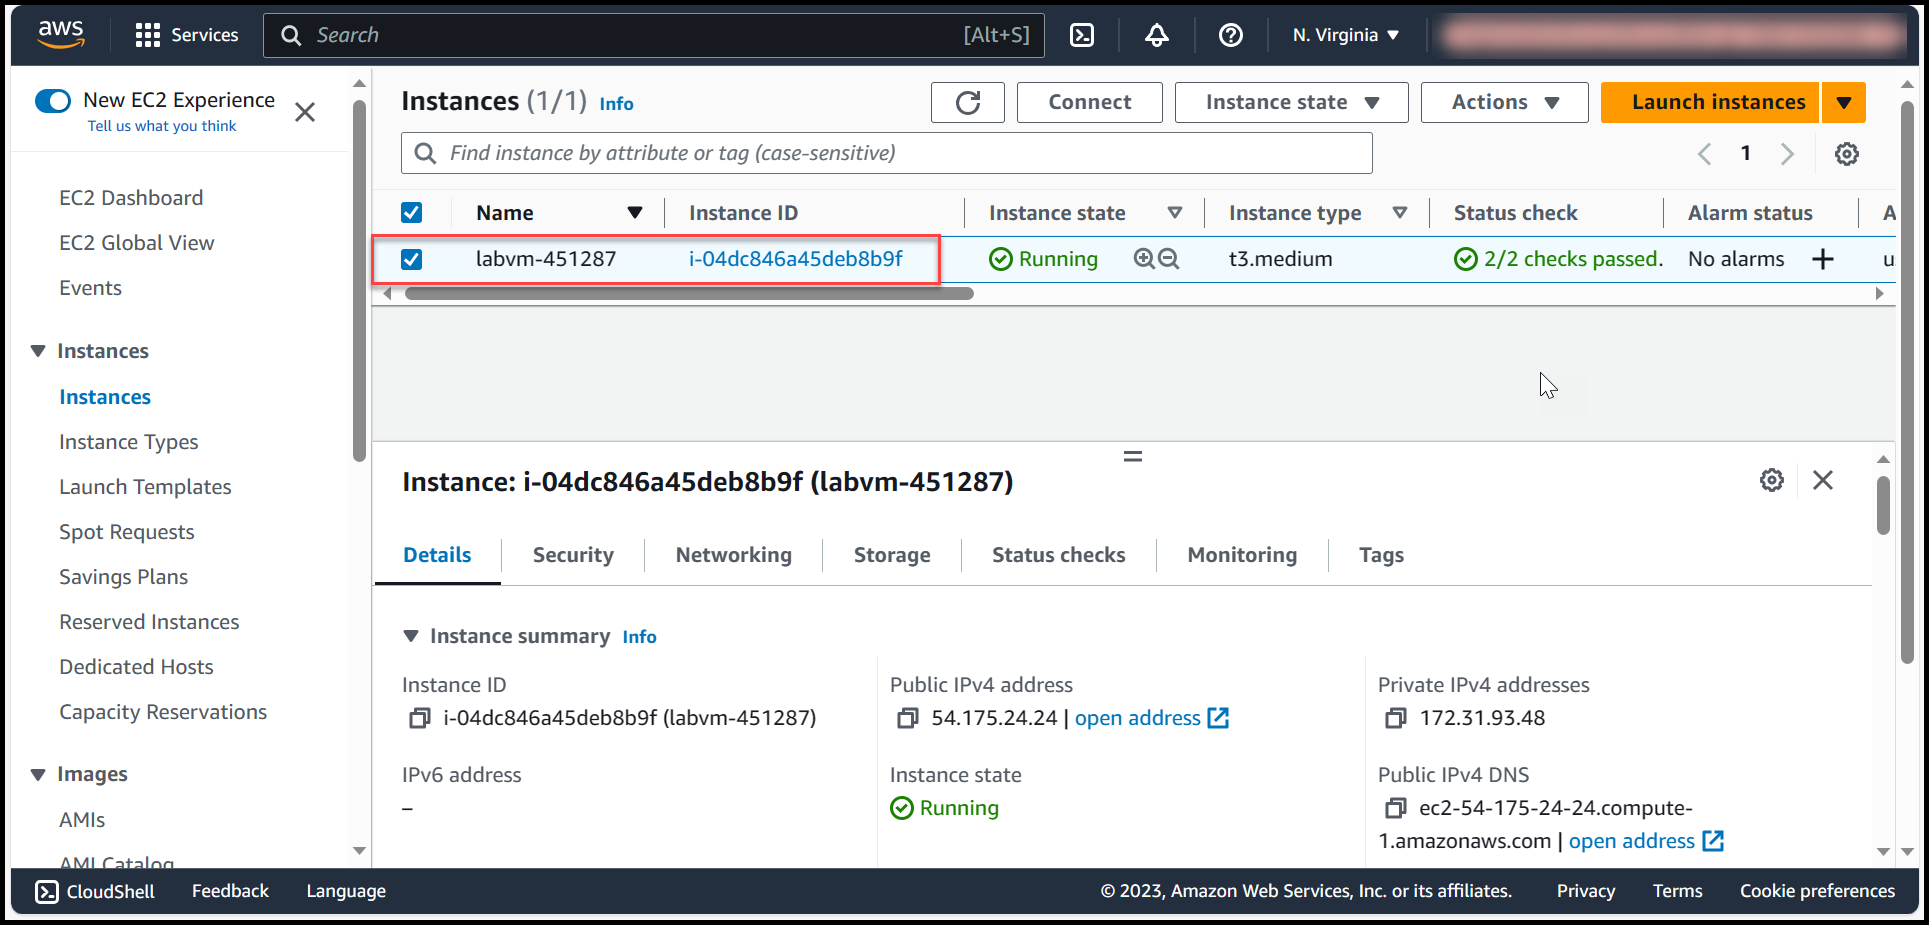
Connect to the VM through RDP (Remote Desktop Protocol) & customize the VM as per your requirements. In this example we will be installing Google Chrome, Visual Studio Code & Git, along with that we will set-up an auto shutdown feature which will pop up a message in every 15 minutes prompting a user to click on OK if he/she is working on the Virtual Machine & in-case of no response for next 5 minutes the VM will auto shutdown (Link to set-up this feature is provided in the end of the documentation)
Once all the customizations are complete ensure to remove all the temp files & cleanup the recycle bin, & then Shutdown the VM selecting Planned Shutdown option. This will prepare a specialized VM for image capturing, we will discuss in details the different types of ways that a VM can be prepared before capturing an image.
A. Specialized VM: A specialized image is an image that contains all the instance-specific information of a running VM, such as the computer name, the SID, and other settings that are unique to that VM. A specialized image can be used to create only one VM that is an exact copy of the original VM.
B. Generalized VM: Generalizing or deprovisioning a VM is done when you specifically want to create an image that has no machine specific information, like user accounts. Generalizing removes machine specific information so the image can be used to create multiple VMs. Once the VM has been generalized or deprovisioned, you need to let the platform know so that the boot sequence can be set correctly. To generalize a Windows VM in AWS follow the steps given below:
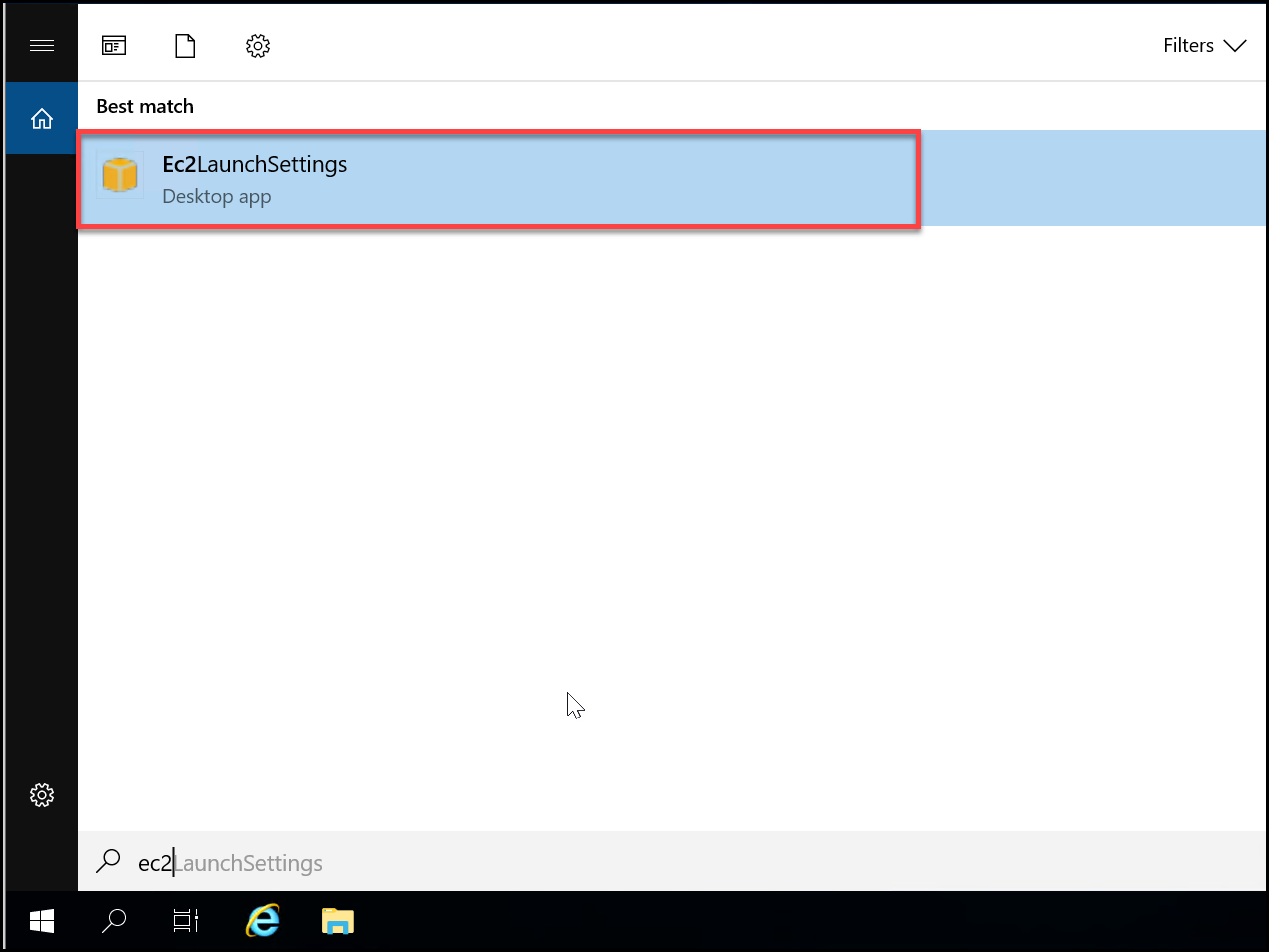
After the completion of customizing your Windows VM, search for EC2 Launch Settings in the Windows search bar.
Note: For Windows Server 2016 & later you can find this option under EC2 Launch Settings while for Windows Server 2012 R2 & earlier it can be found under EC2 Config Setings.
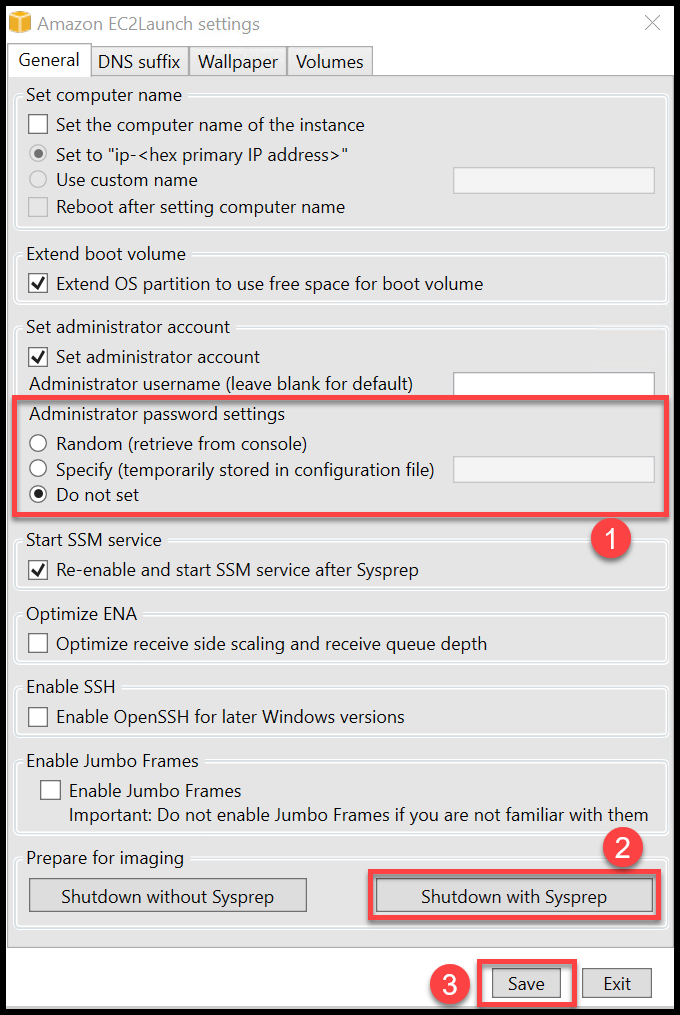
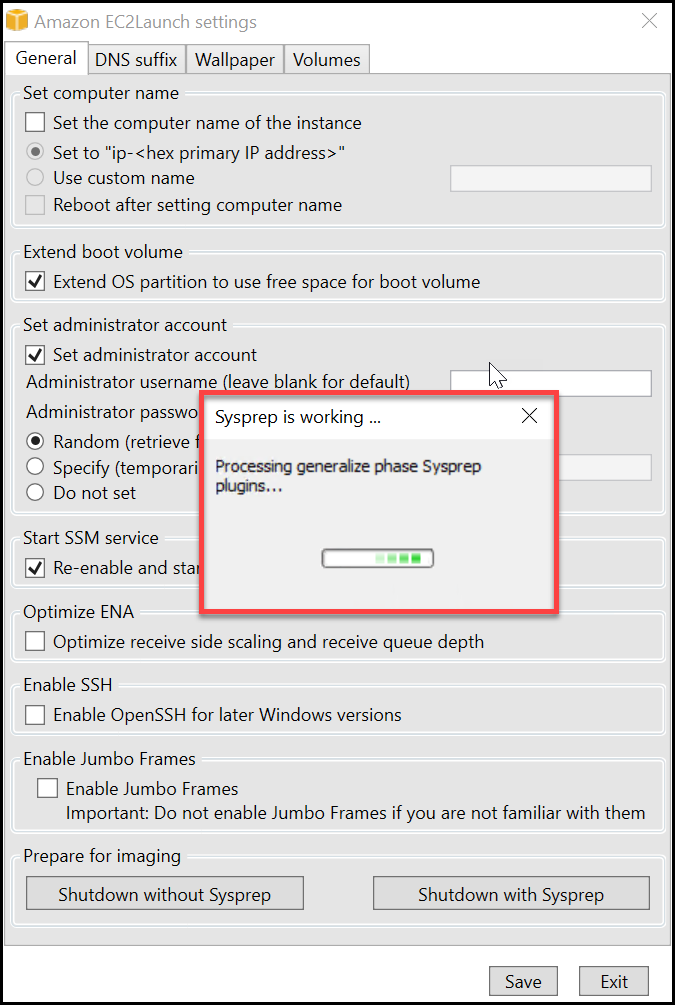
In the EC2 Launch Settings Dialog Box, for Administrator Password (1), do one of the following:
Choose Random: EC2Launch generates a password and encrypts it using the user's key. The system disables this setting after the instance is launched so that this password persists if the instance is rebooted or stopped and started.
Choose Specify: Type a password that meets the system requirements. The password is stored in LaunchConfig.json as clear text and is deleted after Sysprep sets the administrator password. If you shut down now, the password is set immediately. EC2Launch encrypts the password using the user's key.
Choose Do not set: Specify a password in the unattend.xml file. If you don't specify a password in unattend.xml, the administrator account is disabled.
Choose Shutdown with Sysprep (2) & Click on Save (3).
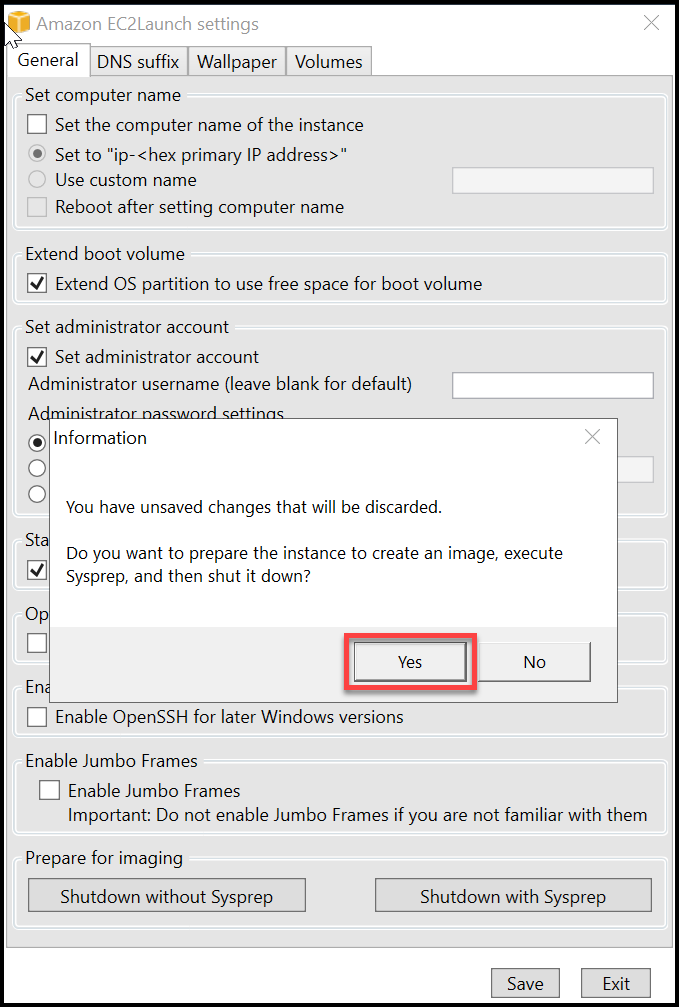
Wait for 5 to 7 minutes for the sysprep to complete, the remote connection will disconnect & VM will go into stopped state.
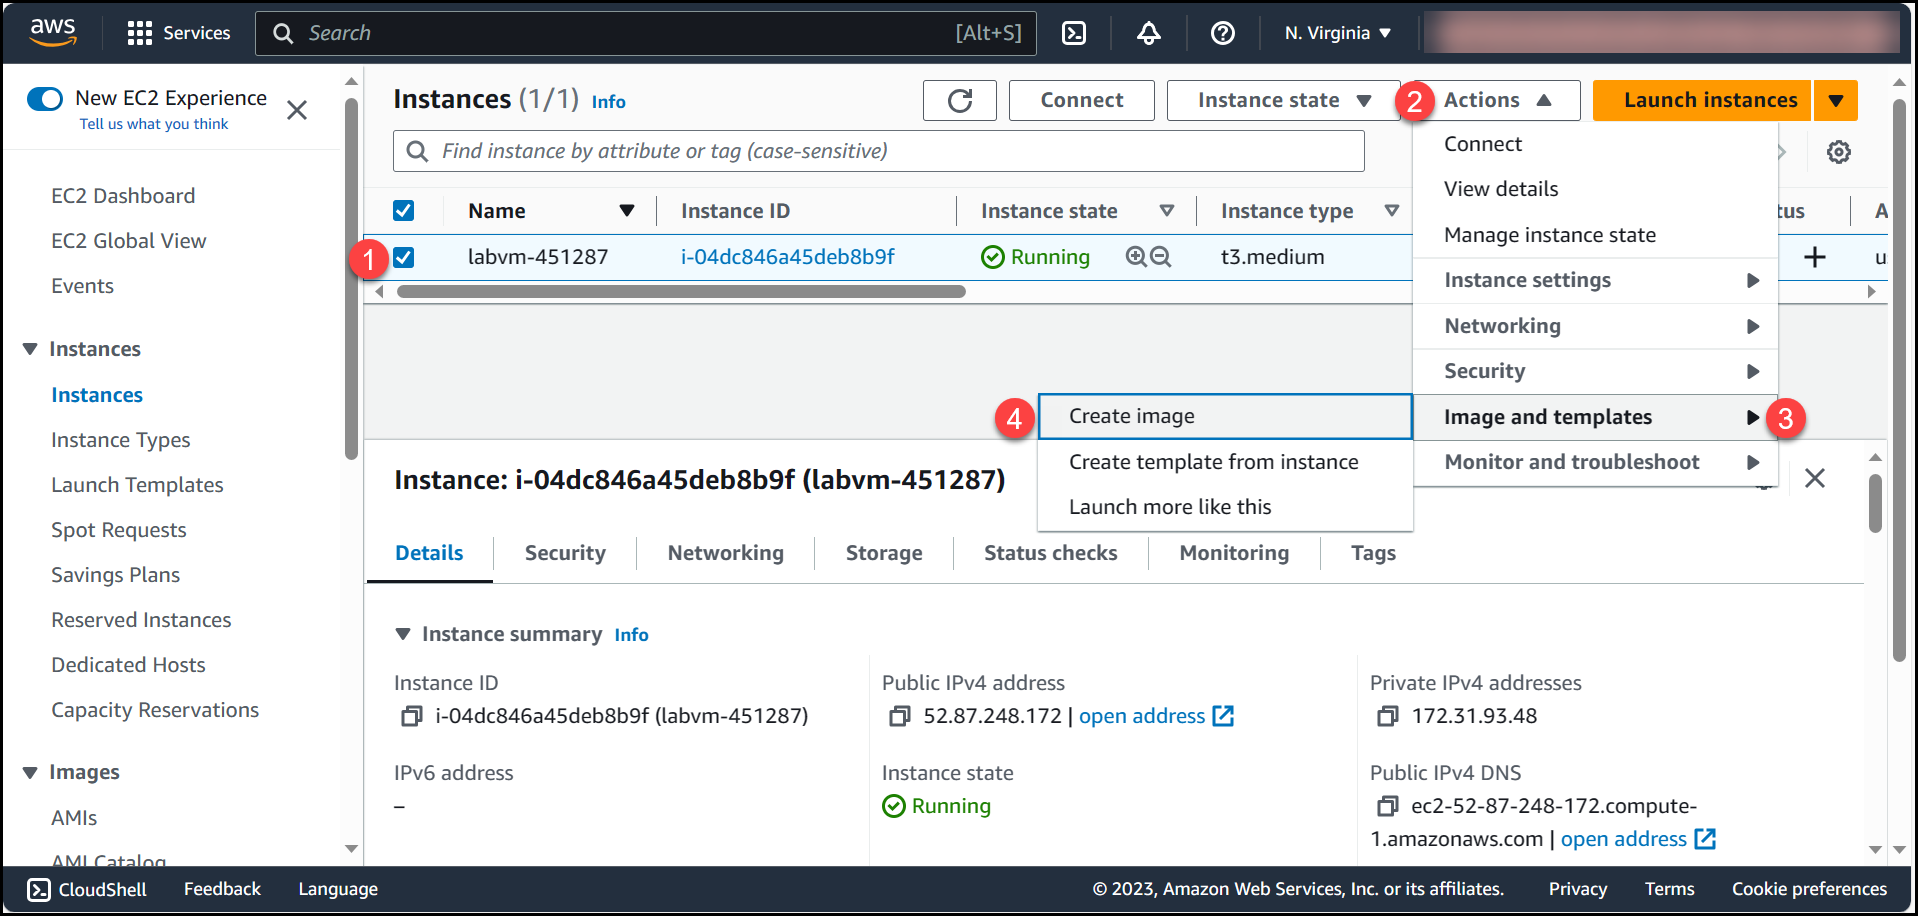
After the VM is in stopped state, Select the VM (1) >> Open Actions Drop-down {2} >> Navigate to Image and templates (3) >> Create image (4)
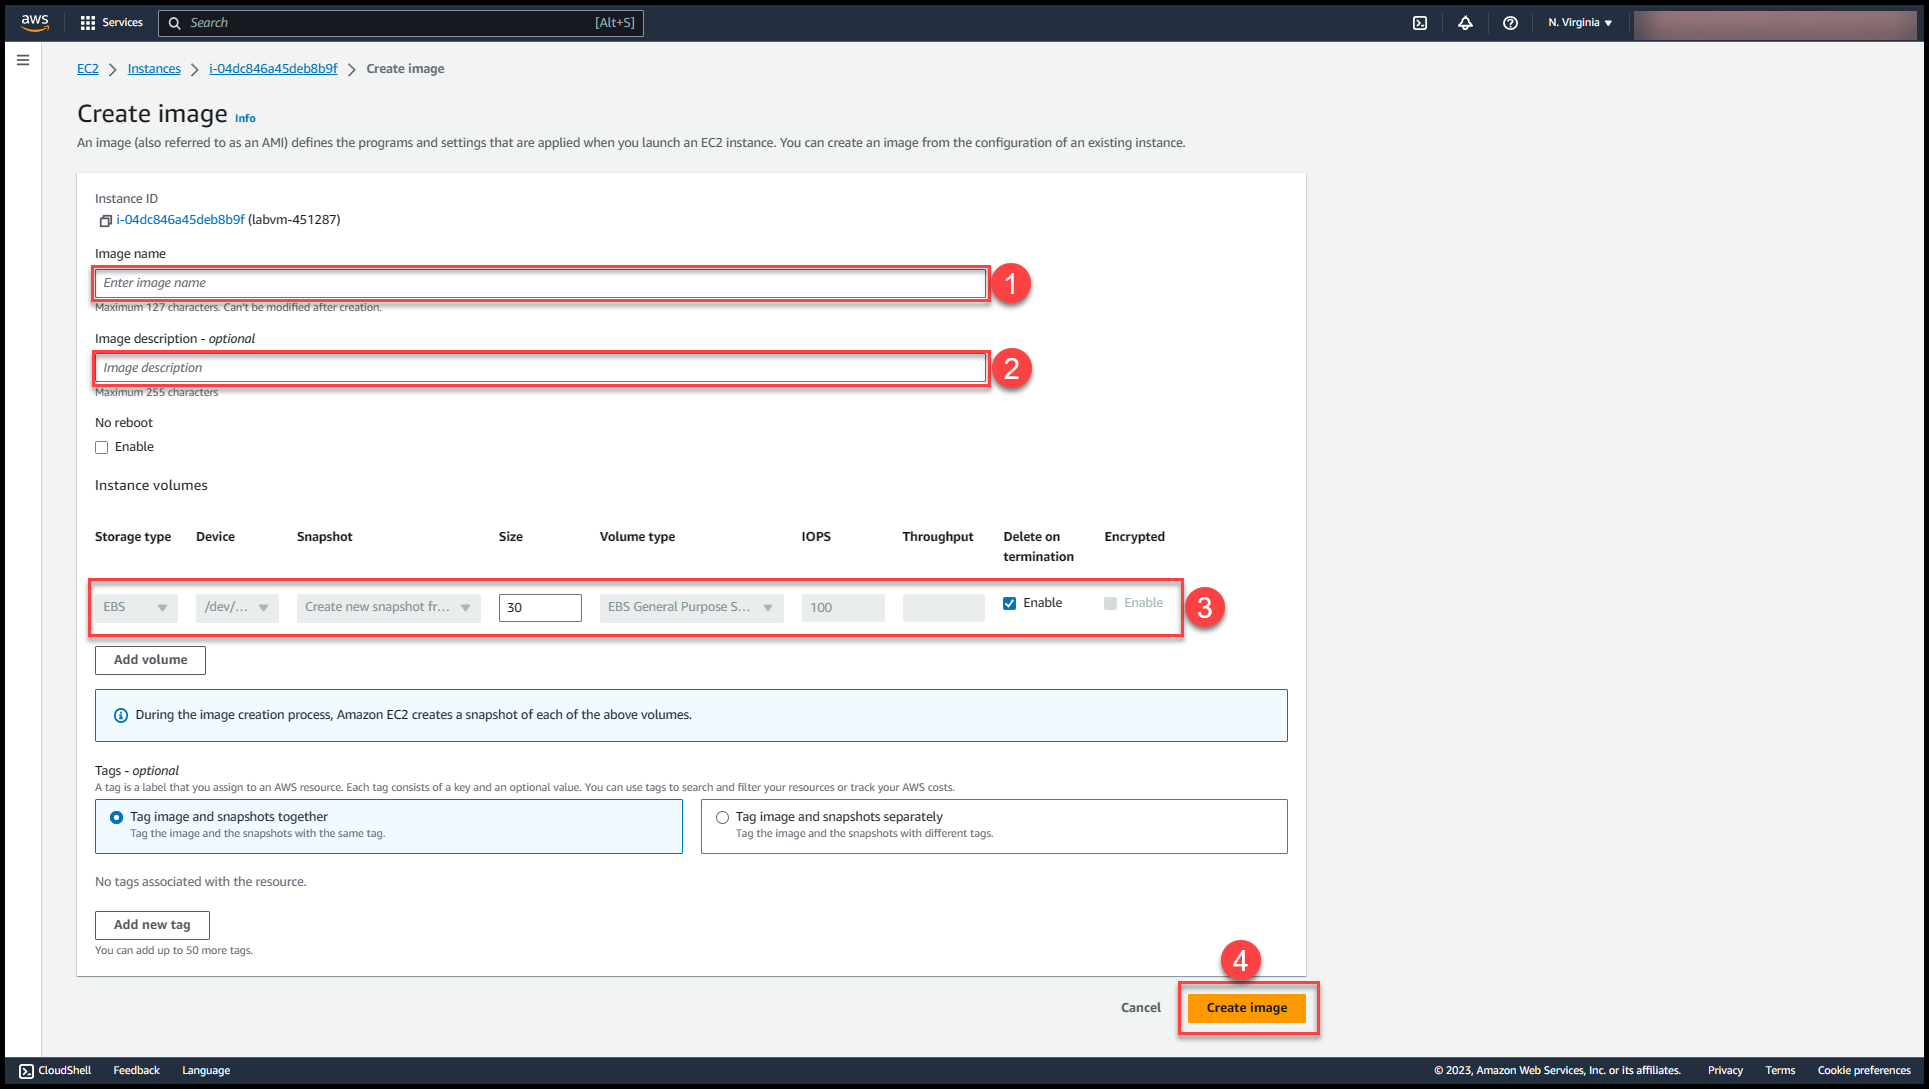
Fill in the details: Name of Custom AMI (1), Description of the AMI (2), EBS Volume (3) & then click on Create Image (4)
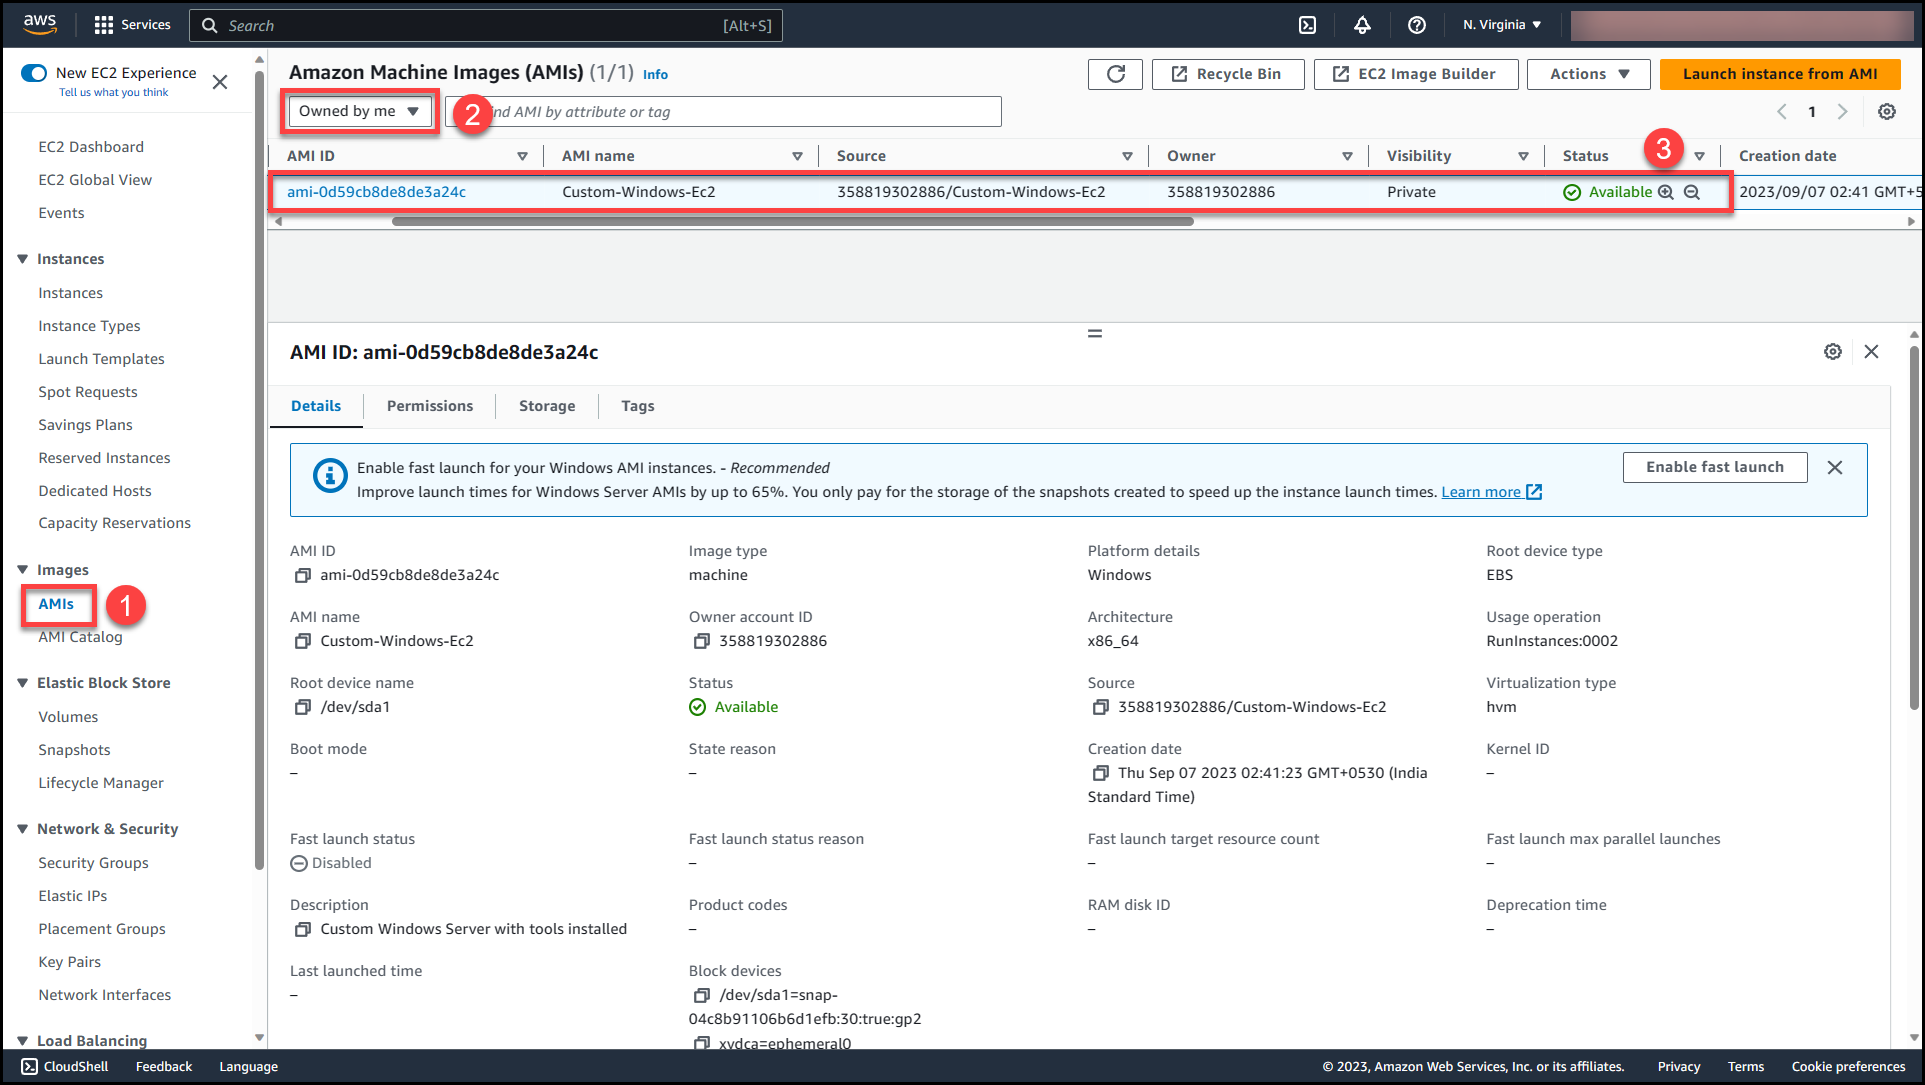
Note: The AMI creation might take 15-20 minutes to complete, you can monitor the status by navigating to AMI (1) >> Owned by me (2)>> Status (3)
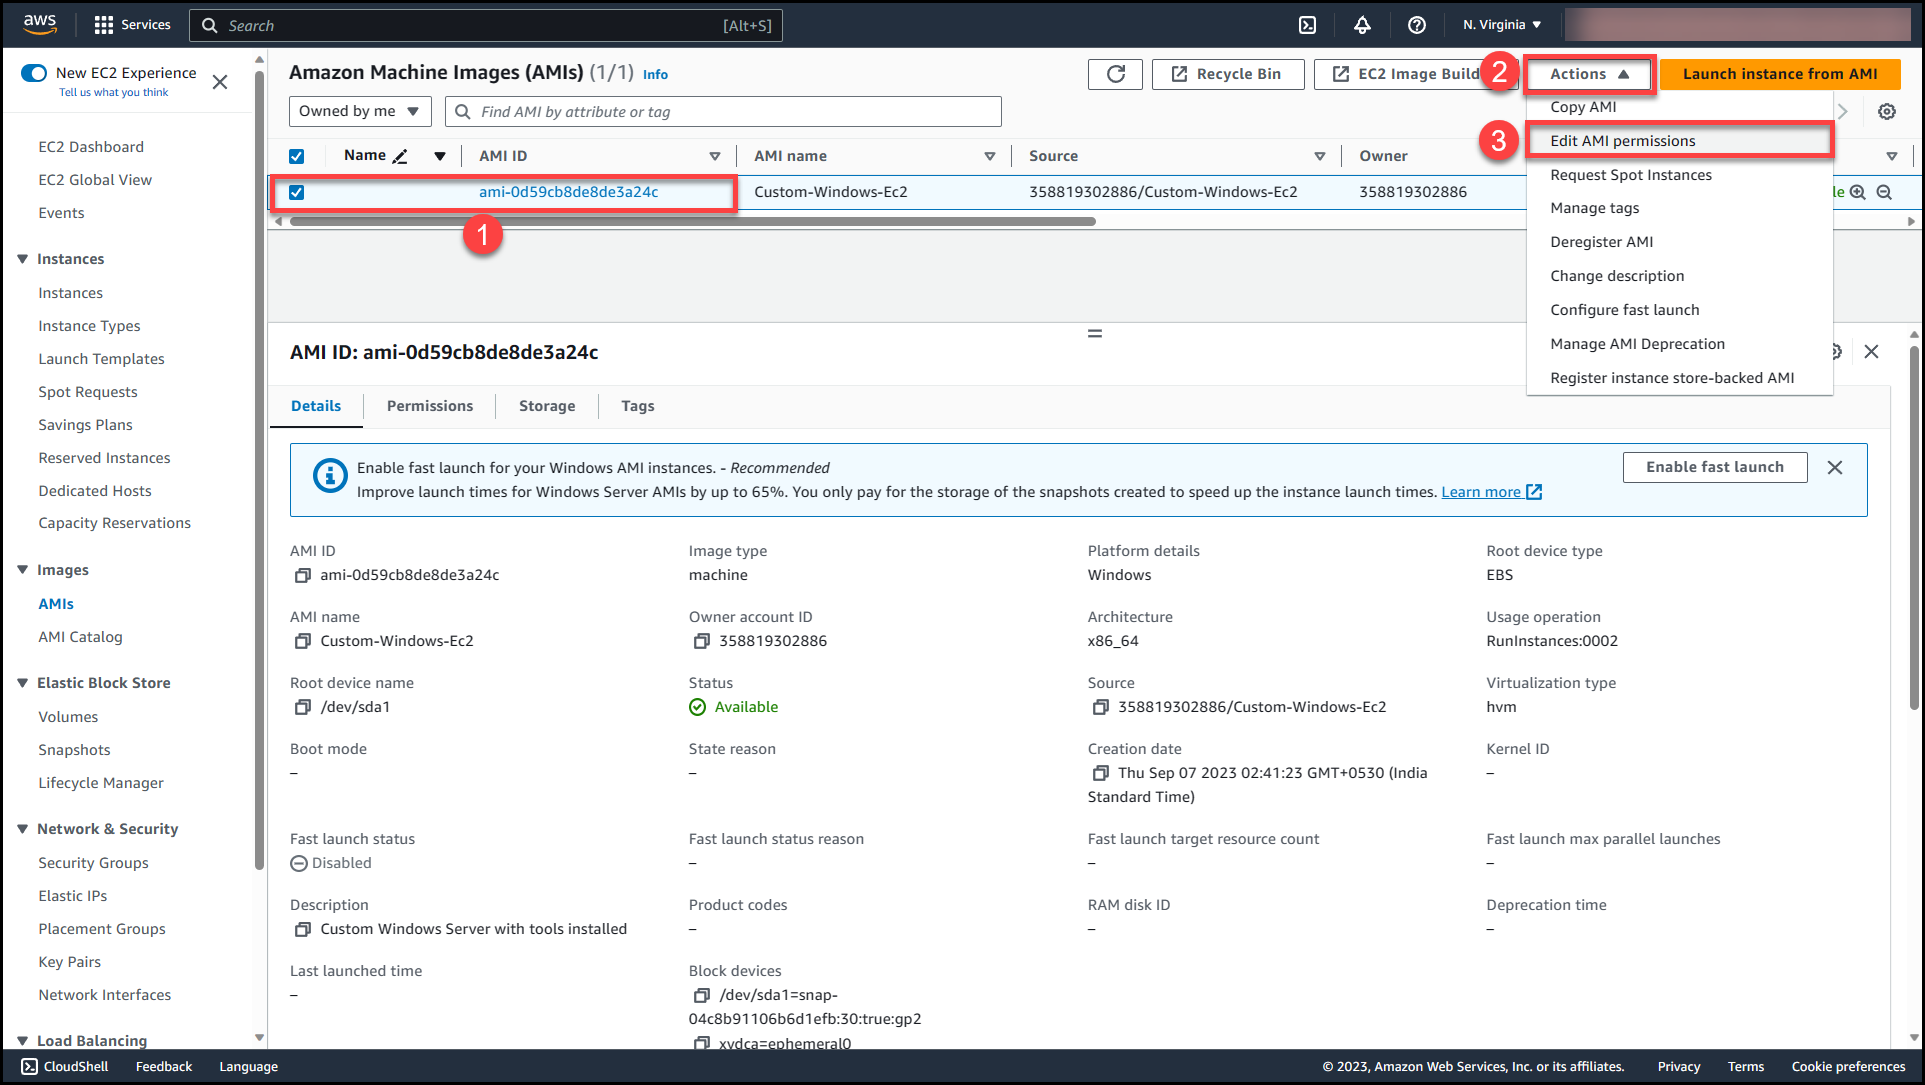
Once the AMI status changes from pending to available, select the AMI (1) >>Navigate to Actions (2) >> Edit AMI permissions (3)
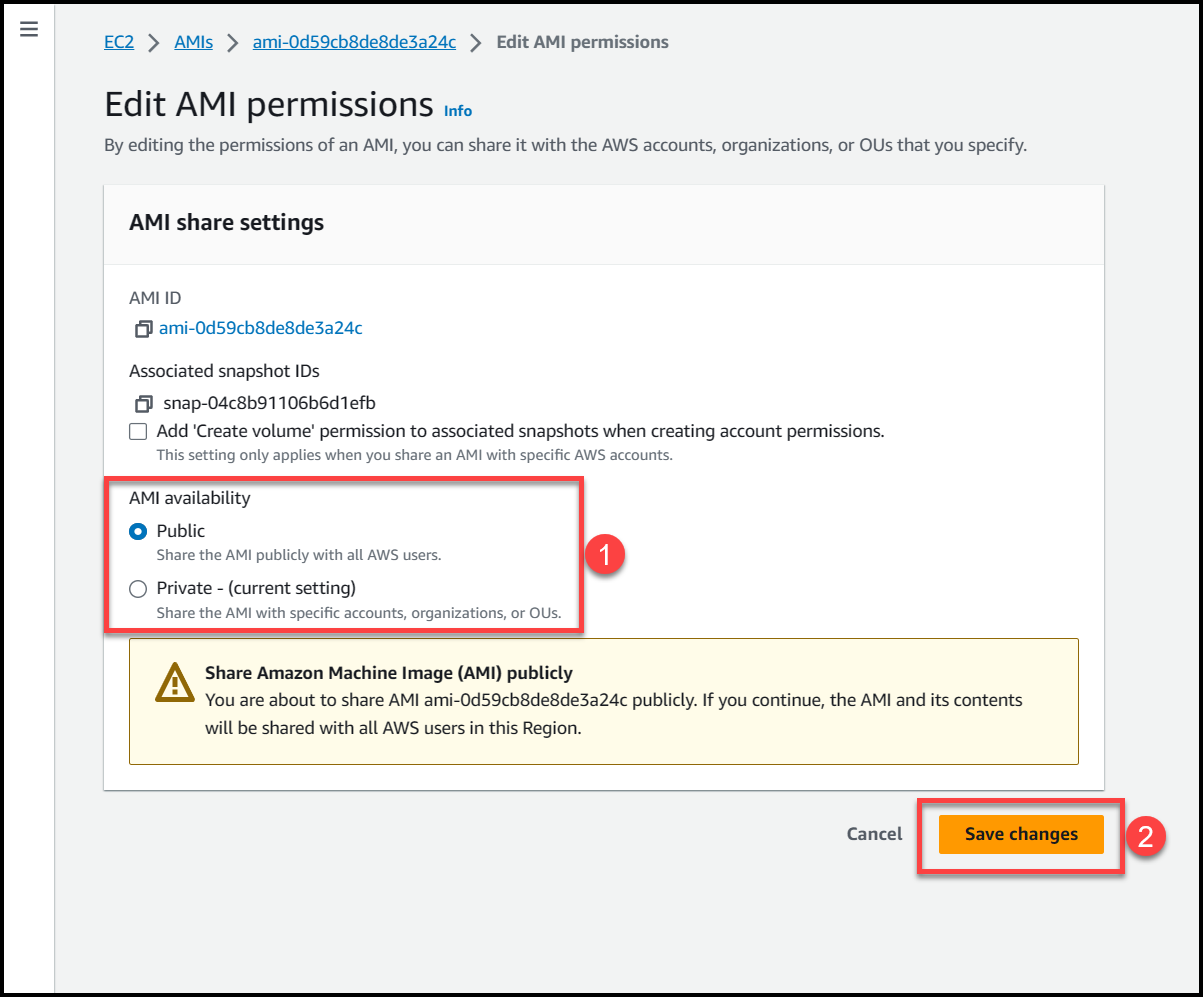
Here we will get 2 options either to make this AMI public or private. Selecting public access will make the AMI available across all AWS organizations & accounts in the region where AMI is present.
To get detailed information on making an AWS AMI public refer to the following link: Making AWS AMI Public
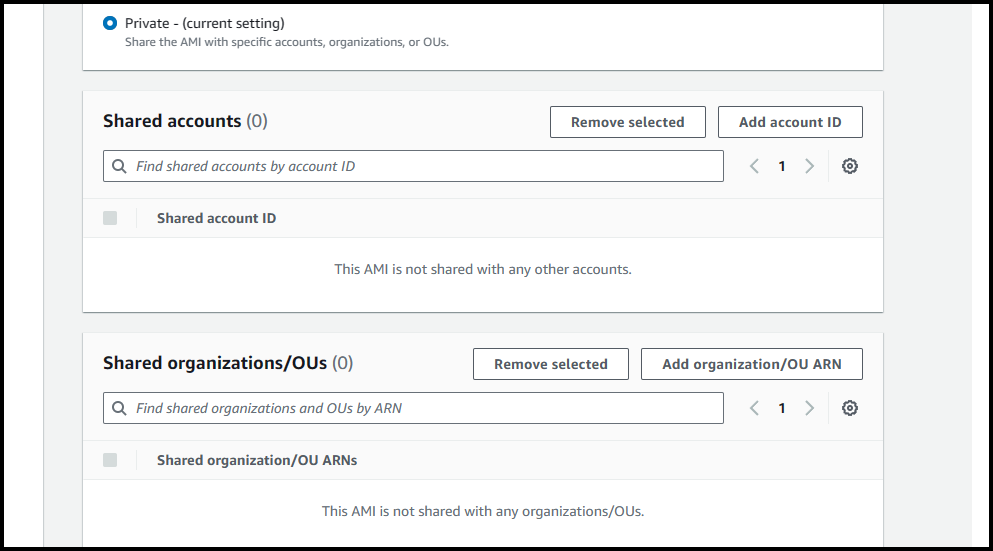
If we select private access, then we can specify the AWS accounts or Organizational Units where we want this AMI to be accessible, to get more detailed information refer to these links:
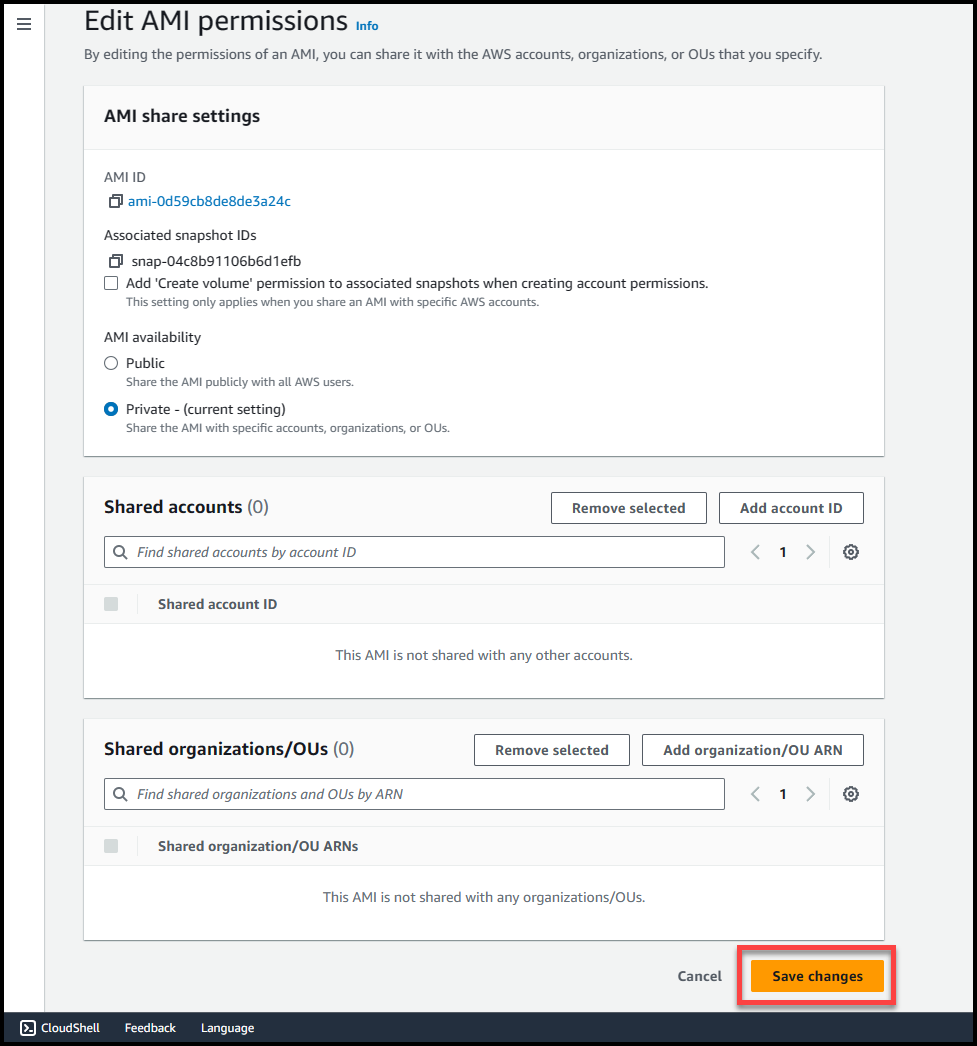
Once you’ve selected the permission type, click on Save Changes
To validate the availability of AMI, log in to any AWS account (if permissions are public) or to respective AWS accounts where access has been provided & try to deploy an EC2 instance with this AMI (ensure that we are deploying the EC2 instance only in the region where AMI is available)
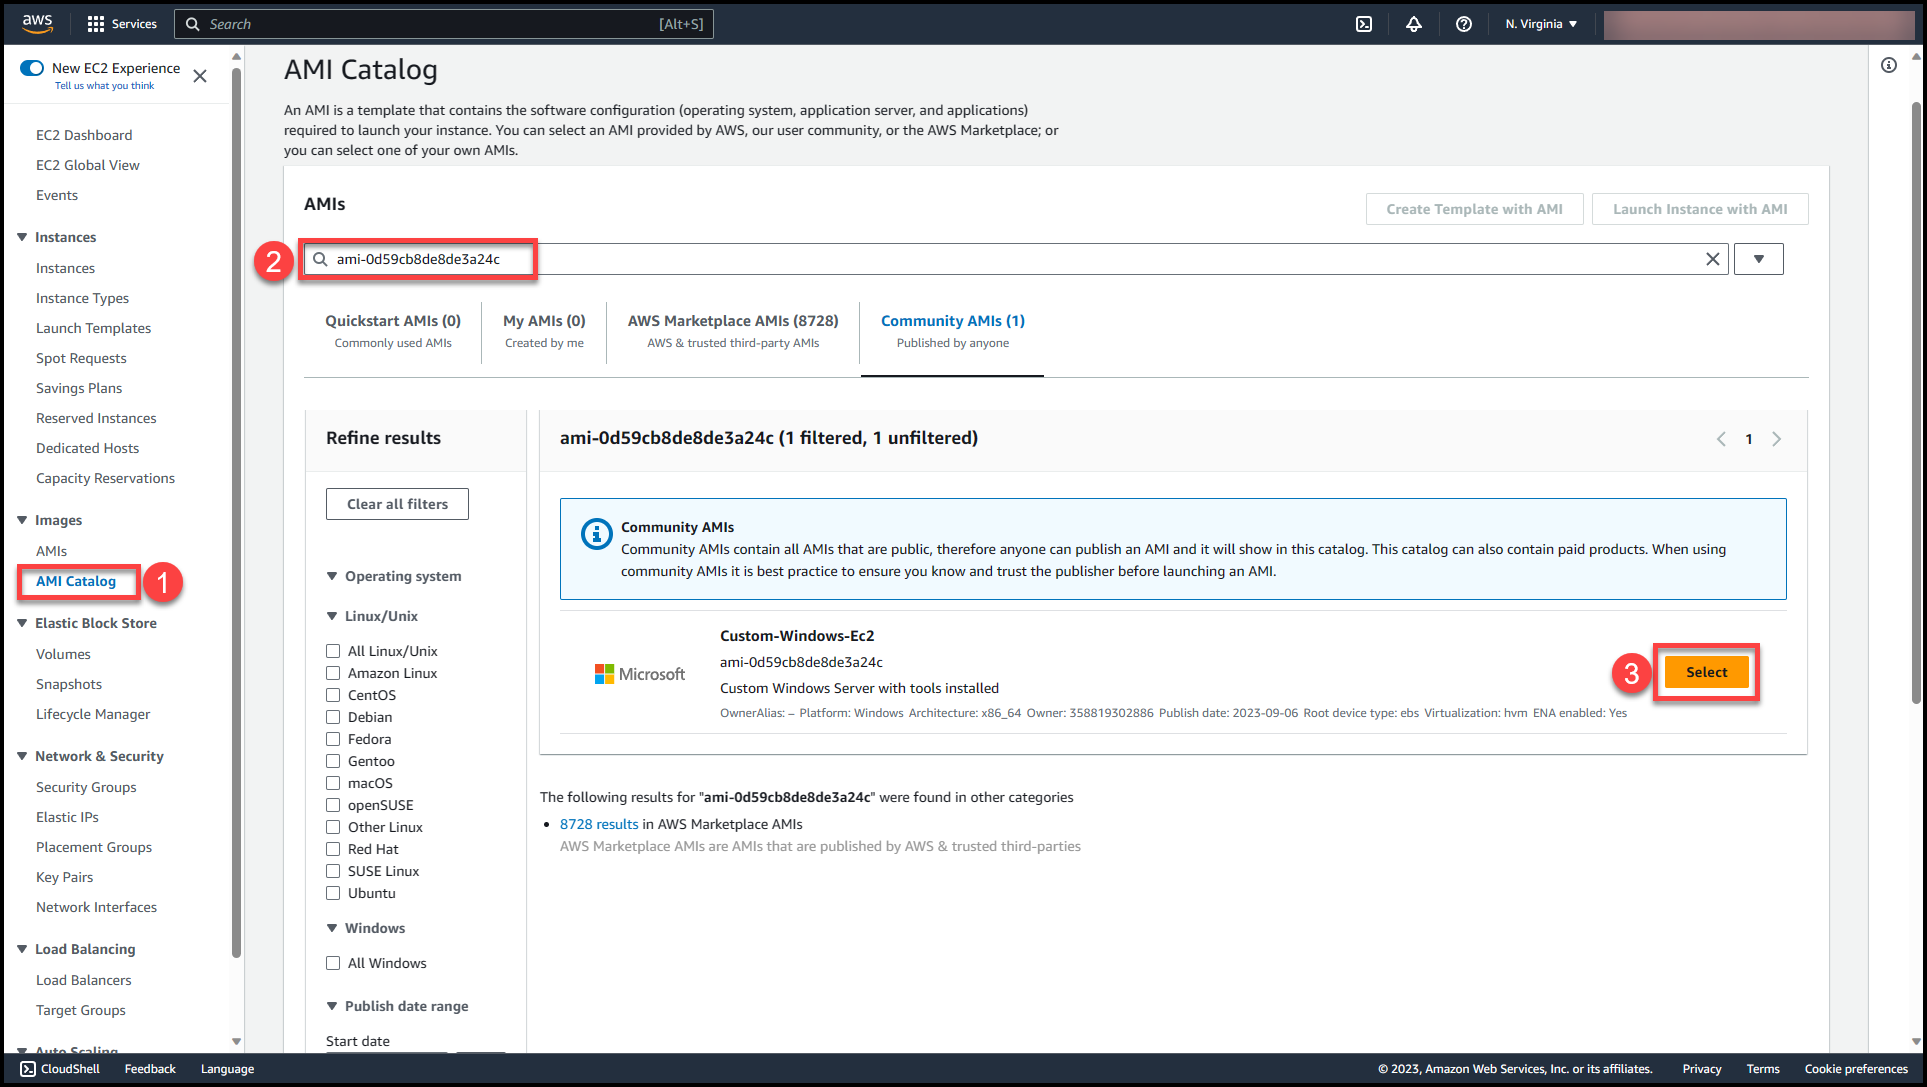
You can select the custom AMI created & start working with the pre-deployed resources & tools.
Cost Estimation for Custom AMI
The cost associated with an AMI is only the storage cost of the EBS snapshot through which the AMI gets created. The hourly cost for storing 1 GB of Data is $0.10 per month. Here we have an EBS Volume of 50 GB which will cost around $5 per month.
For more details on AMI costing check the following links:
Cost of storing EBS backed AMI
Steps for creating a custom EBS backed AMI from an EC2 Instance Using AWS CLI
In the AWS Console launch the Cloudshell.
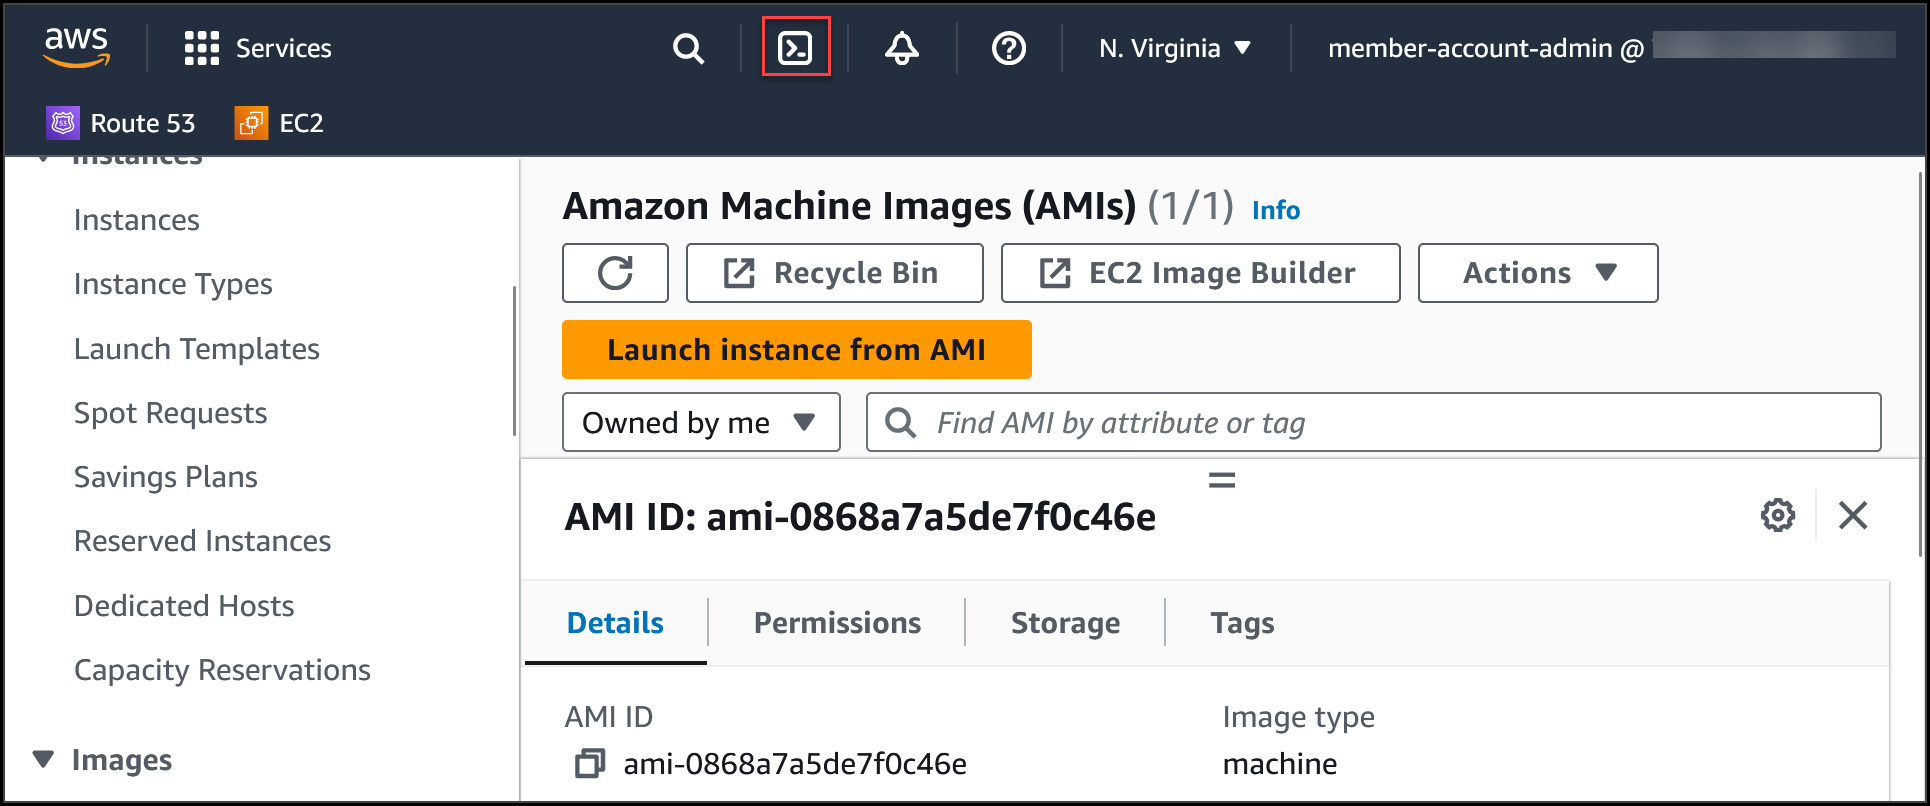
Once the Cloudshell terminal is ready copy the following code in a notepad, make changes acordingly, paste it in the terminal & hit Enter
aws ec2 create-image --instance-id i-00652d5ec7349636d --name MyCustomAAMI --description "This is my custom AMI" --NoReboot falseInstanceID: Instance ID of the instance out of which we want to build an AMI.
Name: Name of the custom AMI.
Description: Description of the Custom AMI.
NoReboot: Indicates whether or not the instance should be automatically rebooted before creating the image. Specify one of the following values:
true - The instance is not rebooted before creating the image. This creates crash-consistent snapshots that include only the data that has been written to the volumes at the time the snapshots are created. Buffered data and data in memory that has not yet been written to the volumes is not included in the snapshots.
false - The instance is rebooted before creating the image. This ensures that all buffered data and data in memory is written to the volumes before the snapshots are created.
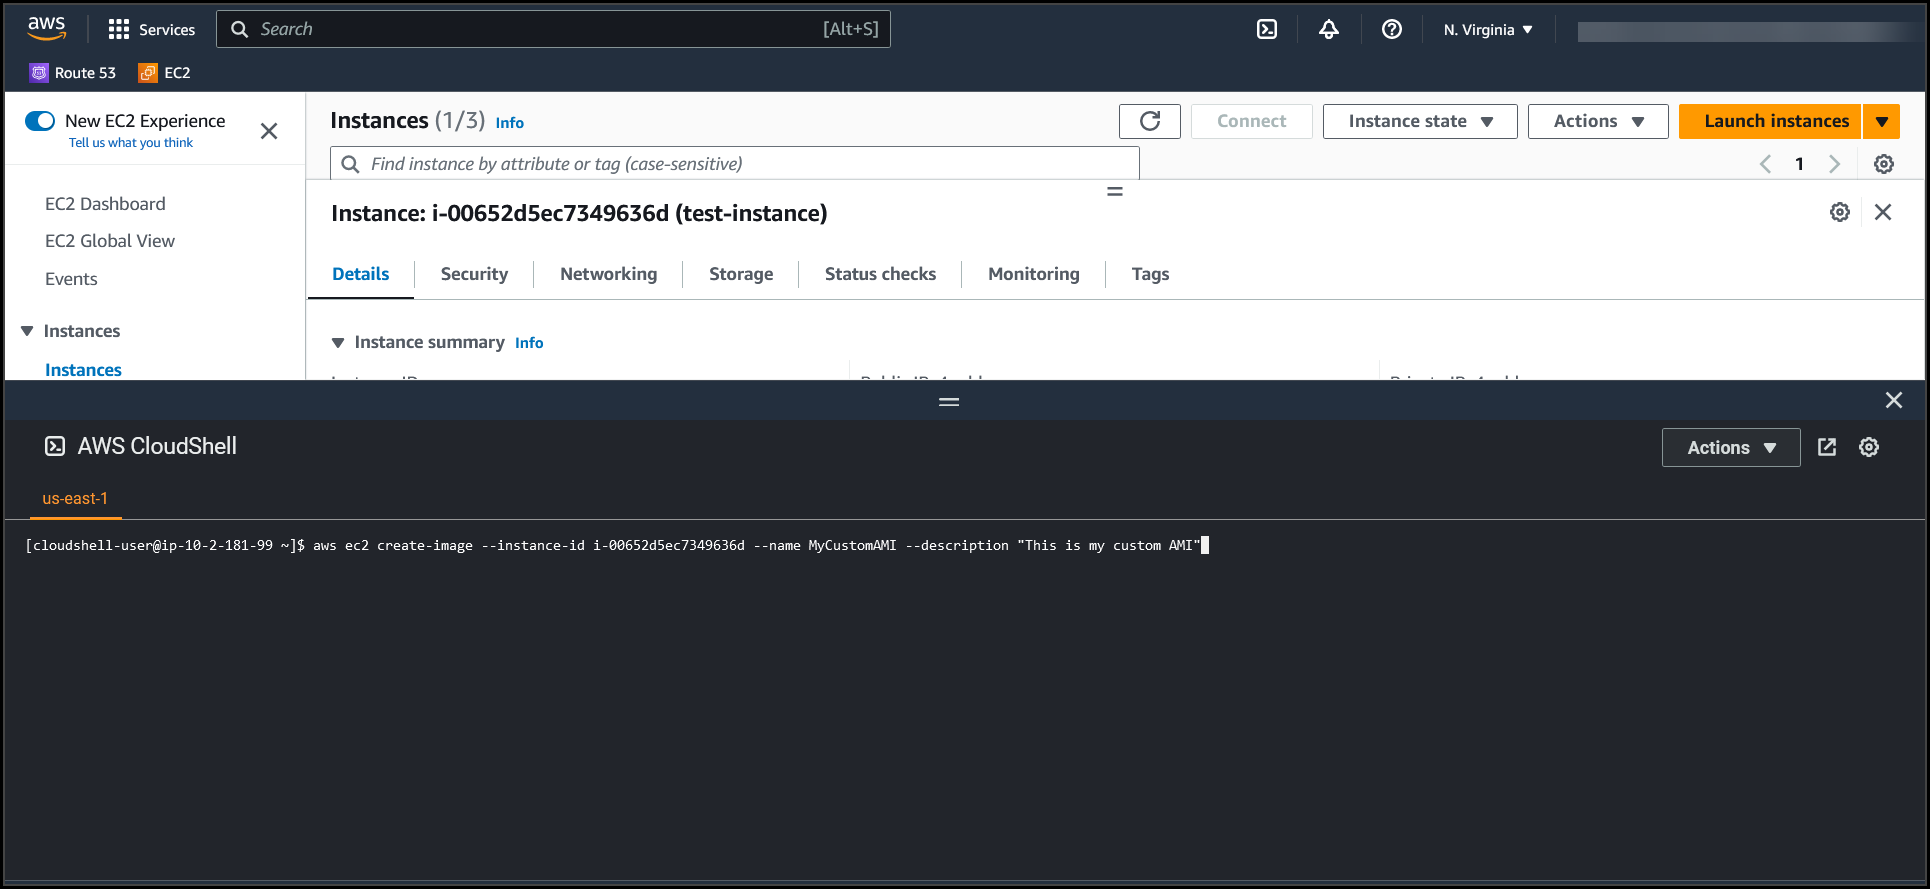
Once the command runs successfully, you will get the Custom AMI ID in the outputs.
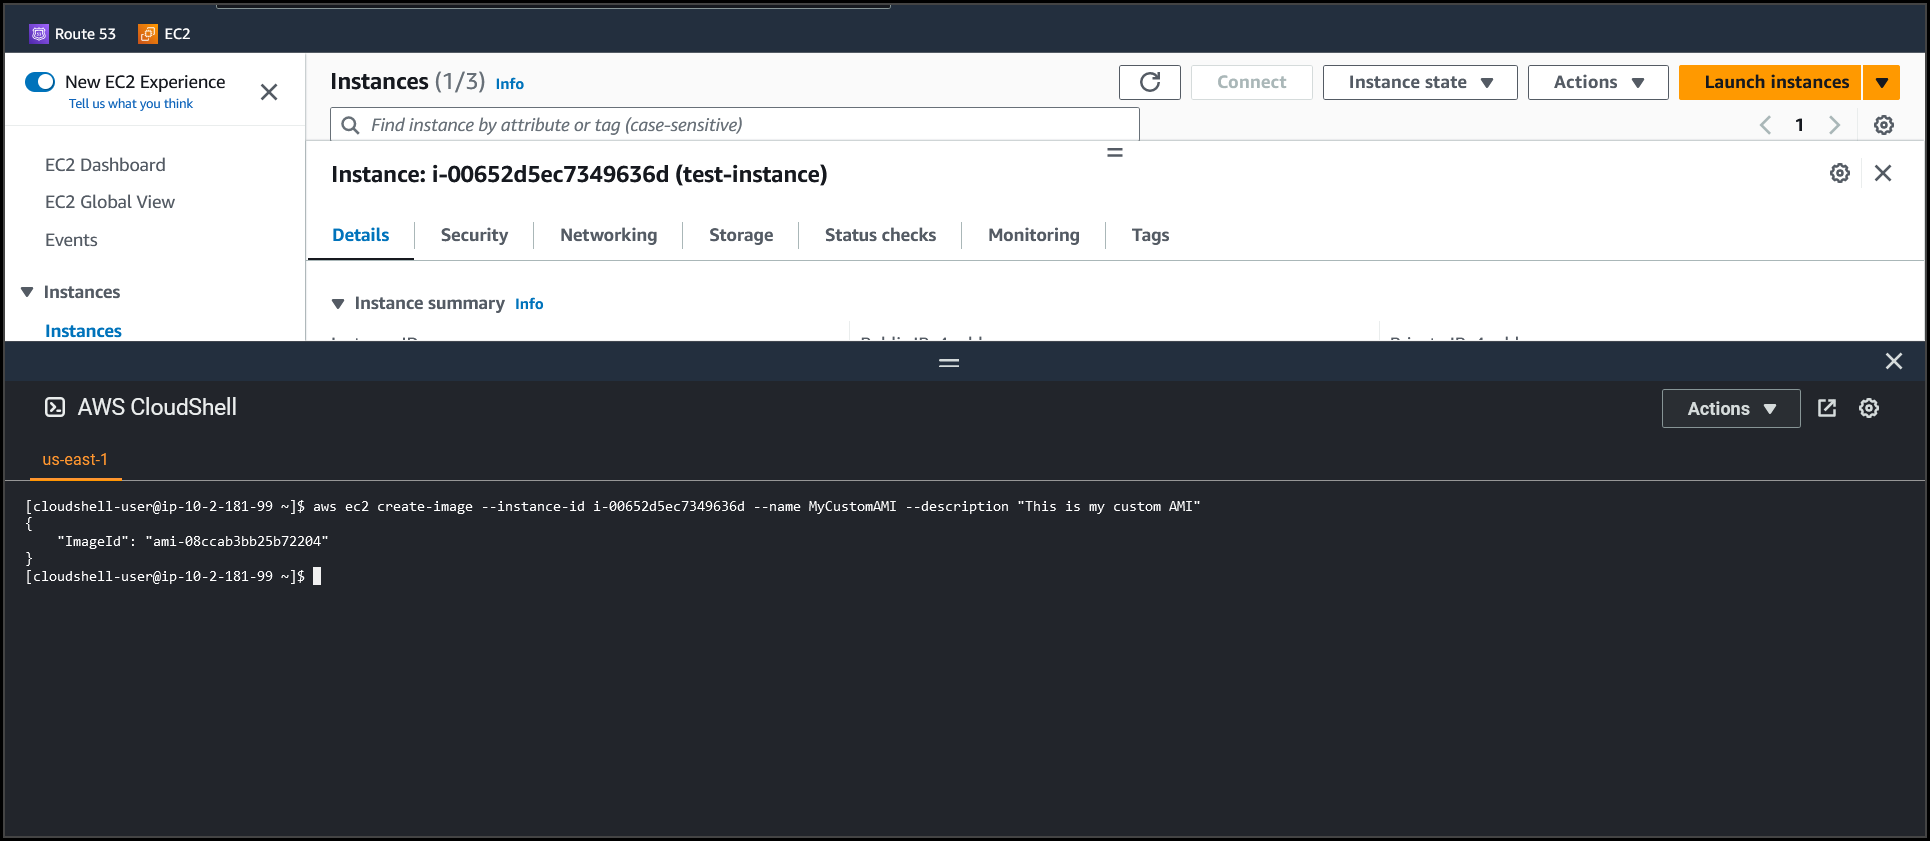
You can Navigate to the AMI section & verify your newly created custom AWS AMI.
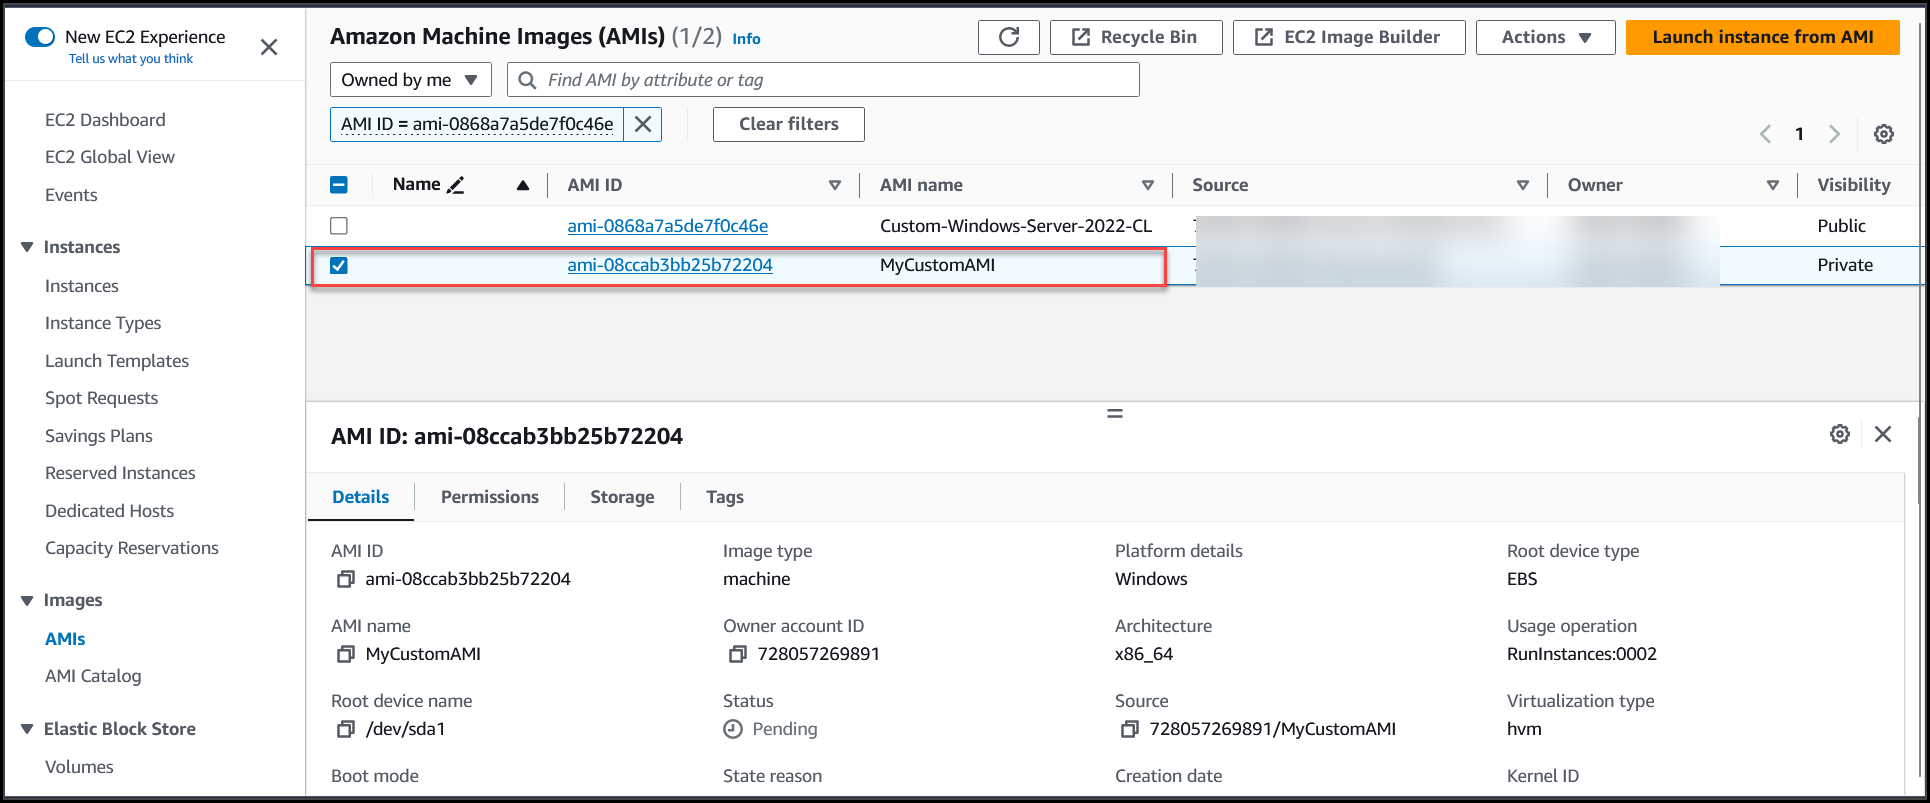
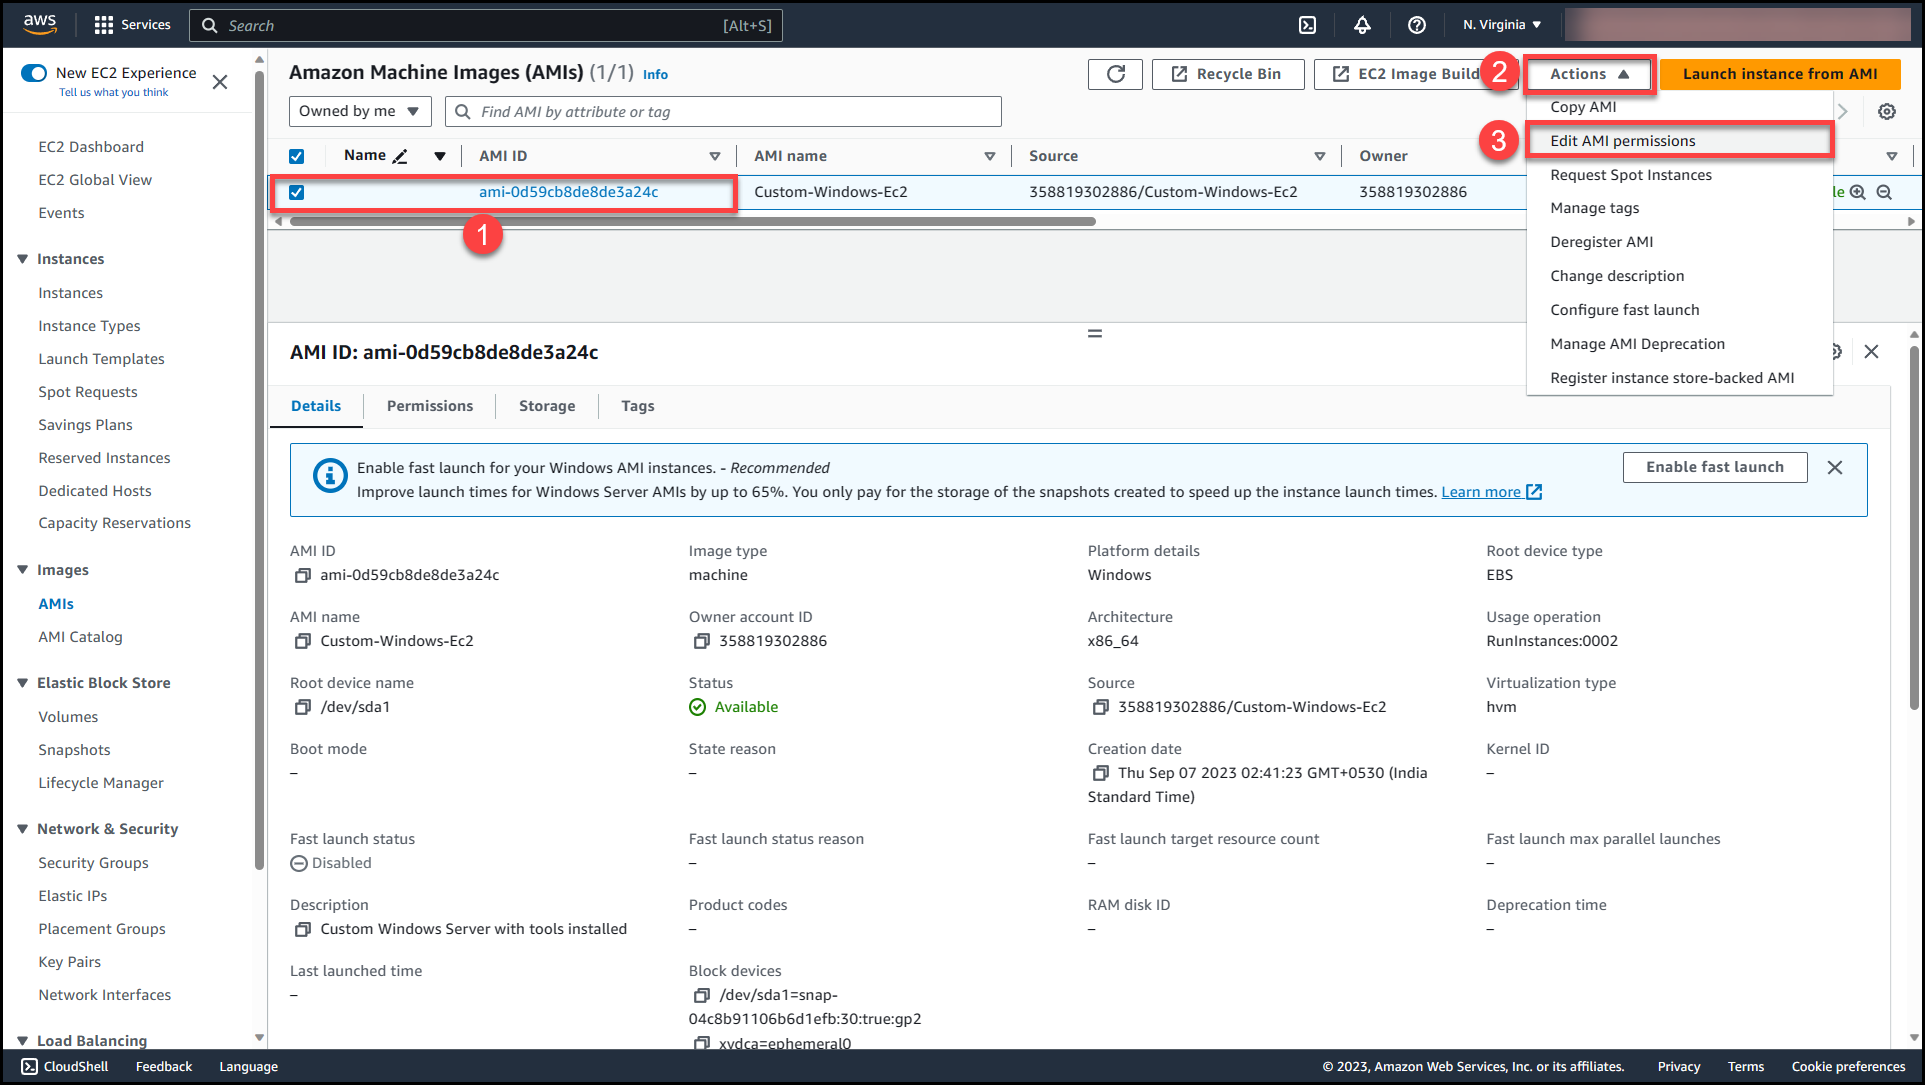
Once the image status changes to Available, we need to edit the permissions & make the AMI available for other Accounts to access the AMI. Select the AMI (1) >>Navigate to Actions (2) >> Edit AMI permissions (3)
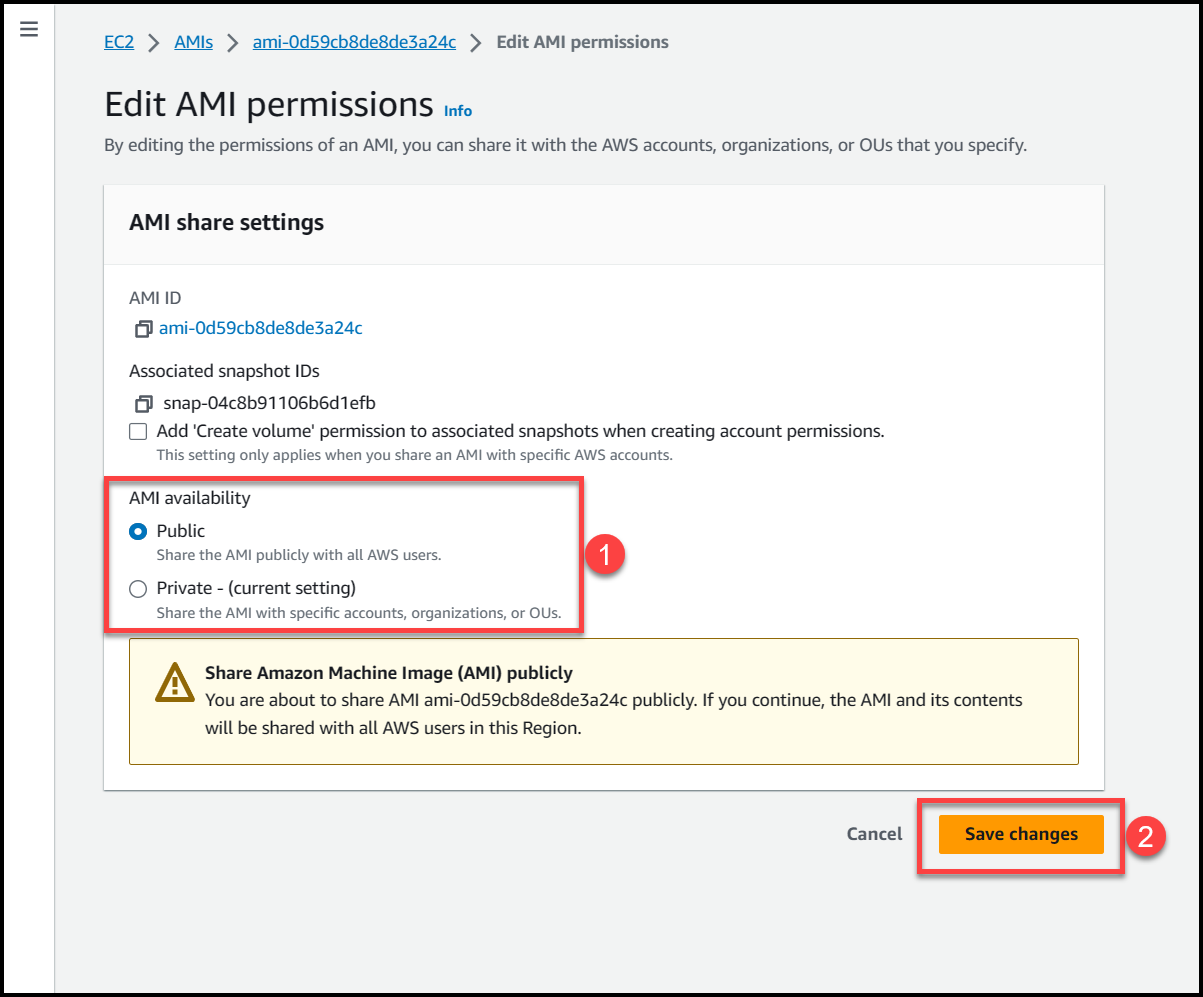
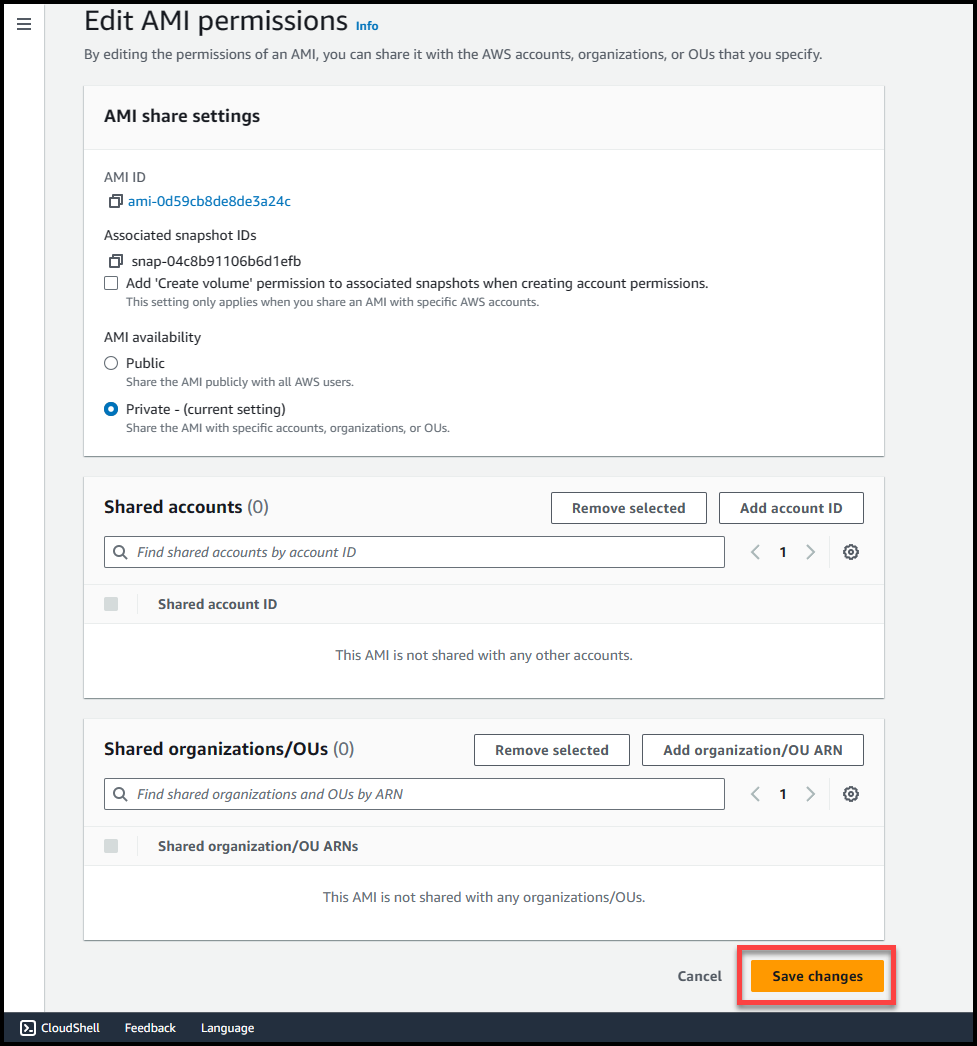
Here we will get 2 options either to make this AMI public or private. Selecting public access will make the AMI available across all AWS organizations & accounts in the region where AMI is present.
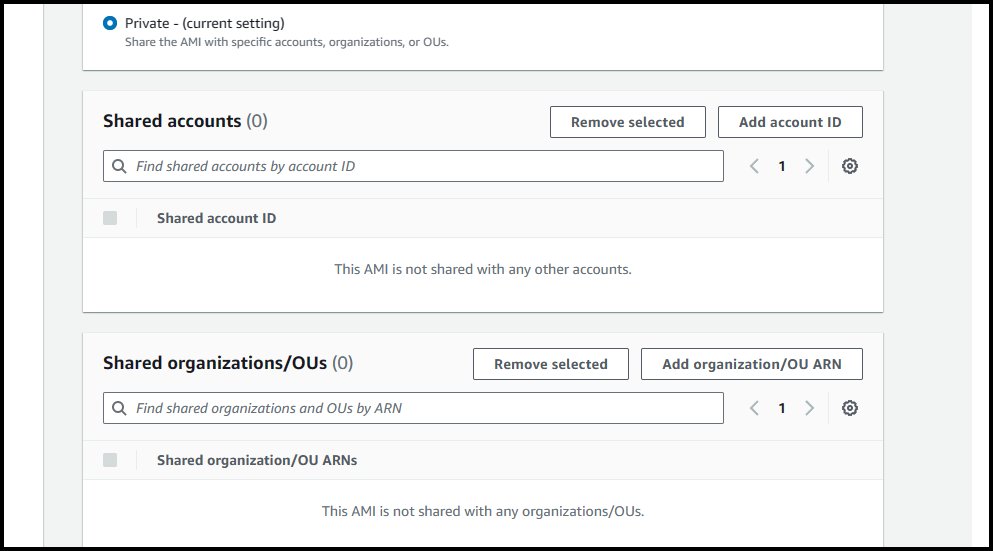
If we select private access, then we can specify the AWS accounts or Organizational Units where we want this AMI to be accessible from.
Once you’ve selected the permission type, click on Save Changes
To validate the availability of AMI, log in to any AWS account (if permissions are public) or to respective AWS accounts where access has been provided & try to deploy an EC2 instance with this AMI (ensure that we are deploying the EC2 instance only in the region where AMI is available)
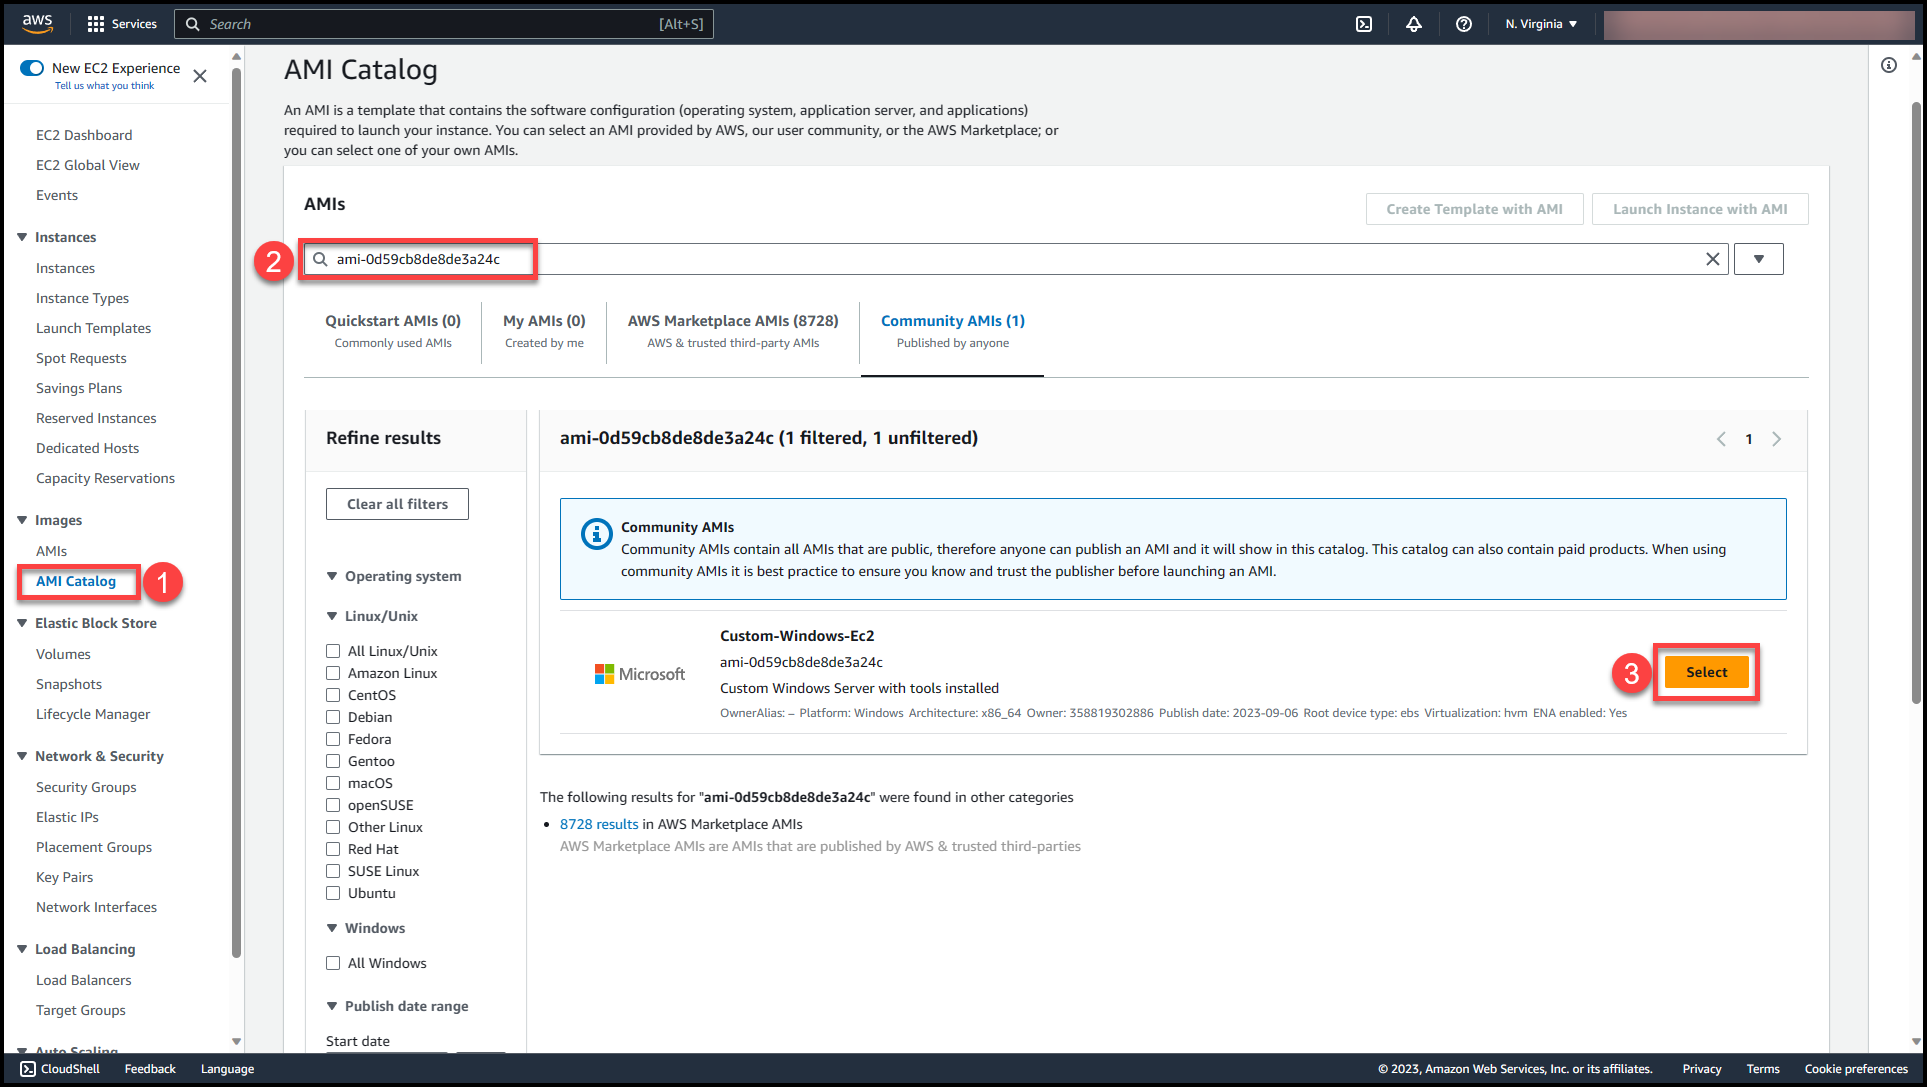
You can select the custom AMI created & start working with the pre-deployed resources & tools.
Copying an EBS backed AMI from one region to another region using AWS Console
Steps for copying a custom EBS backed AMI from an EC2 Instance Using AWS Console
Select the custom AMI which we must copy (1), next navigate to Actions dropdown (2) & select Copy Image (3).

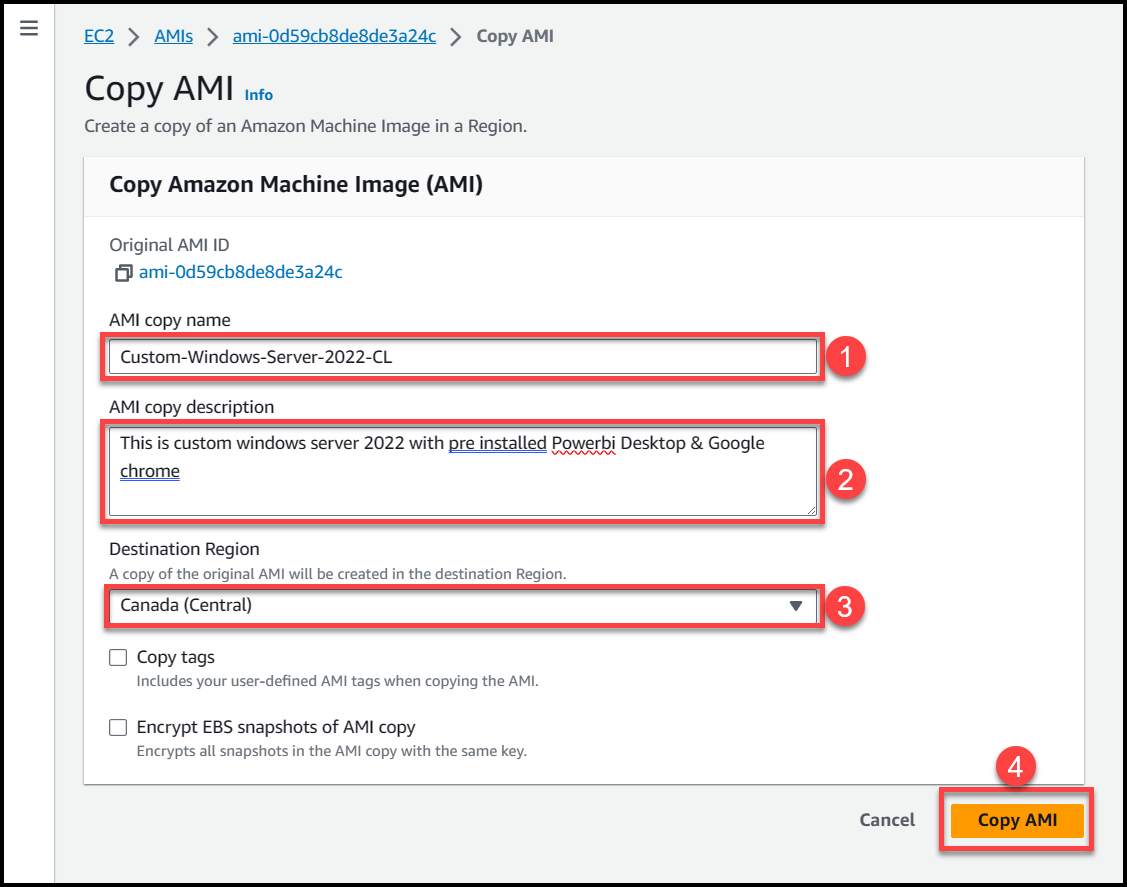
Fill in the required details AMI Image Name (1), AMI Description (2), Destination Region (3) where you want to copy the image & then click on Copy AMI (4)
Once the Copy Image action is initiated, select the Region tab (1) & from the dropdown navigate to the region where the image is copied (2)

Verify the state of the copied AMI, wait for the status to change from Pending to Available (It might take 15-20 minutes to get the image ready to use).


Once the image status changes to Available, we need to edit the permissions & make the AMI available for other Accounts to access the AMI. Select the AMI (1) >>Navigate to Actions (2) >> Edit AMI permissions (3)
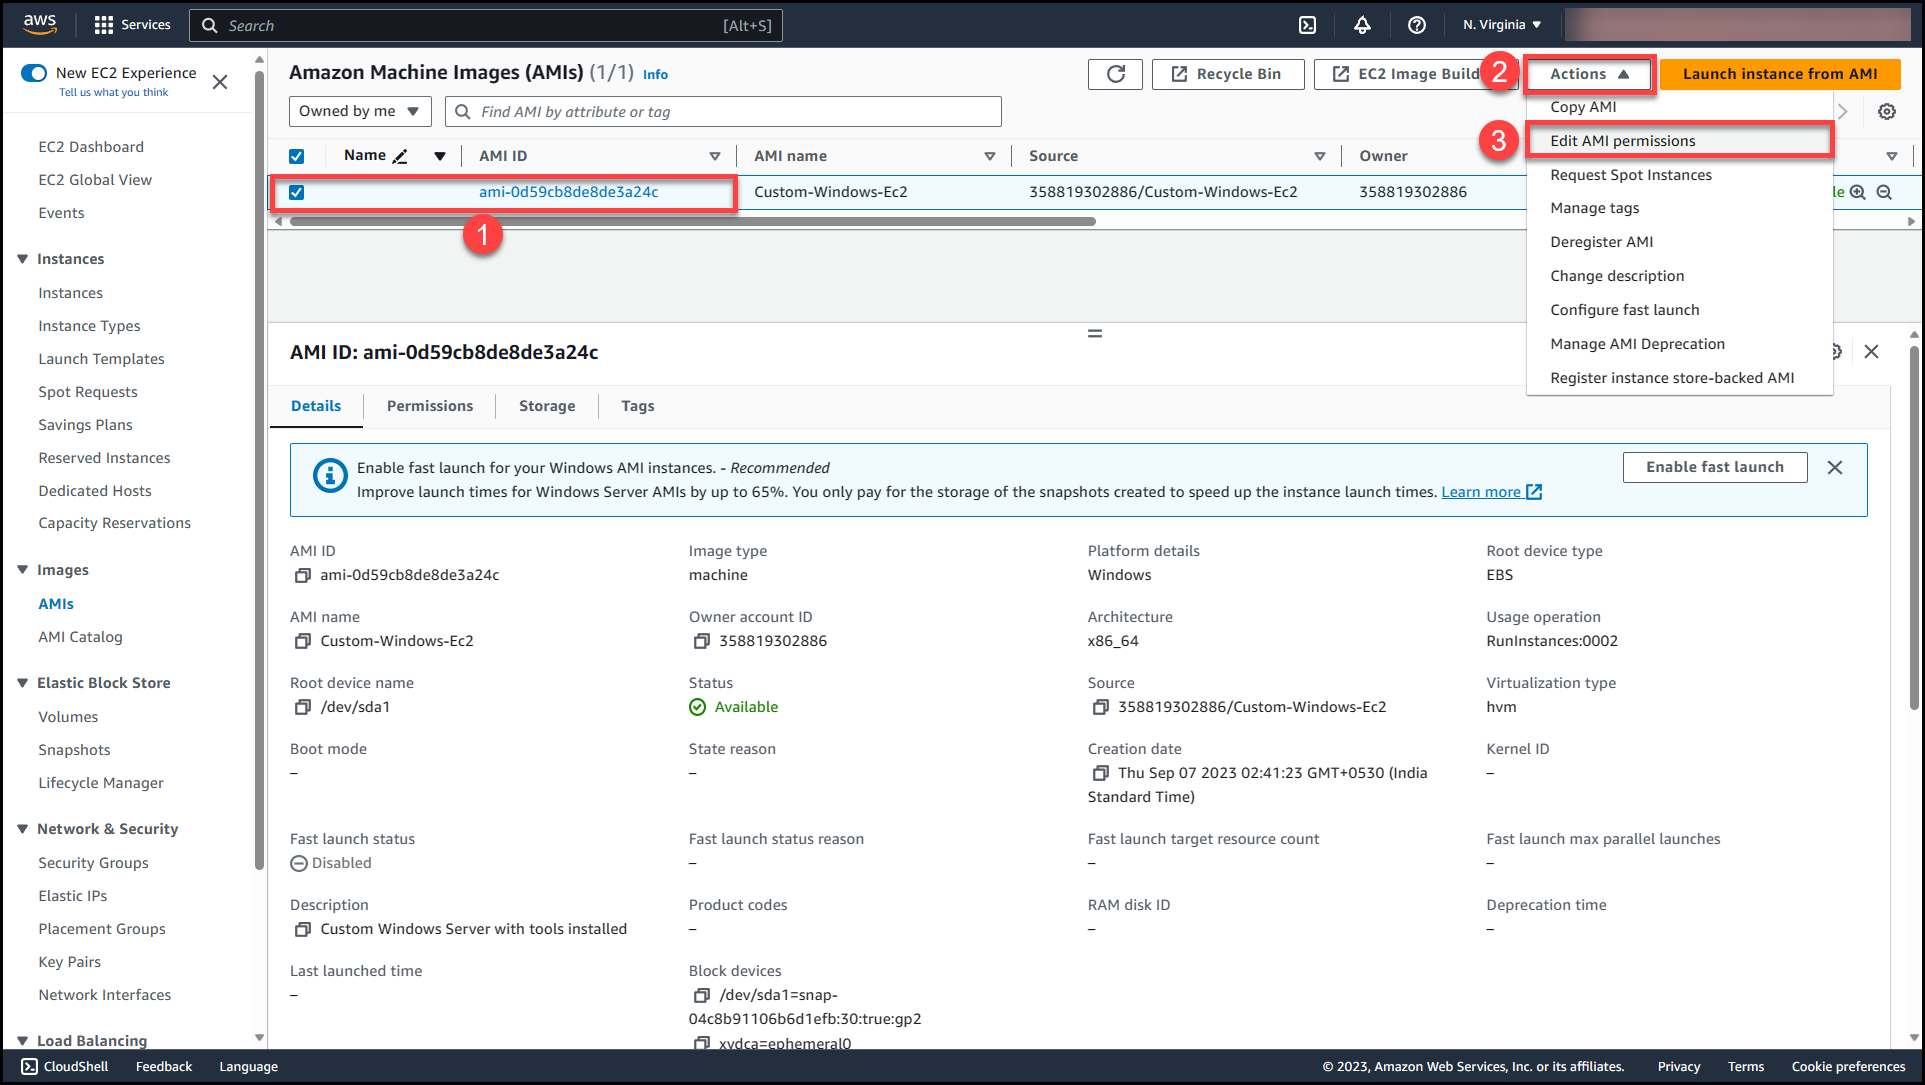
Here we will get 2 options either to make this AMI public or private. Selecting public access will make the AMI available across all AWS organizations & accounts in the region where AMI is present.
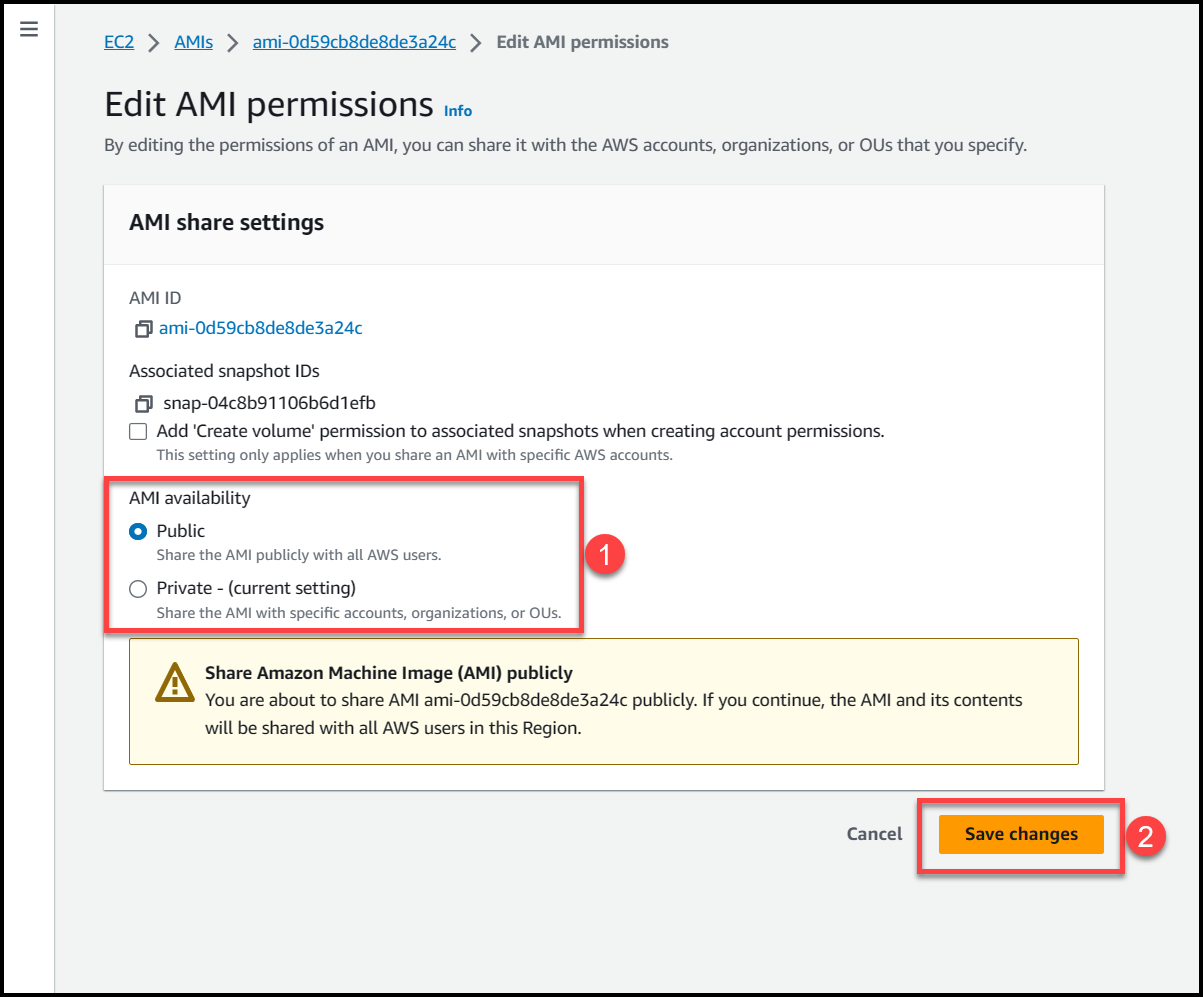
If we select private access, then we can specify the AWS accounts or Organizational Units where we want this AMI to be accessible from.
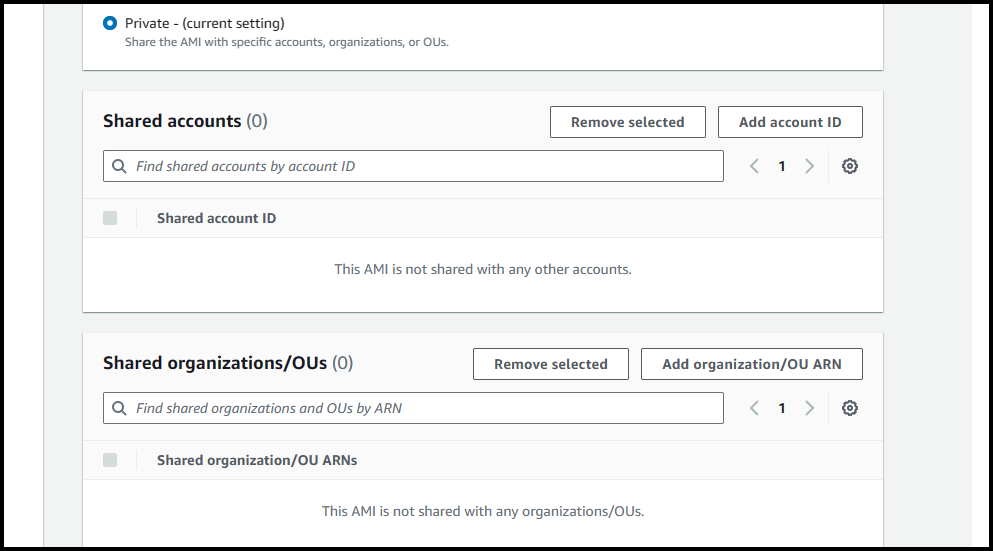
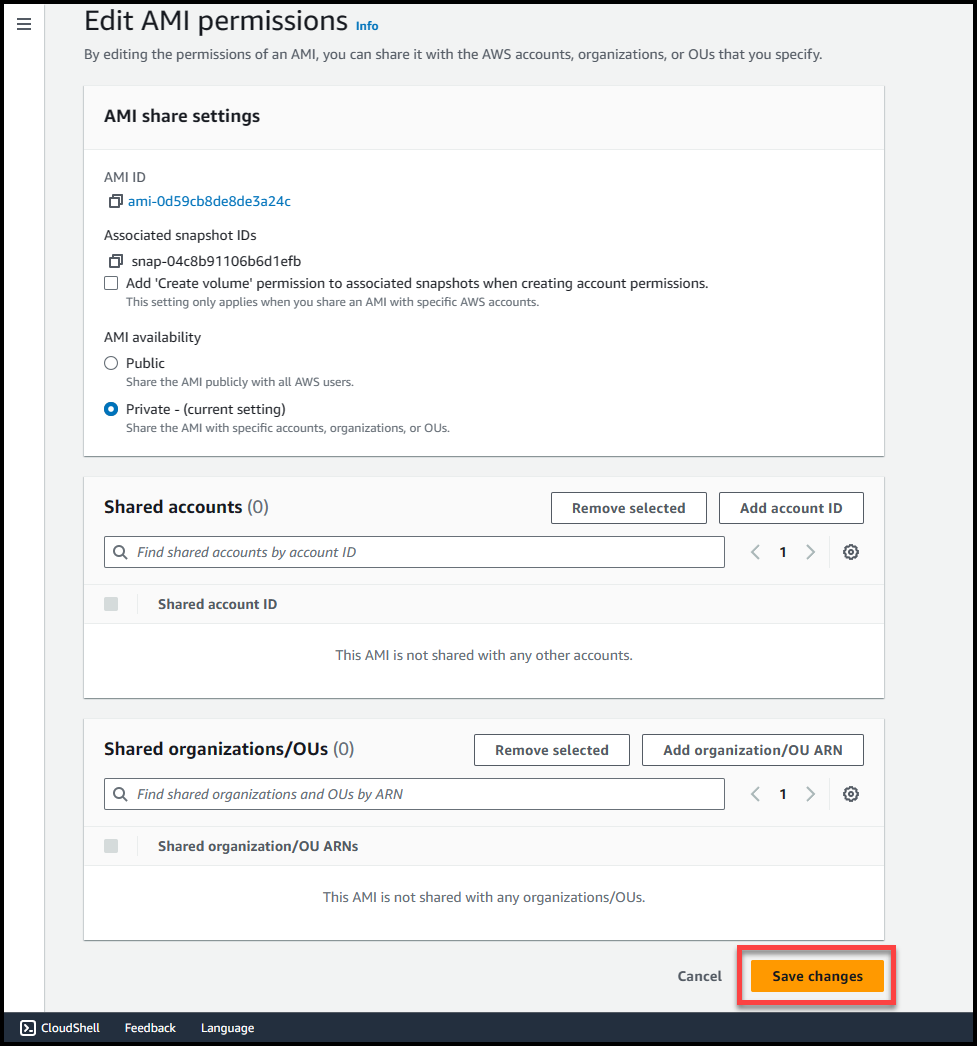
Once you’ve selected the permission type, click on Save Changes
To validate the availability of AMI, log in to any AWS account (if permissions are public) or to respective AWS accounts where access has been provided & try to deploy an EC2 instance with this AMI (ensure that we are deploying the EC2 instance only in the region where AMI is available)
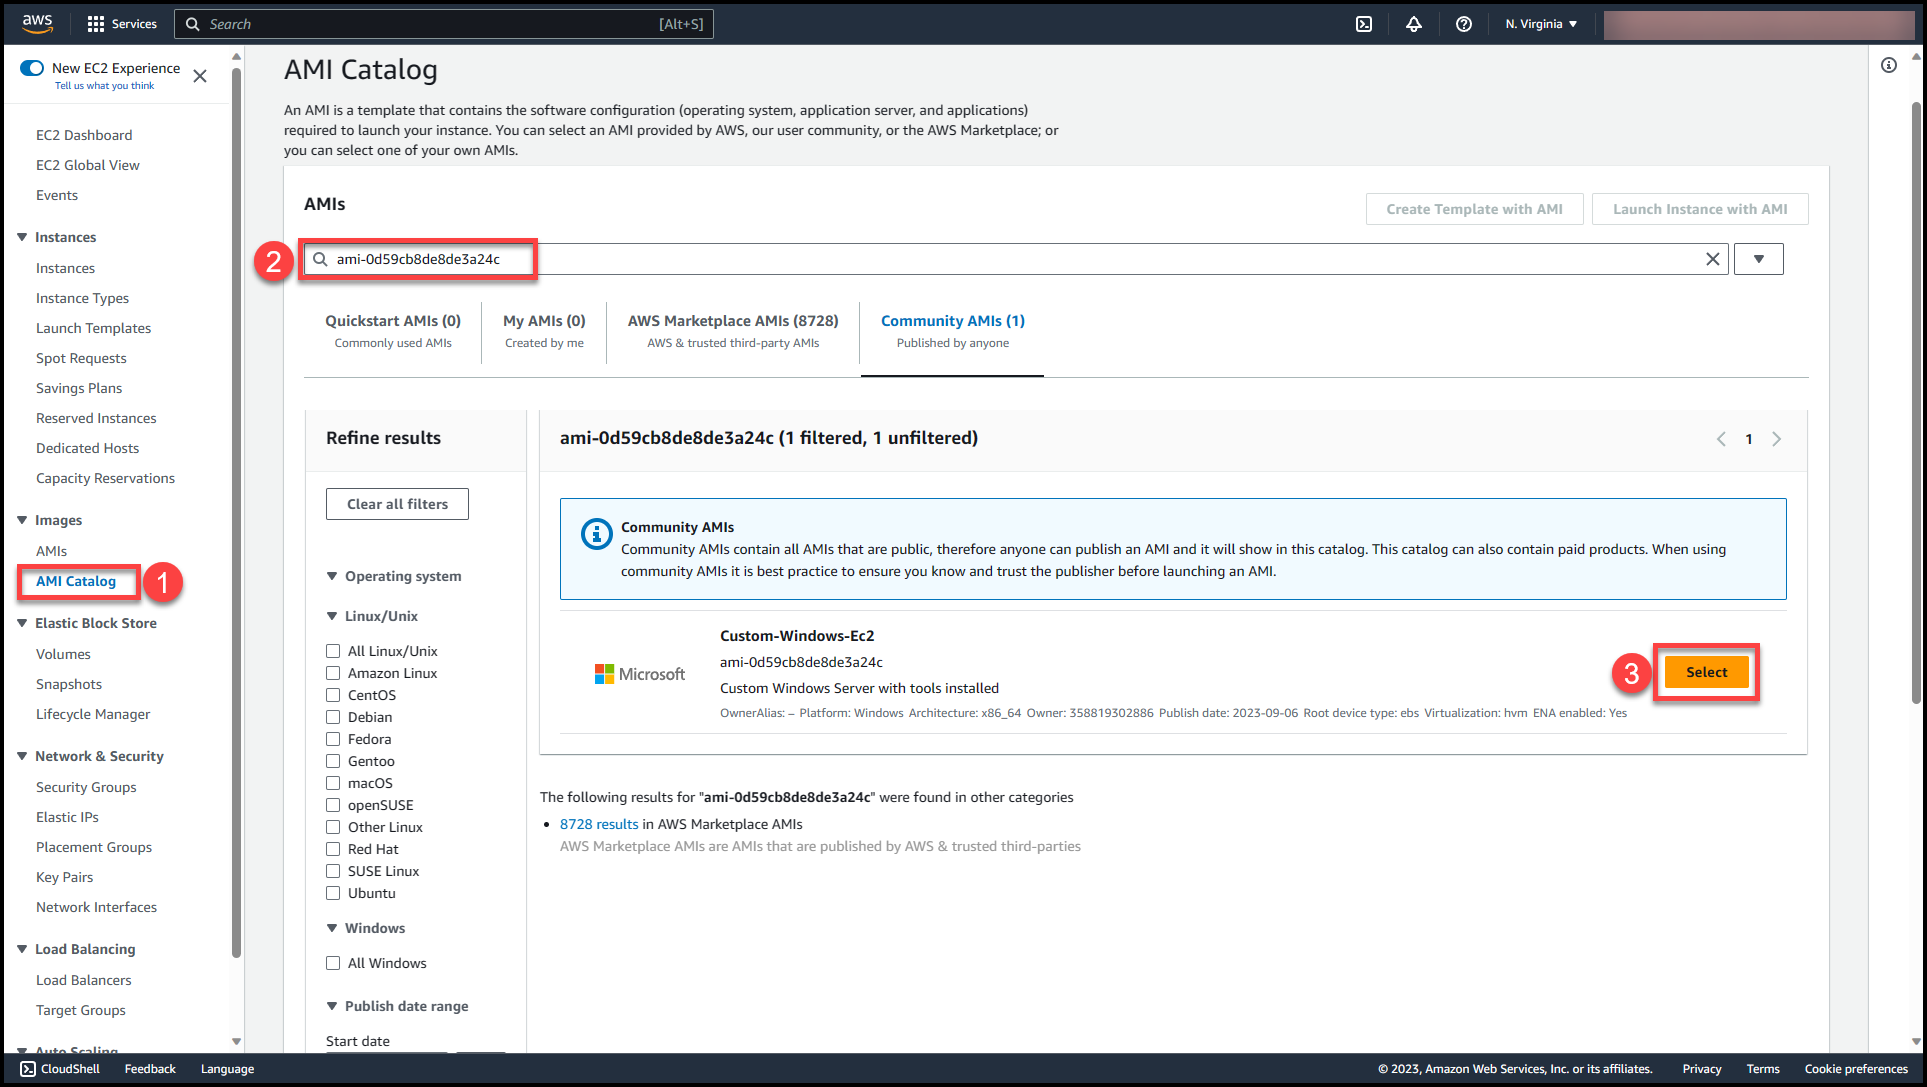
You can select the custom AMI created & start working with the pre-deployed resources & tools.
Steps for copying a custom EBS backed AMI from an EC2 Instance Using AWS CLI
In the AWS Console launch the Cloudshell.
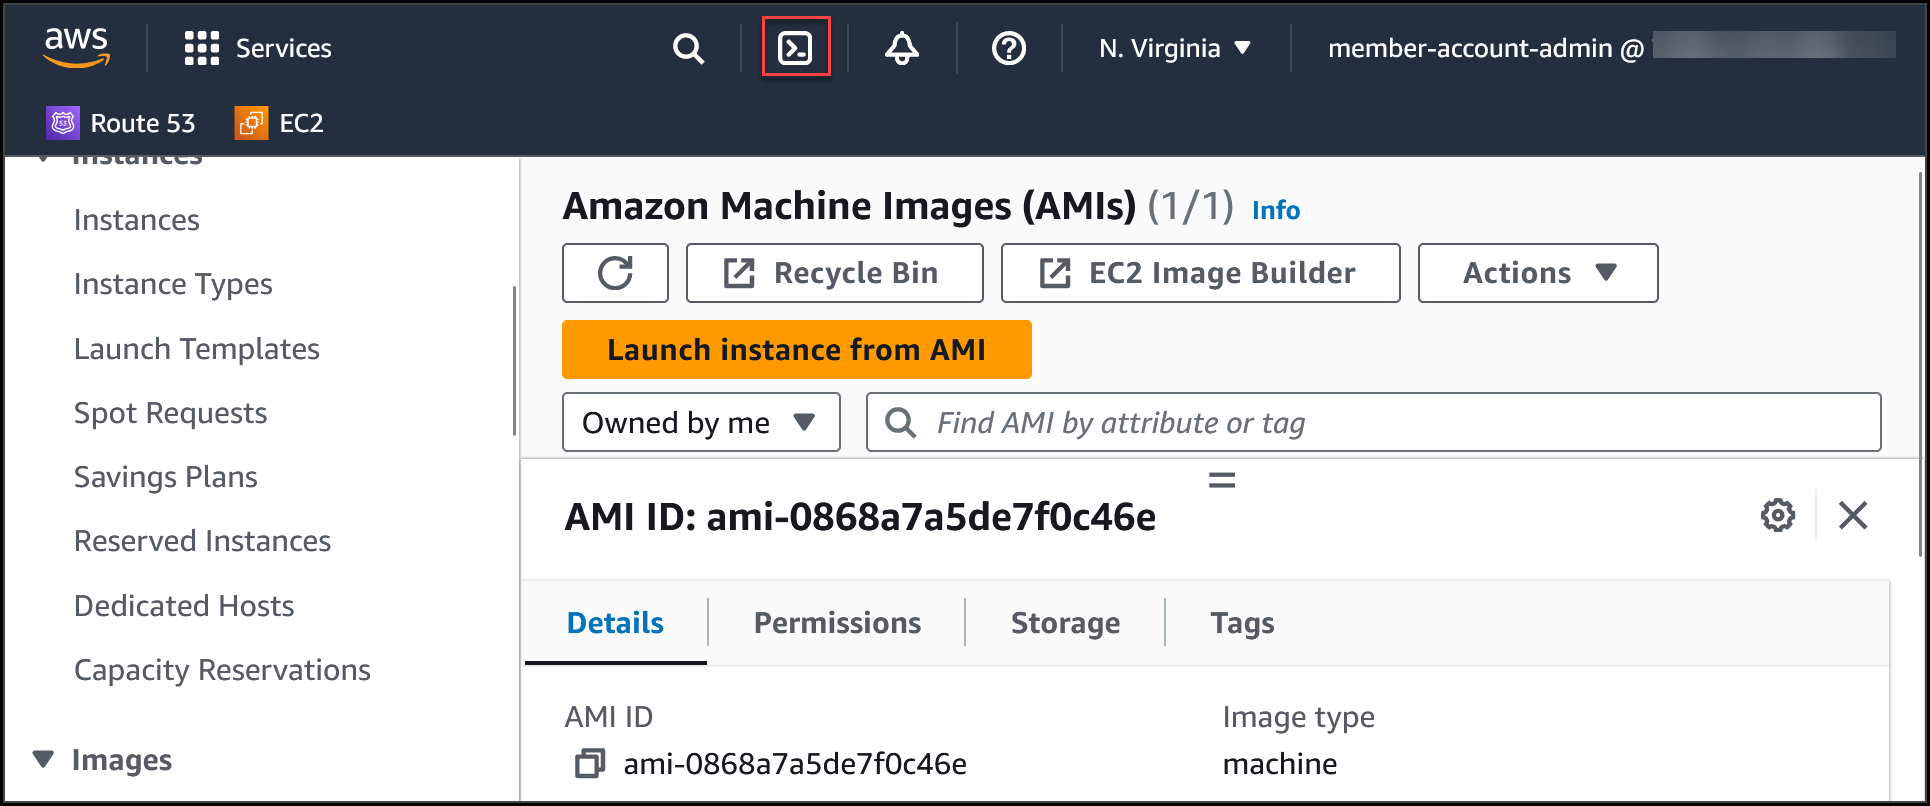
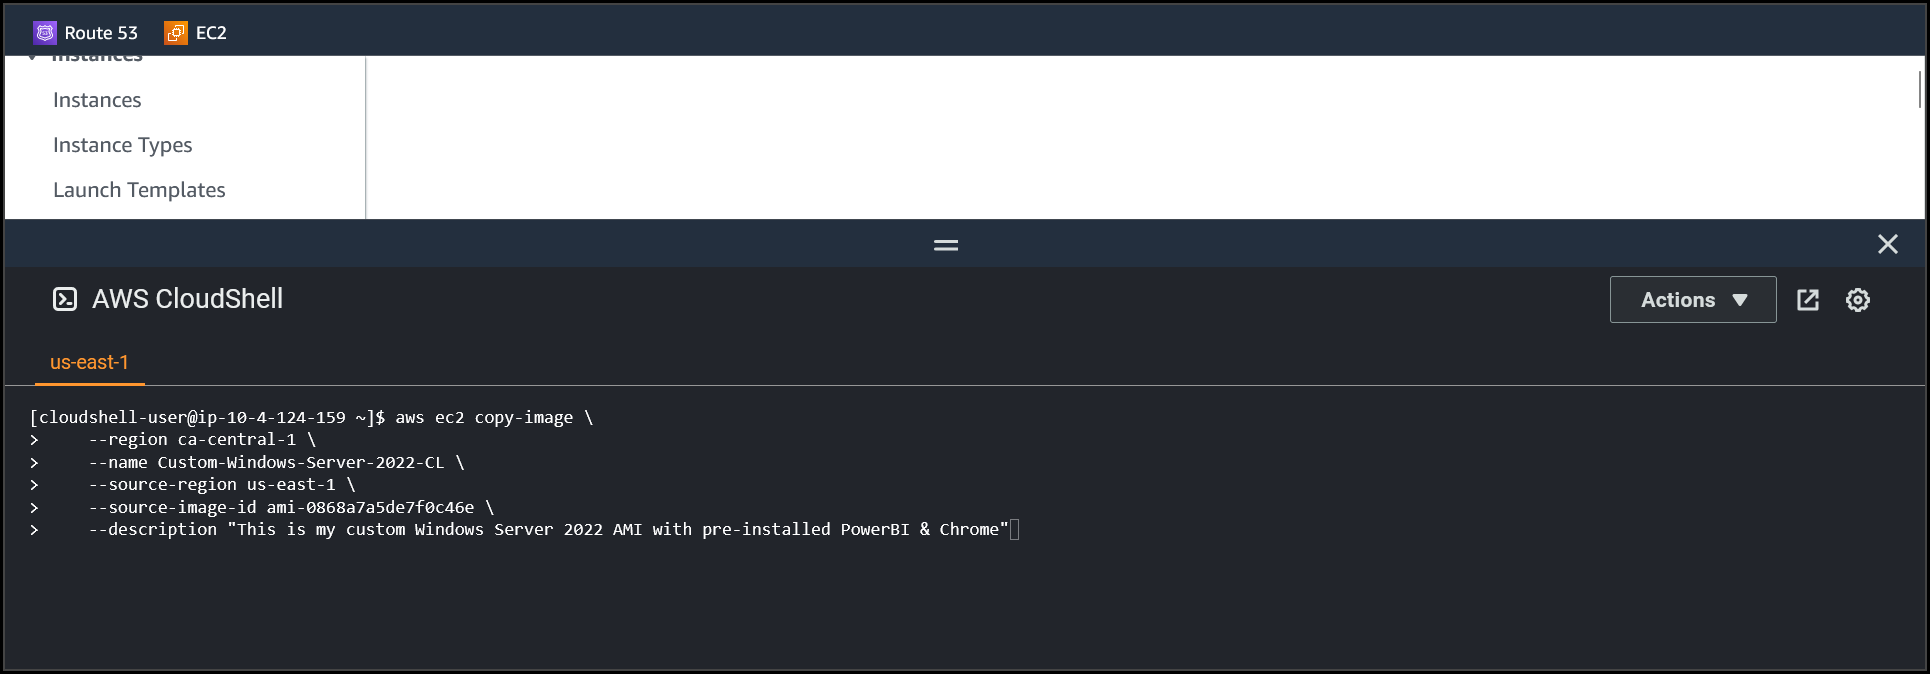
Once the Cloudshell terminal is ready copy the following code in a notepad, make changes acordingly, paste it in the terminal & hit Enter
aws ec2 copy-image \
    --region ca-central-1 \
    --name Custom-Windows-Server-2022-CL \
    --source-region us-east-1 \
    --source-image-id ami-0868a7a5de7f0c46e \
    --description "This is my custom Windows Server 2022 AMI with pre-installed PowerBI & Chrome"
region: Enter the region where you want to copy the custom AMI
name: Name of the custom AMI
source-region: Enter the region where the custom AMI is present.
source-image-id: The AMI ID of the source custom image.
description: Provide the description you want to add to the Custom AMI.
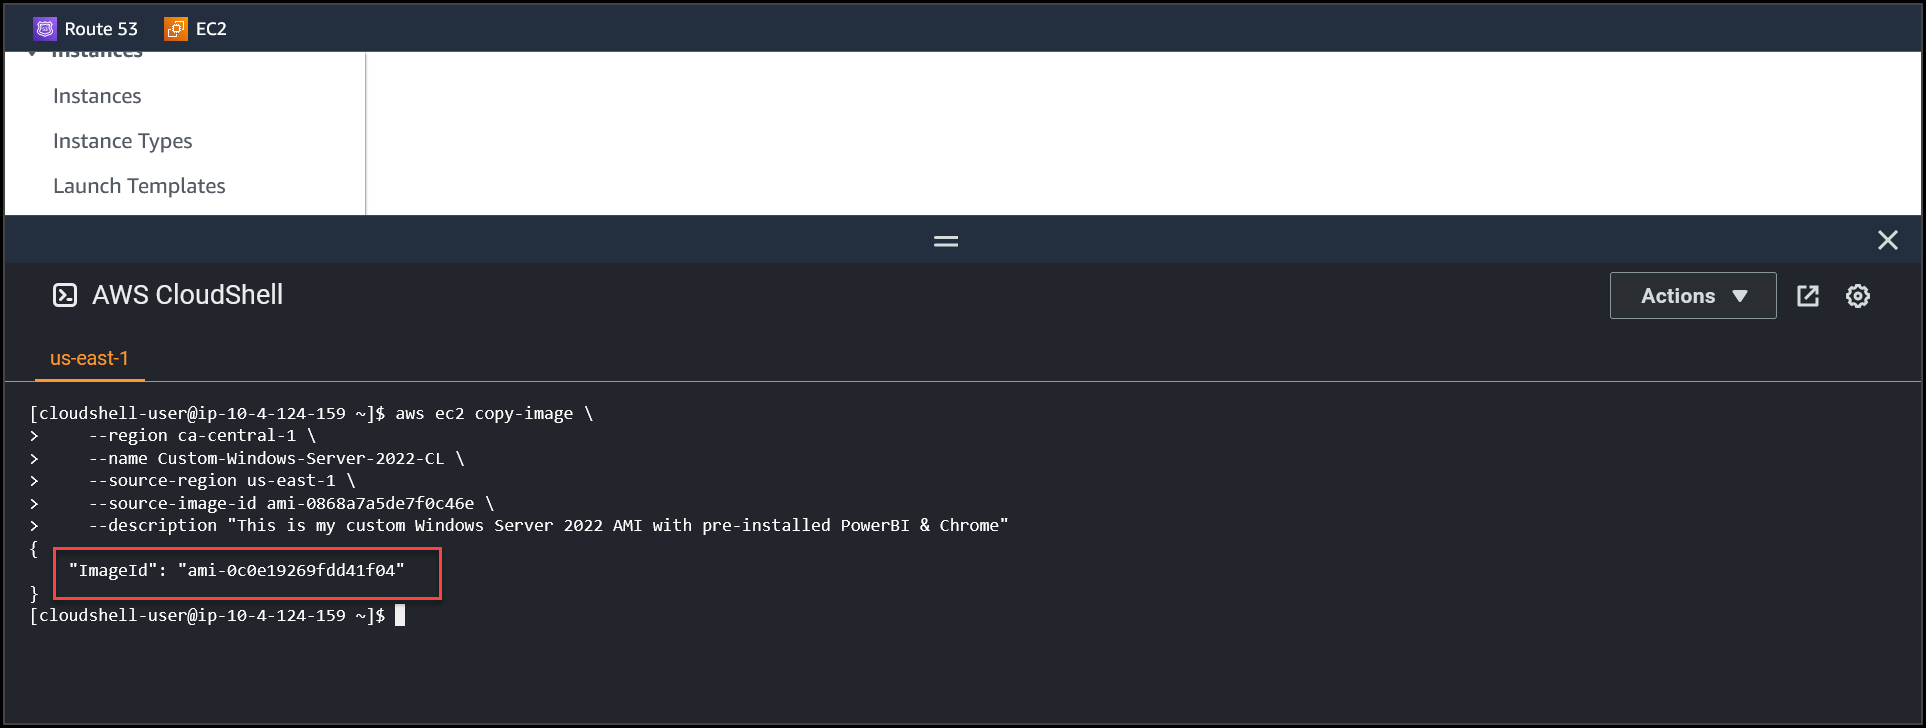
Once the command runs successfully, you will receive an output which will be the AMI ID of the custom image replicated to another region.

Navigate to the region where this Custom AMI is replicated & verify the status.

Once the image status changes to Available, we need to edit the permissions & make the AMI available for other Accounts to access the AMI. Select the AMI (1) >>Navigate to Actions (2) >> Edit AMI permissions (3)
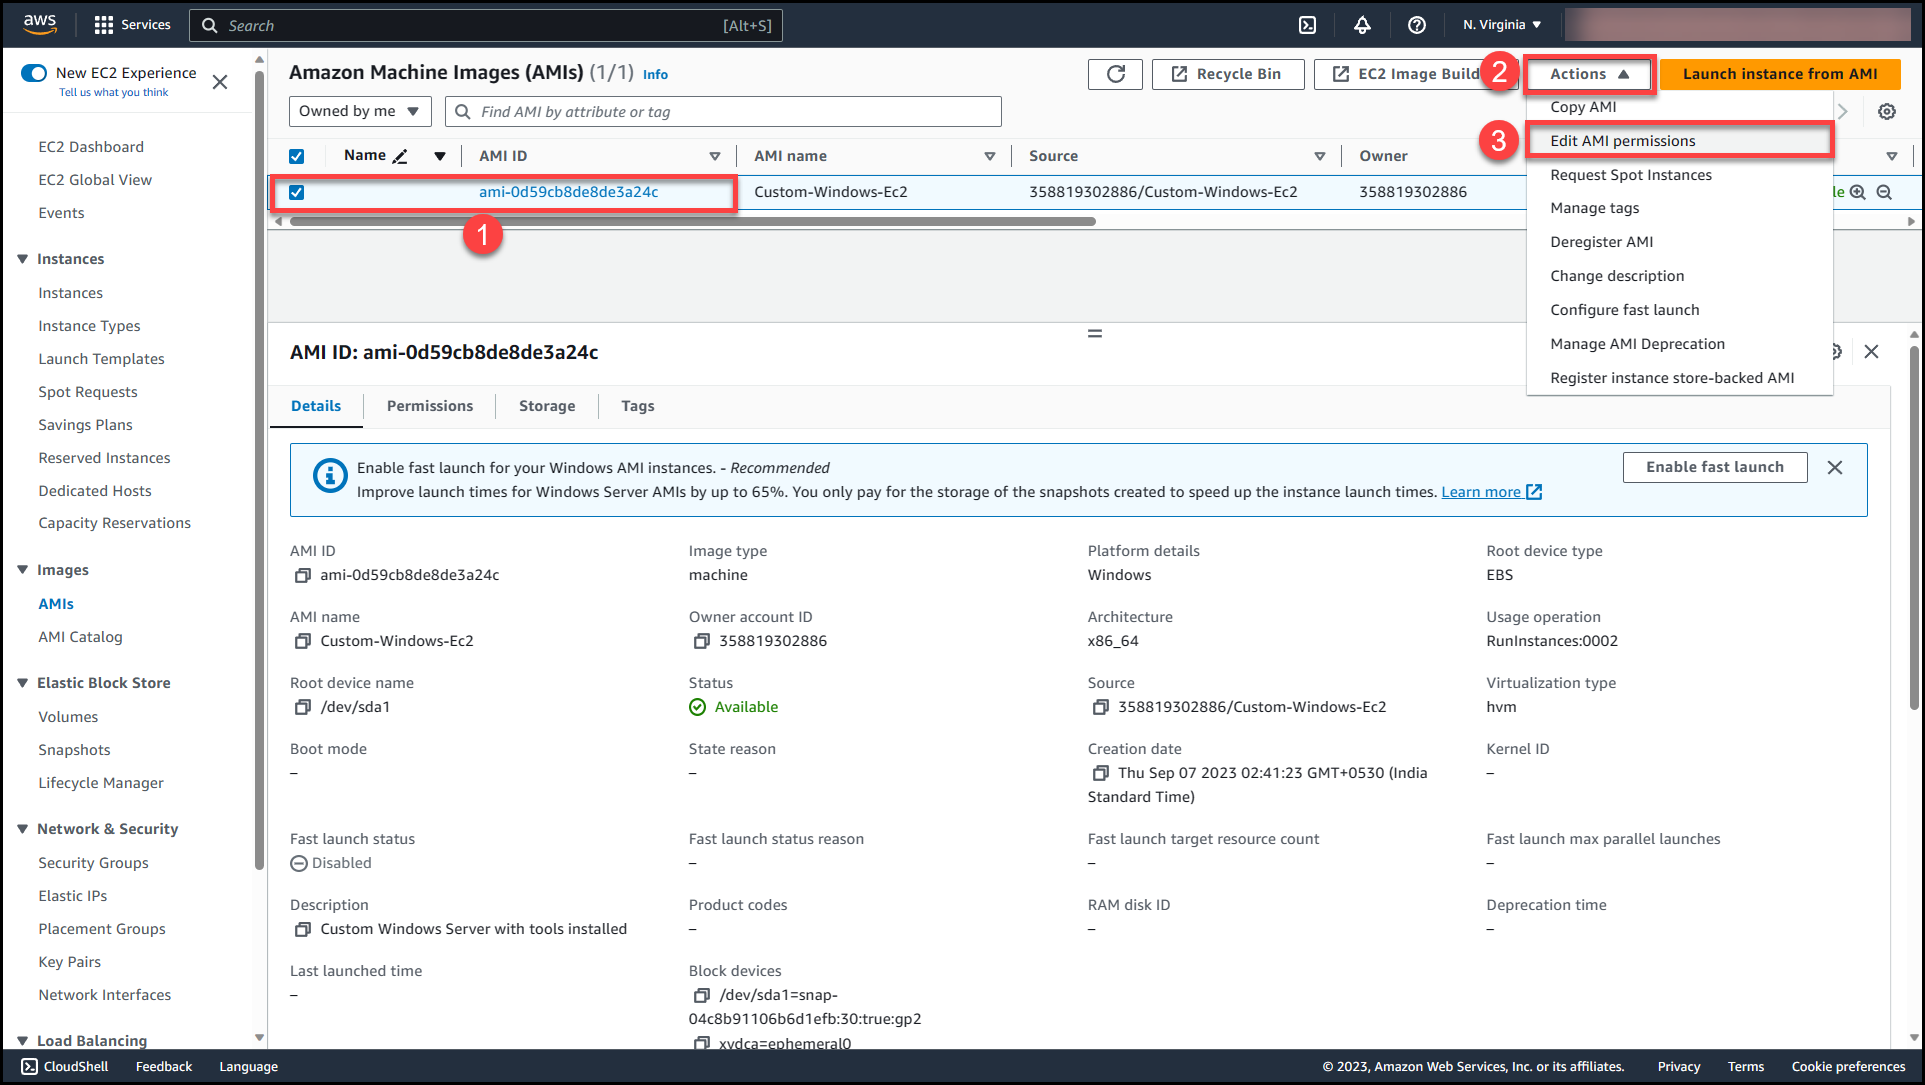
Here we will get 2 options either to make this AMI public or private. Selecting public access will make the AMI available across all AWS organizations & accounts in the region where AMI is present.
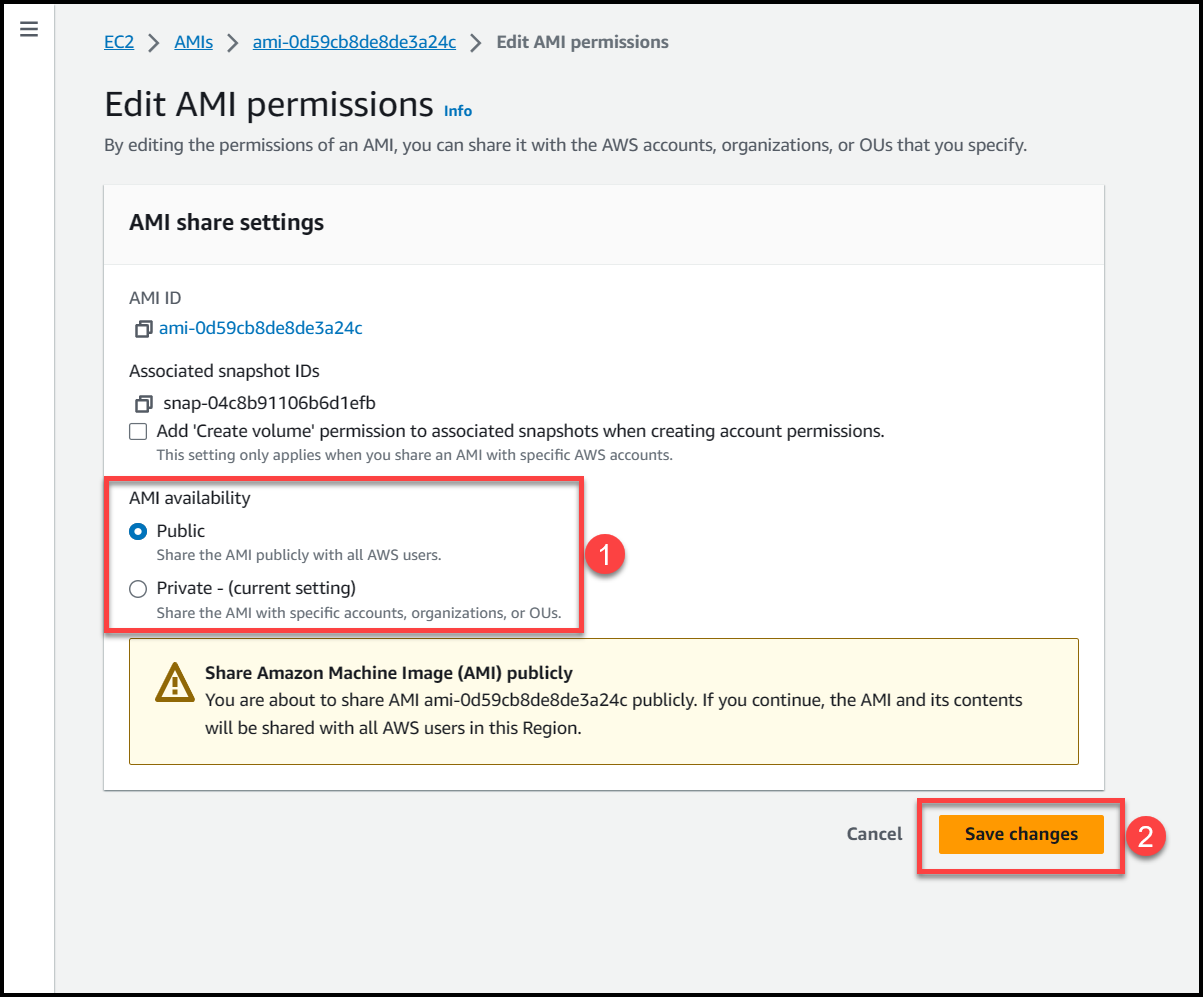
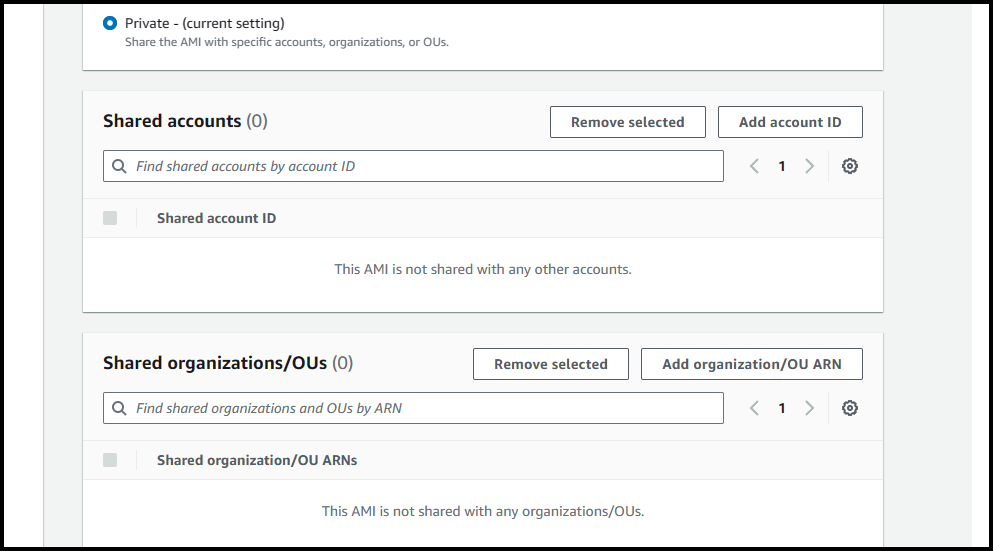
If we select private access, then we can specify the AWS accounts or Organizational Units where we want this AMI to be accessible from.
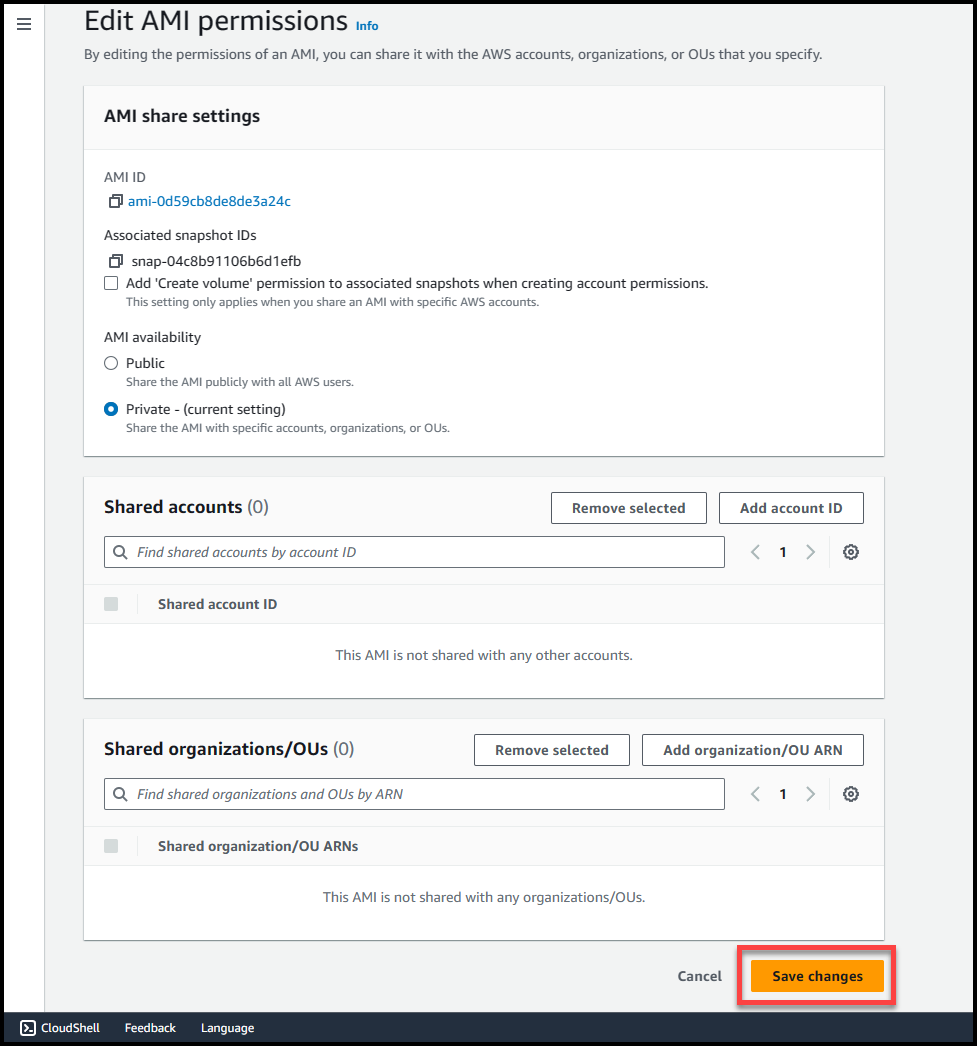
Once you’ve selected the permission type, click on Save Changes
To validate the availability of AMI, log in to any AWS account (if permissions are public) or to respective AWS accounts where access has been provided & try to deploy an EC2 instance with this AMI (ensure that we are deploying the EC2 instance only in the region where AMI is available)
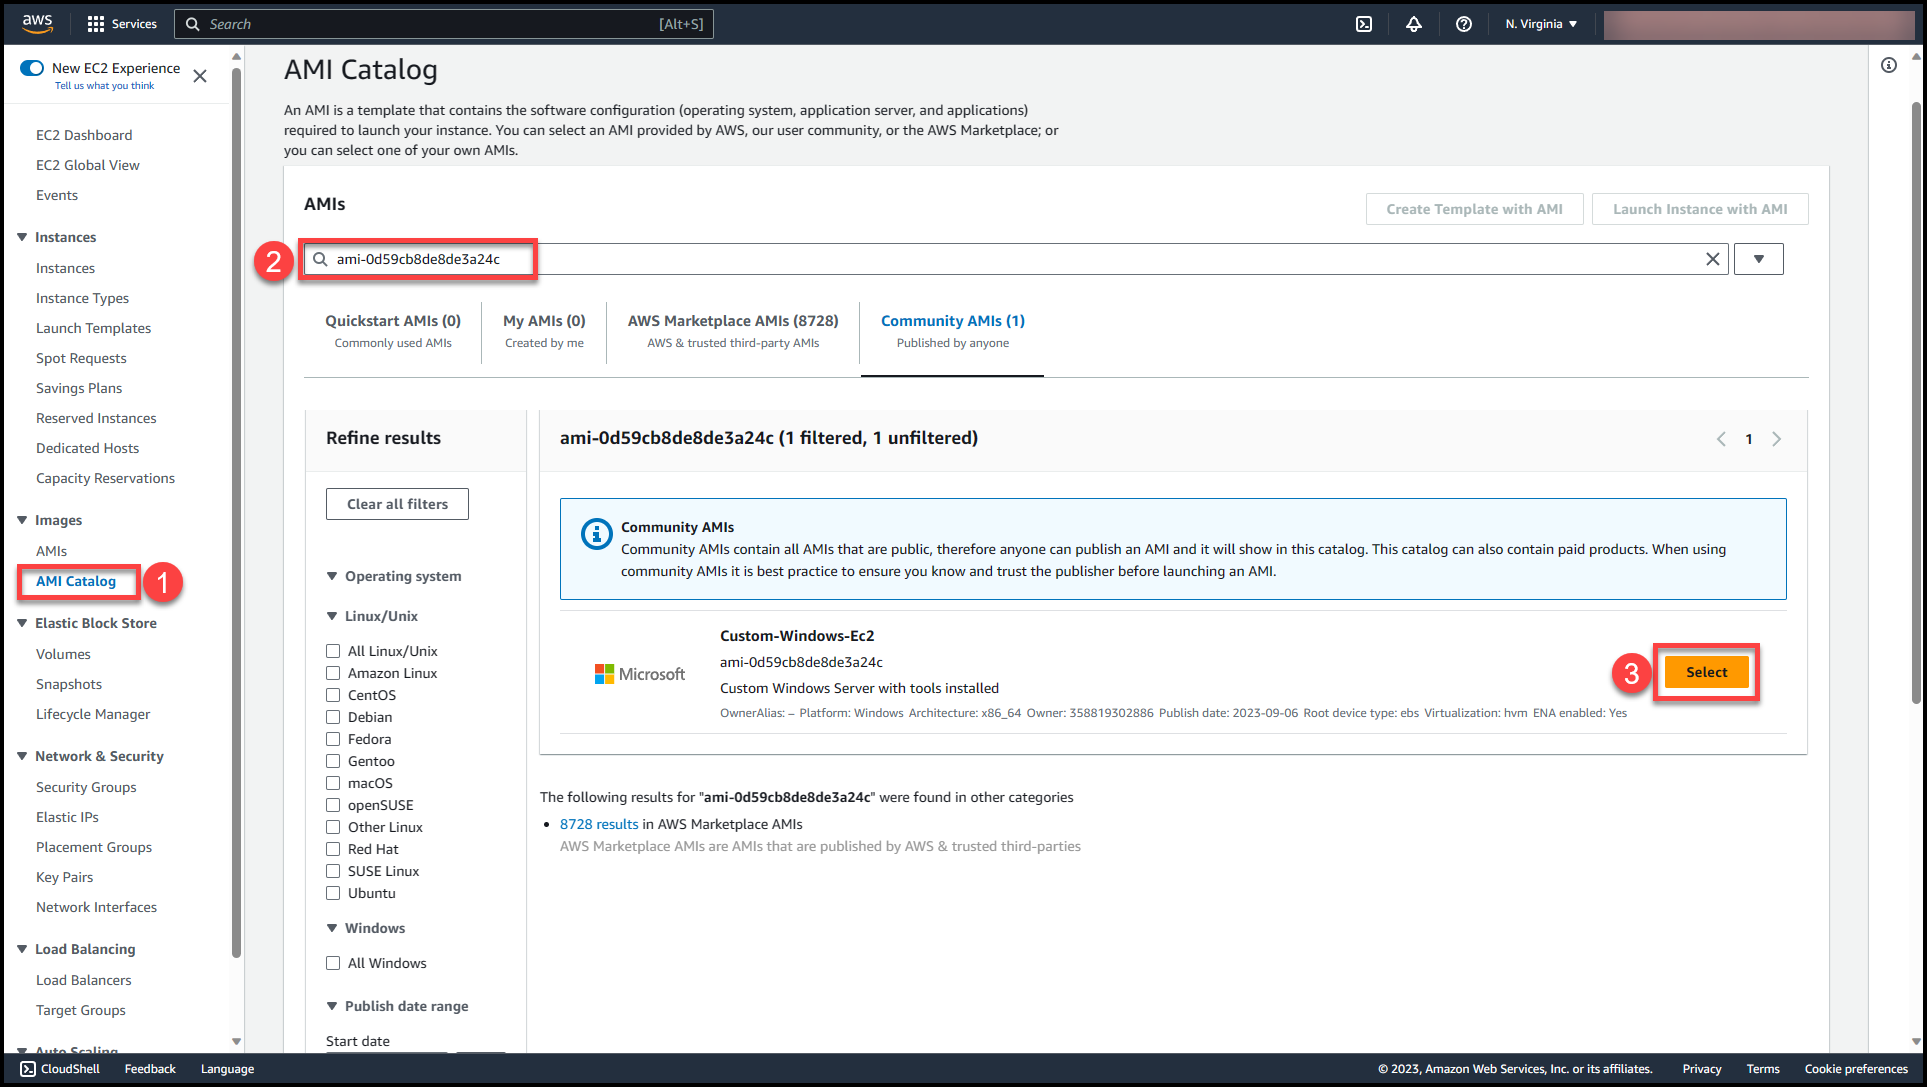
You can select the custom AMI created & start working with the pre-deployed resources & tools.
Deploying a CFT with a Custom Image
To begin with deploying a CFT with a custom AMI created, we need to ensure that the AMI has required permissions to be accessible either publically or to the specific accounts where we want to deploy the EC2 instance from this Custom AMI. Below are the steps to be followed while creating a CFT with custom AMI:
Navigate to the AMI page & copy the AMI id (the custom AMI which we want to use within CFT).
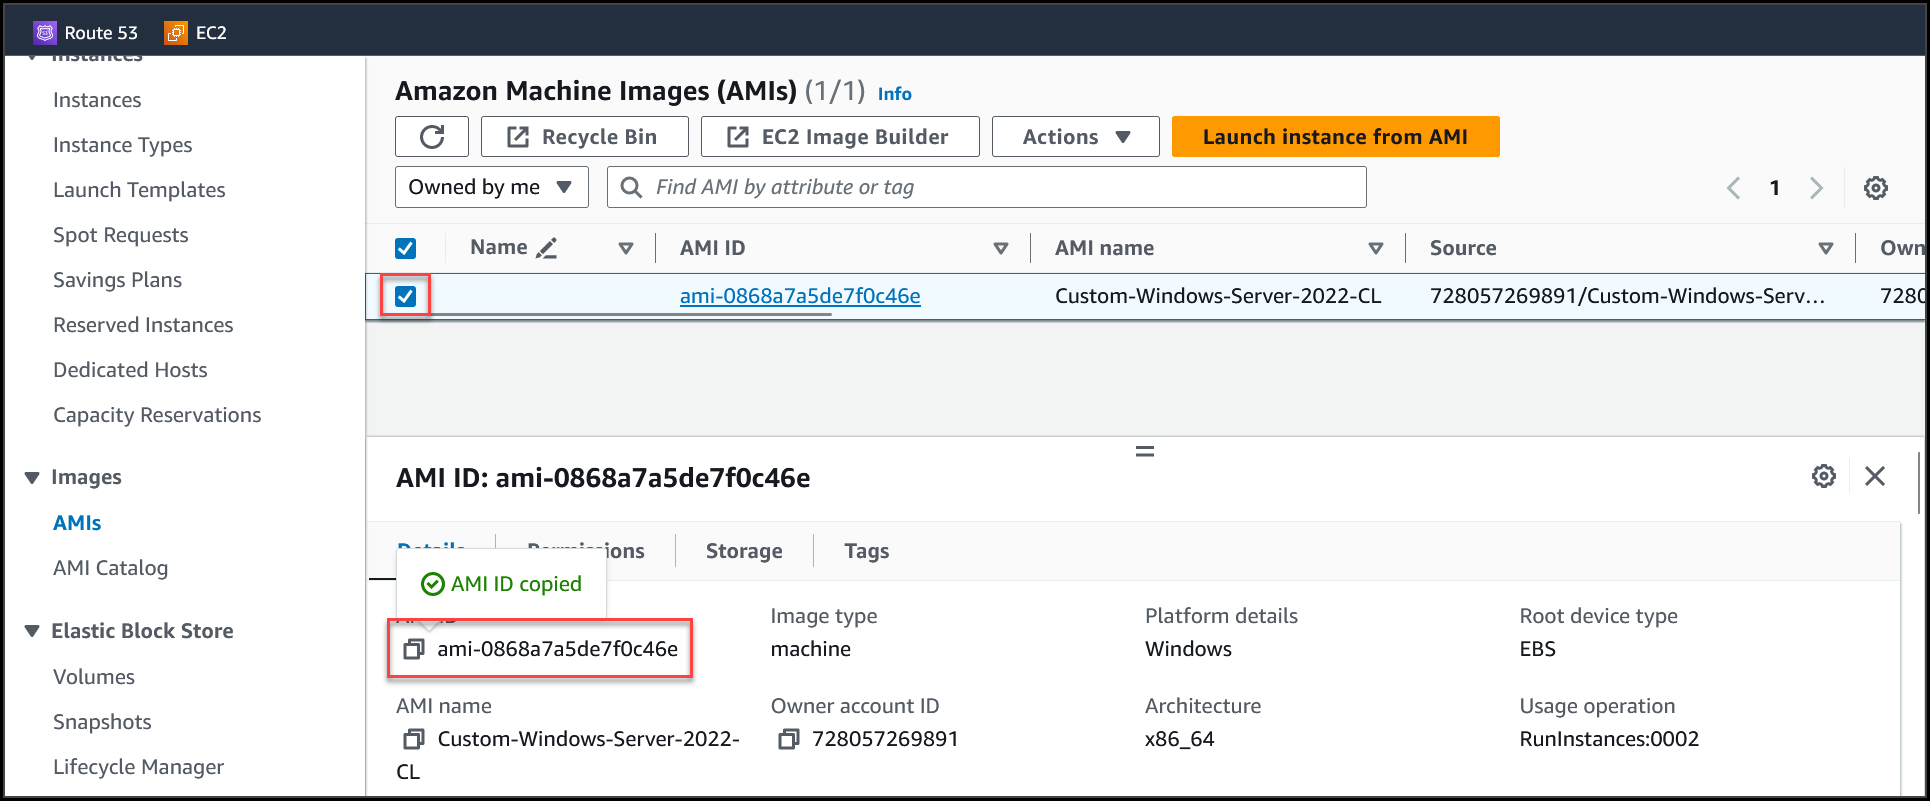
Build a CFT with the required set of resources, while defining properties of an EC2 instance mention the ID of the Custom AMI copied in previous step.
"Ec2Instance": {
    "Type": "AWS::EC2::Instance",
    "Properties": {
        "ImageId": "ami-04d1a28a7c545f5c7",
        "InstanceType": "t2.medium",
        "SecurityGroupIds": [
            {
                "Ref": "InstanceSecurityGroup"
            }
        ]
    }
}
Save the CFT locally or upload it to an S3 bucket & proceed towards deployment of the CloudFormation stack.
Here is the link to Sample CloudFormation template with a custom AMI: Sample CFT to deploy ec2 with custom AMI
Storing & Managing Custom AMIs in AWS
All AMIs are categorized as either backed by Amazon EBS or backed by instance store.
Amazon EBS-backed AMI – The root device for an instance launched from the AMI is an Amazon Elastic Block Store (Amazon EBS) volume created from an Amazon EBS snapshot.
Amazon instance store-backed AMI – The root device for an instance launched from the AMI is an instance store volume created from a template stored in Amazon S3.
Below are the differences listed based on the characterisitc of each storage option :
Characteristic | Amazon EBS-backed AMI | Amazon instance store-backed AMI |
|---|---|---|
Boot time for an instance | Usually less than 1 minute | Usually less than 5 minutes |
Size limit for a root device | 64 TiB | 10 GiB |
Root device volume | EBS volume | Instance store volume |
Data persistence | By default, the root volume is deleted when the instance terminates.* Data on any other EBS volumes persists after instance termination by default. | Data on any instance store volumes persists only during the life of the instance. |
Modifications | The instance type, kernel, RAM disk, and user data can be changed while the instance is stopped. | Instance attributes are fixed for the life of an instance. |
Charges | You're charged for instance usage, EBS volume usage, and storing your AMI as an EBS snapshot. | You're charged for instance usage and storing your AMI in Amazon S3. |
AMI creation/bundling | Uses a single command/call | Requires installation and use of AMI tools |
Stopped state | Can be in a stopped state. Even when the instance is stopped and not running, the root volume is persisted in Amazon EBS | Cannot be in a stopped state; instances are running or terminated |
To summarize the most efficient way to create & store a cutom AWS AMI is by creating an Amazon EBS-backed AMI.
Note: It is not possible to set delete protection on a custom AMI, thus ensure that it is stored in a single AWS account with only few people having Administrator Access on the account, for other members you can provide fine-grained restrictions to access the AMI but not delete it.